[C++]ベクトルの練習
先にシューティングのページを参考にプロジェクトの初期設定↓とScreen.hの導入まではやっておいた前提で進めます
https://yonezawashin.github.io/yonezawashin.github.io-2020c/
Vector2.hの簡易版を新規作成して以下のコードを実装します。
#ifndef VECTOR2_H_
#define VECTOR2_H_
#include <array> //基本配列と同じ(有限個数)。生配列より便利な機能がある.size()関数とかstd::vector系関数が使える
#include <limits> // std::numeric_limitsで無限大などを使う https://cpprefjp.github.io/reference/limits/numeric_limits.html
#include <cmath> // std::の数学系関数に必要
//【注意】std::vectorとは全く違う。数学で習う【ベクトル】です。ごっちゃにしないで。
//★【UnityのVector演算コード】https://github.com/Unity-Technologies /UnityCsReference/blob/02d565cf3dd0f6b15069ba976064c75dc2705b08/Runtime/Export/Math/Vector2.cs
//★【UnityのMath演算コード】https://github.com/Unity-Technologies /UnityCsReference/blob/master/Runtime/Export/Math/Mathf.cs
// 2変数x,yを持つ構造体。2つの数字をまとめて扱うならXY座標以外にも使えるよ。x,y別々に足したり引いたり面倒でしょう。
struct Vector2
{
union { // ★共用体unionテクニック https://inemaru.hatenablog.com/entry/2016/03/02/005408
struct { // [参考ビットサイズ] https://marycore.jp/prog/c-lang/data-type-ranges-and-bit-byte-sizes/
float x;
float y;
}; //[匿名共用体とは] https://code.i-harness.com/ja-jp/q/4d437c
std::array<float, 2> xy; // float xy[2];と同じ意味 float 2個ぶんのデータサイズでx,y 2個ぶんと一致するので★unionで共用
}; // unionは異なる複数のものをメモリ上の同一の番地に割り当てられる⇒x,y分けて記述するの面倒なとき配列xy[2]をfor文i=0~2で回せる
// float型のポインタへ(float*)キャストすればx,yデータの配列の先頭のアドレスを返す
inline operator float* () const { return (float*)this; }
// float型のポインタへ(const float*)キャストすればx,yデータの配列の先頭のアドレスを返す
inline operator const float* () const { return (const float*)this; }
// 初期化コンストラクタ
Vector2(float x = 0.0f, float y = 0.0f) //初期化
{
this->xy = { x,y }; // たった1行で書ける
//this->x = x;
//this->y = y; 2行が上のxyzの様にたった1行で書けるようになる
}
};
#endif
main.cppを作成して以下のコードでVector2を使って直線や円を描いてみます。
#include "DxLib.h"
#include "Screen.h"
#include "Vector2.h"
int WINAPI WinMain(HINSTANCE hInstance, HINSTANCE hPrevInstance, LPSTR lpCmdLine, int nCmdShow)
{
// 画面モードの設定
SetWindowSize(Screen::Width, Screen::Height);// ウィンドウサイズ960×540(こことSetGraphModeのサイズが異なると画像がゆがむ)
SetGraphMode(Screen::Width, Screen::Height, 32); // 画面サイズ960×540のカラービット数32ビットで起動
SetMainWindowText("数学のベクトルの練習");//この行でエラーになったら【設定】マルチバイト文字セットが間違ってるかも
ChangeWindowMode(TRUE);//フルスクリーン表示かウィンドウ表示か
SetAlwaysRunFlag(TRUE); // ウィンドウが非アクティブでも動作させる
// DXライブラリの初期化
if (DxLib_Init() < 0)
{
// エラーが発生したら直ちに終了
return -1;
}
SetMouseDispFlag(TRUE);// ここをFALSEにするとマウスカーソル非表示
//表示しているスクリーンの後ろで隠れて次に描く画像を先に描くモード
// これとペアでScreenFlip();でつぎのページと入れ替えでちらつきを防ぐ
SetDrawScreen(DX_SCREEN_BACK);
SetUseTransColor(FALSE); // 画像の指定色を透過する機能を無効化
ScreenFlip();
// アニメーション(パラパラ漫画)するにはWhile文
while (ProcessMessage() == 0)
{// ProcessMessage() == 0になるのは×ボタン押したときなど
ClearDrawScreen(); // 画面をまっさらにリセット
Vector2 p1{ 100,100 }; // (x,y) = (100,100)の位置の点
Vector2 p2{ 200,200 }; // (x,y) = (200,200)の位置の点
Vector2 p3{ 300,300 }; // (x,y) = (300,300)の位置の点
float r = 30; // 円の半径
DxLib::DrawLine(p1.x, p1.y, p2.x, p2.y, GetColor(255, 255, 255)); // 線分p1p2を描く
DxLib::DrawCircle(p3.x, p3.y, r, GetColor(0, 255, 0), FALSE); // 半径rの円(中心:p3)を描く(FALSEで塗りつぶし無し)
ScreenFlip(); // 裏で描いておいたスクリーンを表画面にフリップ入れ替え
}
// キー入力待ちをする
WaitKey();
// DXライブラリの後始末
DxLib_End();
// ソフトの終了
return 0;
}
Vector2.hに以下のoperator関連のコードを追加します。
#ifndef VECTOR2_H_
#define VECTOR2_H_
#include <array> //基本配列と同じ(有限個数)。生配列より便利な機能がある.size()関数とかstd::vector系関数が使える
#include <limits> // std::numeric_limitsで無限大などを使う https://cpprefjp.github.io/reference/limits/numeric_limits.html
#include <cmath> // std::の数学系関数に必要
//【注意】std::vectorとは全く違う。数学で習う【ベクトル】です。ごっちゃにしないで。
//★【UnityのVector演算コード】https://github.com/Unity-Technologies /UnityCsReference/blob/02d565cf3dd0f6b15069ba976064c75dc2705b08/Runtime/Export/Math/Vector2.cs
//★【UnityのMath演算コード】https://github.com/Unity-Technologies /UnityCsReference/blob/master/Runtime/Export/Math/Mathf.cs
// 2変数x,yを持つ構造体。2つの数字をまとめて扱うならXY座標以外にも使えるよ。x,y別々に足したり引いたり面倒でしょう。
struct Vector2
{
union { // ★共用体unionテクニック https://inemaru.hatenablog.com/entry/2016/03/02/005408
struct { // [参考ビットサイズ] https://marycore.jp/prog/c-lang/data-type-ranges-and-bit-byte-sizes/
float x;
float y;
}; //[匿名共用体とは] https://code.i-harness.com/ja-jp/q/4d437c
std::array<float, 2> xy; // float xy[2];と同じ意味 float 2個ぶんのデータサイズでx,y 2個ぶんと一致するので★unionで共用
}; // unionは異なる複数のものをメモリ上の同一の番地に割り当てられる⇒x,y分けて記述するの面倒なとき配列xy[2]をfor文i=0~2で回せる
// float型のポインタへ(float*)キャストすればx,yデータの配列の先頭のアドレスを返す
inline operator float* () const { return (float*)this; }
// float型のポインタへ(const float*)キャストすればx,yデータの配列の先頭のアドレスを返す
inline operator const float* () const { return (const float*)this; }
// 初期化コンストラクタ
Vector2(float x = 0.0f, float y = 0.0f) //初期化
{
this->xy = { x,y }; // たった1行で書ける
//this->x = x;
//this->y = y; 2行が上のxyzの様にたった1行で書けるようになる
}
/*----- 演算子オーバーロード -----*/
// 逆ベクトル
inline Vector2 operator -() const
{
return Vector2{ -this->x, -this->y };
}
// Vectorをそのまま足し合わせる
inline Vector2 operator + () const
{
return *this;
}
Vector2& operator += (const Vector2 add_v2)
{
this->x += add_v2.x;
this->y += add_v2.y;
return *this; //*thisを返すことで v1 + v2 + v3見たく数珠繋ぎできる
}
Vector2& operator -= (const Vector2 minus_v2)
{
this->x -= minus_v2.x;
this->y -= minus_v2.y;
return *this;
}
Vector2& operator *= (float multiply_num)
{
this->x *= multiply_num;
this->y *= multiply_num;
return *this;
}
// 0.fで割ったときは±無限大を返す
inline Vector2& operator /= (float divide_num)
{
if (divide_num == 0.0f) // 0で割ったら±無限大を返す
{
*this = Vector2{ ((this->x < 0) ? 1 : -1) * std::numeric_limits<float>::infinity(),
((this->y < 0) ? 1 : -1) * std::numeric_limits<float>::infinity() };
return *this;
}
this->x /= divide_num;
this->y /= divide_num;
return *this;
}
// 代入演算子 x,y,zを全部 change_numに変える
Vector2& operator = (float change_num)
{
this->x = change_num;
this->y = change_num;
return *this;
}
// 一致演算子 x,y,zを全部一致するか 一つでも違えばfalse
bool operator == (const Vector2& v2_other)
{
if (this->x != v2_other.x) return false;
if (this->y != v2_other.y) return false;
return true;
}
// 不一致演算子 一致演算子の逆
bool operator != (const Vector2& v2_other)
{
return !(*this == v2_other);
}
};
// Vector2どうしの足し算 割り算 掛け算 割り算などの 基本演算の グローバル定義
// Vector同士の足し算 x,y個別に足し合わせる
inline Vector2 operator + (const Vector2& left, const Vector2& right)
{
Vector2 v2; //注意 vec1 = vec1 + vec2のとき vec1の数値が書き変わったら嫌だからv3を新たに用意
v2.x = left.x + right.x; //[コレはダメ] left.x = left.x + right.x;
v2.y = left.y + right.y;
return v2;
}
// Vector同士の引き算 x,y個別に足し合わせる
inline Vector2 operator - (const Vector2& left, const Vector2& right)
{
Vector2 v2; //注意 vec1 = vec1 - vec2のとき vec1の数値が書き変わったら嫌だからv2を新たに用意
v2.x = left.x - right.x; //[コレはダメ] left.x = left.x - right.x;
v2.y = left.y - right.y;
return v2;
}
// Vectorと数値の掛け算 x,y個別に掛け合わせる
inline Vector2 operator * (const Vector2& left, float right)
{
Vector2 v2;
v2.x = left.x * right;
v2.y = left.y * right;
return v2;
}
// 数値とVectorの掛け算 x,y個別に掛け合わせる
inline Vector2 operator * (float left, const Vector2& right)
{
Vector2 v2;
v2.x = left * right.x;
v2.y = left * right.y;
return v2;
}
// Vectorと数値の割り算 x,y,z個別に割り合わせる
// 0.fで割ると±無限大を返す
inline Vector2 operator / (const Vector2& left, float right)
{
if (right == 0.0f) // 0で割ったら±無限大を返す
return Vector2{ ((left.x < 0) ? 1 : -1) * std::numeric_limits<float>::infinity(),
((left.y < 0) ? 1 : -1) * std::numeric_limits<float>::infinity() };
Vector2 v2;
v2.x = left.x / right;
v2.y = left.y / right;
return v2;
}
// 比較不等号 < 演算子
inline bool operator < (const Vector2& left, const Vector2& right)
{
if (left.x != right.x) return left.x < right.x;
return left.y < right.y;
}
// 比較不等号 > 演算子
inline bool operator > (const Vector2& left, const Vector2& right)
{
if (left.x != right.x) return left.x > right.x;
return left.y > right.y;
}
// 比較不等号 <= 演算子
inline bool operator <= (const Vector2& left, const Vector2& right)
{
return !(left > right);
}
// 比較不等号 >= 演算子
inline bool operator >= (const Vector2& left, const Vector2& right)
{
return !(left < right);
}
#endif
main.cppを変更してVector2どうしの足し算や引き算を使って線を描いてみます。
#include "DxLib.h"
#include "Screen.h"
#include "Vector2.h"
int WINAPI WinMain(HINSTANCE hInstance, HINSTANCE hPrevInstance, LPSTR lpCmdLine, int nCmdShow)
{
// 画面モードの設定
SetWindowSize(Screen::Width, Screen::Height);// ウィンドウサイズ960×540(こことSetGraphModeのサイズが異なると画像がゆがむ)
SetGraphMode(Screen::Width, Screen::Height, 32); // 画面サイズ960×540のカラービット数32ビットで起動
SetMainWindowText("数学のベクトルの練習");//この行でエラーになったら【設定】マルチバイト文字セットが間違ってるかも
ChangeWindowMode(TRUE);//フルスクリーン表示かウィンドウ表示か
SetAlwaysRunFlag(TRUE); // ウィンドウが非アクティブでも動作させる
// DXライブラリの初期化
if (DxLib_Init() < 0)
{
// エラーが発生したら直ちに終了
return -1;
}
SetMouseDispFlag(TRUE);// ここをFALSEにするとマウスカーソル非表示
//表示しているスクリーンの後ろで隠れて次に描く画像を先に描くモード
// これとペアでScreenFlip();でつぎのページと入れ替えでちらつきを防ぐ
SetDrawScreen(DX_SCREEN_BACK);
SetUseTransColor(FALSE); // 画像の指定色を透過する機能を無効化
ScreenFlip();
// アニメーション(パラパラ漫画)するにはWhile文
while (ProcessMessage() == 0)
{// ProcessMessage() == 0になるのは×ボタン押したときなど
ClearDrawScreen(); // 画面をまっさらにリセット
Vector2 p1{ 100,100 }; // (x,y) = (100,100)の位置の点
Vector2 p2{ 200,200 }; // (x,y) = (200,200)の位置の点
Vector2 p3{ 300,300 }; // (x,y) = (300,300)の位置の点
float r = 30; // 円の半径
Vector2 v13 = p3 - p1; // 終点p3 から 始点p1を引くとp1からp3へ向かう方向ベクトルになる
DxLib::DrawLine(p1.x, p1.y, p1.x + v13.x * 2, p1.y + v13.y * 2, GetColor(255, 0, 255)); // 線分p1p3の2倍した線を描く
DxLib::DrawLine(p1.x, p1.y, p1.x + v13.x, p1.y + v13.y, GetColor(255, 255, 255)); // 線分p1p3を 描く
DxLib::DrawCircle(p3.x, p3.y, r, GetColor(0, 255, 0), FALSE); // 半径rの円(中心:p3)を描く(FALSEで塗りつぶし無し)
ScreenFlip(); // 裏で描いておいたスクリーンを表画面にフリップ入れ替え
}
// キー入力待ちをする
WaitKey();
// DXライブラリの後始末
DxLib_End();
// ソフトの終了
return 0;
}
Vector2.hに以下のzeroベクトルupベクトルなどの定義のコードを追加します。
#ifndef VECTOR2_H_
#define VECTOR2_H_
#include <array> //基本配列と同じ(有限個数)。生配列より便利な機能がある.size()関数とかstd::vector系関数が使える
#include <limits> // std::numeric_limitsで無限大などを使う https://cpprefjp.github.io/reference/limits/numeric_limits.html
#include <cmath> // std::の数学系関数に必要
//【注意】std::vectorとは全く違う。数学で習う【ベクトル】です。ごっちゃにしないで。
//★【UnityのVector演算コード】https://github.com/Unity-Technologies /UnityCsReference/blob/02d565cf3dd0f6b15069ba976064c75dc2705b08/Runtime/Export/Math/Vector3.cs
//★【UnityのMath演算コード】https://github.com/Unity-Technologies/UnityCsReference /blob/master/Runtime/Export/Math/Mathf.cs
// 2変数x,yを持つ構造体。2つの数字をまとめて扱うならXY座標以外にも使えるよ。x,y別々に足したり引いたり面倒でしょう。
struct Vector2
{
union { // ★共用体unionテクニック https://inemaru.hatenablog.com/entry/2016/03/02/005408
struct { // [参考ビットサイズ] https://marycore.jp/prog/c-lang/data-type-ranges-and-bit-byte-sizes/
float x;
float y;
}; //[匿名共用体とは] https://code.i-harness.com/ja-jp/q/4d437c
std::array<float, 2> xy; // float xy[2];と同じ意味 float 2個ぶんのデータサイズでx,y 2個ぶんと一致するので★unionで共用
}; // unionは異なる複数のものをメモリ上の同一の番地に割り当てられる⇒x,y分けて記述するの面倒なとき配列xy[2]をfor文i=0~2で回せる
// float型のポインタへ(float*)キャストすればx,yデータの配列の先頭のアドレスを返す
inline operator float* () const { return (float*)this; }
// float型のポインタへ(const float*)キャストすればx,yデータの配列の先頭のアドレスを返す
inline operator const float* () const { return (const float*)this; }
// 初期化コンストラクタ
Vector2(float x = 0.0f, float y = 0.0f) //初期化
{
this->xy = { x,y }; // たった1行で書ける
//this->x = x;
//this->y = y; 2行が上のxyzの様にたった1行で書けるようになる
}
// Unityのstatic変数を参考に https://docs.unity3d.com/ja/current/ScriptReference/Vector3.html
static const Vector2 zero;// = { 0.f, 0.f };
static const Vector2 one; // = { 1.f, 1.f };
static const Vector2 up; // = { 0.f, 1.f };
static const Vector2 down;// = { 0.f, -1.f };
static const Vector2 left; // = { -1.f, 0.f };
static const Vector2 right;// = { 1.f, 0.f };
//[負の値の最小値] https://stackoverflow.com/questions/20016600/negative-infinity
static const Vector2 negativeInfinity;// = { -std::numeric_limits<float>::infinity(), .. };
//[極大値]https://cpprefjp.github.io/reference/limits/numeric_limits/lowest.html
static const Vector2 positiveInfinity;// = { std::numeric_limits<float>::infinity(), .. };
/*----- 演算子オーバーロード -----*/
// 逆ベクトル
inline Vector2 operator -() const
{
return Vector2{ -this->x, -this->y };
}
// Vectorをそのまま足し合わせる
inline Vector2 operator + () const
{
return *this;
}
Vector2& operator += (const Vector2 add_v2)
{
this->x += add_v2.x;
this->y += add_v2.y;
return *this; //*thisを返すことで v1 + v2 + v3見たく数珠繋ぎできる
}
Vector2& operator -= (const Vector2 minus_v2)
{
this->x -= minus_v2.x;
this->y -= minus_v2.y;
return *this;
}
Vector2& operator *= (float multiply_num)
{
this->x *= multiply_num;
this->y *= multiply_num;
return *this;
}
// 0.fで割ったときは±無限大を返す
inline Vector2& operator /= (float divide_num)
{
if (divide_num == 0.0f) // 0で割ったら±無限大を返す
{
*this = Vector2{ ((this->x < 0) ? 1 : -1) * std::numeric_limits<float>::infinity(),
((this->y < 0) ? 1 : -1) * std::numeric_limits<float>::infinity() };
return *this;
}
this->x /= divide_num;
this->y /= divide_num;
return *this;
}
// 代入演算子 x,y,zを全部 change_numに変える
Vector2& operator = (float change_num)
{
this->x = change_num;
this->y = change_num;
return *this;
}
// 一致演算子 x,y,zを全部一致するか 一つでも違えばfalse
bool operator == (const Vector2& v2_other)
{
if (this->x != v2_other.x) return false;
if (this->y != v2_other.y) return false;
return true;
}
// 不一致演算子 一致演算子の逆
bool operator != (const Vector2& v2_other)
{
return !(*this == v2_other);
}
};
// Vector2どうしの足し算 割り算 掛け算 割り算などの 基本演算の グローバル定義
// Vector同士の足し算 x,y個別に足し合わせる
inline Vector2 operator + (const Vector2& left, const Vector2& right)
{
Vector2 v2; //注意 vec1 = vec1 + vec2のとき vec1の数値が書き変わったら嫌だからv3を新たに用意
v2.x = left.x + right.x; //[コレはダメ] left.x = left.x + right.x;
v2.y = left.y + right.y;
return v2;
}
// Vector同士の引き算 x,y個別に足し合わせる
inline Vector2 operator - (const Vector2& left, const Vector2& right)
{
Vector2 v2; //注意 vec1 = vec1 - vec2のとき vec1の数値が書き変わったら嫌だからv2を新たに用意
v2.x = left.x - right.x; //[コレはダメ] left.x = left.x - right.x;
v2.y = left.y - right.y;
return v2;
}
// Vectorと数値の掛け算 x,y個別に掛け合わせる
inline Vector2 operator * (const Vector2& left, float right)
{
Vector2 v2;
v2.x = left.x * right;
v2.y = left.y * right;
return v2;
}
// 数値とVectorの掛け算 x,y個別に掛け合わせる
inline Vector2 operator * (float left, const Vector2& right)
{
Vector2 v2;
v2.x = left * right.x;
v2.y = left * right.y;
return v2;
}
// Vectorと数値の割り算 x,y,z個別に割り合わせる
// 0.fで割ると±無限大を返す
inline Vector2 operator / (const Vector2& left, float right)
{
if (right == 0.0f) // 0で割ったら±無限大を返す
return Vector2{ ((left.x < 0) ? 1 : -1) * std::numeric_limits<float>::infinity(),
((left.y < 0) ? 1 : -1) * std::numeric_limits<float>::infinity() };
Vector2 v2;
v2.x = left.x / right;
v2.y = left.y / right;
return v2;
}
// 比較不等号 < 演算子
inline bool operator < (const Vector2& left, const Vector2& right)
{
if (left.x != right.x) return left.x < right.x;
return left.y < right.y;
}
// 比較不等号 > 演算子
inline bool operator > (const Vector2& left, const Vector2& right)
{
if (left.x != right.x) return left.x > right.x;
return left.y > right.y;
}
// 比較不等号 <= 演算子
inline bool operator <= (const Vector2& left, const Vector2& right)
{
return !(left > right);
}
// 比較不等号 >= 演算子
inline bool operator >= (const Vector2& left, const Vector2& right)
{
return !(left < right);
}
#endif
Vector2.cppを新規作成して以下のzeroベクトルやupベクトルなどの数値の初期化のコードを追加します (static定義した変数はcppでしか初期化できないので)。
#include "Vector2.h"
// Unityのstatic変数を参考に https://docs.unity3d.com/ja/current/ScriptReference/Vector3.html
Vector2 const Vector2::zero = Vector2(0.f, 0.f);
Vector2 const Vector2::one = Vector2(1.f, 1.f);
Vector2 const Vector2::up = Vector2(0.f, 1.f);
Vector2 const Vector2::down = Vector2(0.f, -1.f);
Vector2 const Vector2::left = Vector2(-1.f, 0.f);
Vector2 const Vector2::right = Vector2(1.f, 0.f);
//[負の値の最小値] https://stackoverflow.com/questions/20016600/negative-infinity
Vector2 const Vector2::negativeInfinity = Vector2(-std::numeric_limits<float>::infinity(), -std::numeric_limits<float>::infinity());
//[極大値]https://cpprefjp.github.io/reference/limits/numeric_limits /lowest.html
Vector2 const Vector2::positiveInfinity = Vector2(std::numeric_limits<float>::infinity(), std::numeric_limits<float>::infinity());
main.cppを変更して上方向upベクトルを水色の線で描いてみます。
#include "DxLib.h"
#include "Screen.h"
#include "Vector2.h"
int WINAPI WinMain(HINSTANCE hInstance, HINSTANCE hPrevInstance, LPSTR lpCmdLine, int nCmdShow)
{
// 画面モードの設定
SetWindowSize(Screen::Width, Screen::Height);// ウィンドウサイズ960×540(こことSetGraphModeのサイズが異なると画像がゆがむ)
SetGraphMode(Screen::Width, Screen::Height, 32); // 画面サイズ960×540のカラービット数32ビットで起動
SetMainWindowText("数学のベクトルの練習");//この行でエラーになったら【設定】マルチバイト文字セットが間違ってるかも
ChangeWindowMode(TRUE);//フルスクリーン表示かウィンドウ表示か
SetAlwaysRunFlag(TRUE); // ウィンドウが非アクティブでも動作させる
// DXライブラリの初期化
if (DxLib_Init() < 0)
{
// エラーが発生したら直ちに終了
return -1;
}
SetMouseDispFlag(TRUE);// ここをFALSEにするとマウスカーソル非表示
//表示しているスクリーンの後ろで隠れて次に描く画像を先に描くモード
// これとペアでScreenFlip();でつぎのページと入れ替えでちらつきを防ぐ
SetDrawScreen(DX_SCREEN_BACK);
SetUseTransColor(FALSE); // 画像の指定色を透過する機能を無効化
ScreenFlip();
// アニメーション(パラパラ漫画)するにはWhile文
while (ProcessMessage() == 0)
{// ProcessMessage() == 0になるのは×ボタン押したときなど
ClearDrawScreen(); // 画面をまっさらにリセット
Vector2 p1{ 100,100 }; // (x,y) = (100,100)の位置の点
Vector2 p2{ 200,200 }; // (x,y) = (200,200)の位置の点
Vector2 p3{ 300,300 }; // (x,y) = (300,300)の位置の点
float r = 30; // 円の半径
Vector2 v13 = p3 - p1; // 終点p3 から 始点p1を引くとp1からp3へ向かう方向ベクトルになる
DxLib::DrawLine(p1.x, p1.y, p1.x + Vector2::up.x * 30, p1.y + Vector2::up.y * 30, GetColor(0, 255, 255)); // upベクトルを30倍した線を描く
DxLib::DrawLine(p1.x, p1.y, p1.x + v13.x * 2, p1.y + v13.y * 2, GetColor(255, 0, 255)); // 線分p1p3の2倍した線を描く
DxLib::DrawLine(p1.x, p1.y, p1.x + v13.x, p1.y + v13.y, GetColor(255, 255, 255)); // 線分p1p3を描く
DxLib::DrawCircle(p3.x, p3.y, r, GetColor(0, 255, 0), FALSE); // 半径rの円(中心:p3)を描く(FALSEで塗りつぶし無し)
ScreenFlip(); // 裏で描いておいたスクリーンを表画面にフリップ入れ替え
}
// キー入力待ちをする
WaitKey();
// DXライブラリの後始末
DxLib_End();
// ソフトの終了
return 0;
}
MathGraph2D.hを新規作成して数学っぽいマス目グリッドを描いたり、画面上方向がy方向プラスにしたり、#ifndef MATHGRAPH_H_
#define MATHGRAPH_H_
#include "DxLib.h"
#include "Vector2.h"
#include "Screen.h"
#include <cmath>
#include <string>
// 数学のグラフを描く(DXで普通に描くと左上 0,0 で↓方向が+なので数学らしくないので)
class MathGraph2D
{
public:
Vector2 pos; // グラフを描く起点(100,100なら左上から→に100,↓に100の位置がグラフの原点)
//Vector2 origin; // グラフ原点
float scale; // グラフのスケール(1/10 なら10ドットで1目盛りぶん)
Vector2 grid; // (10,10)なら10おきにグリッドを描く
MathGraph2D(Vector2 position, float scale = 5.0f, Vector2 grid = { 5.0f,5.0f })
: pos{ Vector2((int)position.x,(int)position.y)}, scale{scale}, grid{ Vector2((int)grid.x,(int)grid.y) }
{}
virtual ~MathGraph2D(){};
inline Vector2 graphPos(Vector2 mousePos) { return Vector2{ (mousePos.x - pos.x) / scale, (-mousePos.y + pos.y) / scale }; }
inline Vector2 graphPosInt(Vector2 mousePos) { return Vector2{ (float)((int)((mousePos.x - pos.x) / scale)), (float)((int)((-mousePos.y + pos.y) / scale)) }; }
int DrawString(float x, float y, const TCHAR* String, unsigned int Color, unsigned int EdgeColor DEFAULTPARAM(= 0))
{ // y方向にはマイナス - をつけて上方向↑がプラスになるようにして描く
return DxLib::DrawString(pos.x + x * scale, pos.y - y * scale, String, Color, EdgeColor);
}
int DrawLine(float x1, float y1, float x2, float y2, unsigned int Color, int Thickness DEFAULTPARAM(= 1))
{ // y方向にはマイナス - をつけて上方向↑がプラスになるようにして描く
return DxLib::DrawLine(pos.x + x1 * scale, pos.y - y1 * scale, pos.x + x2 * scale, pos.y - y2 * scale, Color, Thickness);
}
int DrawTriangle(float x1, float y1, float x2, float y2, float x3, float y3, unsigned int Color, int FillFlag DEFAULTPARAM(= TRUE))
{ // y方向にはマイナス - をつけて上方向↑がプラスになるようにして描く
return DxLib::DrawTriangle(pos.x + x1 * scale, pos.y - y1 * scale,
pos.x + x2 * scale, pos.y - y2 * scale,
pos.x + x3 * scale, pos.y - y3 * scale, Color, FillFlag);
}
// 矢印→を線のかわりに描く
int DrawArrow(float x1, float y1, float w1, float h1, float x2, float y2, float w2, float h2, unsigned int Color, int Thickness DEFAULTPARAM(= 1))
{ // y方向にはマイナス - をつけて上方向↑がプラスになるようにして描く
//[矢印の描きかた] https://ameblo.jp/tomi-omiya/entry-12641374677.html
if (w1 != 0.0f && h1 != 0.0f)
{
float theta1 = -std::atan2(y1 - y2, x1 - x2), cos1 = std::cosf(theta1), sin1 = std::sinf(theta1);
float angle = theta1 / DX_PI * 180;
DrawTriangle(x1, y1, x1 - h1 * cos1 - w1 / 2 * sin1, y1 + h1 * sin1 - w1 / 2 * cos1,
x1 - h1 * cos1 + w1 / 2 * sin1, y1 + h1 * sin1 + w1 / 2 * cos1, Color, TRUE);
}
if (w2 != 0.0f && h2 != 0.0f)
{
float theta2 = -std::atan2(y2 - y1, x2 - x1), cos2 = std::cosf(theta2), sin2 = std::sinf(theta2);
DrawTriangle(x2, y2, x2 - h2 * cos2 - w2 / 2 * sin2, y2 + h2 * sin2 - w2 / 2 * cos2,
x2 - h2 * cos2 + w2 / 2 * sin2, y2 + h2 * sin2 + w2 / 2 * cos2, Color, TRUE);
}
return DxLib::DrawLine(pos.x + x1 * scale, pos.y - y1 * scale, pos.x + x2 * scale, pos.y - y2 * scale, Color, Thickness);
}
int DrawLineBox(float x1, float y1, float x2, float y2, unsigned int Color)
{ // y方向にはマイナス - をつけて上方向↑がプラスになるようにして描く
return DxLib::DrawLineBox(pos.x + x1 * scale, pos.y - y1 * scale, pos.x + x2 * scale, pos.y - y2 * scale, Color);
}
int DrawFillBox(float x1, float y1, float x2, float y2, unsigned int Color)
{ // y方向にはマイナス - をつけて上方向↑がプラスになるようにして描く
return DxLib::DrawFillBox(pos.x + x1 * scale, pos.y - y1 * scale, pos.x + x2 * scale, pos.y - y2 * scale, Color);
}
int DrawCircle(float x, float y, int r, unsigned int Color, int FillFlag DEFAULTPARAM(= TRUE), int LineThickness DEFAULTPARAM(= 1))
{ // y方向にはマイナス - をつけて上方向↑がプラスになるようにして描く
return DxLib::DrawCircle(pos.x + x * scale, pos.y - y * scale, r * scale, Color, FillFlag, LineThickness);
}
int DrawPoint(float x, float y, int r, unsigned int Color, int FillFlag DEFAULTPARAM(= TRUE), int LineThickness DEFAULTPARAM(= 1))
{ // y方向にはマイナス - をつけて上方向↑がプラスになるようにして描く
return DxLib::DrawCircle(pos.x + x * scale, pos.y - y * scale, r, Color, FillFlag, LineThickness);
}
// グラフの目盛りの縦横グリッドを描く
void DrawGrid(unsigned int Color, int Thickness DEFAULTPARAM(= 1))
{
float test = std::fmodf(pos.x, grid.x * scale);
for (int x = std::fmodf(pos.x, grid.x * scale); x < Screen::Width; x += grid.x * scale)
DxLib::DrawLine(x, 0, x, Screen::Height,
(x == (int)pos.x) ? GetColor(255,0,0) : // グラフの原点を通る線は色を変える
((x-(int)pos.x) % (int)(grid.x * scale * 10) == 0) ? GetColor(255, 255, 255) : Color, // 10マスおきに色を変える
Thickness);
for (int y = std::fmodf(pos.y, grid.y * scale); y <= Screen::Height; y += grid.y * scale)
DxLib::DrawLine(0, y, Screen::Width, y,
(y == (int)pos.y) ? GetColor(0, 0, 255) : // グラフの原点を通る線は色を変える
((y - (int)pos.y) % (int)(grid.y * scale * 10) == 0) ? GetColor(255, 255, 255) : Color, // 10マスおきに色を変える
Thickness);
}
};
#endif
main.cppを変更して数学グラフクラスMathGraph2Dを通して円や線を描いてみます。
#include "DxLib.h"
#include "Screen.h"
#include "Vector2.h"
#include "MathGraph2D.h"
int WINAPI WinMain(HINSTANCE hInstance, HINSTANCE hPrevInstance, LPSTR lpCmdLine, int nCmdShow)
{
// 画面モードの設定
SetWindowSize(Screen::Width, Screen::Height);// ウィンドウサイズ960×540(こことSetGraphModeのサイズが異なると画像がゆがむ)
SetGraphMode(Screen::Width, Screen::Height, 32); // 画面サイズ960×540のカラービット数32ビットで起動
SetMainWindowText("数学のベクトルの練習");//この行でエラーになったら【設定】マルチバイト文字セットが間違ってるかも
ChangeWindowMode(TRUE);//フルスクリーン表示かウィンドウ表示か
SetAlwaysRunFlag(TRUE); // ウィンドウが非アクティブでも動作させる
// DXライブラリの初期化
if (DxLib_Init() < 0)
{
// エラーが発生したら直ちに終了
return -1;
}
SetMouseDispFlag(TRUE);// ここをFALSEにするとマウスカーソル非表示
//表示しているスクリーンの後ろで隠れて次に描く画像を先に描くモード
// これとペアでScreenFlip();でつぎのページと入れ替えでちらつきを防ぐ
SetDrawScreen(DX_SCREEN_BACK);
SetUseTransColor(FALSE); // 画像の指定色を透過する機能を無効化
ScreenFlip();
// 数学っぽくわかりやすくマス目を描いて、原点を画面の中心にして、10倍のスケールでみやすく描く
MathGraph2D mathGraph{ {Screen::Width / 2 ,Screen::Height / 2 },10.0f,{1.0f,1.0f} };
// アニメーション(パラパラ漫画)するにはWhile文
while (ProcessMessage() == 0)
{// ProcessMessage() == 0になるのは×ボタン押したときなど
ClearDrawScreen(); // 画面をまっさらにリセット
mathGraph.DrawGrid(GetColor(100, 100, 100)); // 100,100,100のグレーのグリッドでマス目を描く
Vector2 p1{ 1,1 }; // (x,y) = (1,1)の位置の点
Vector2 p2{ 2,2 }; // (x,y) = (2,2)の位置の点
Vector2 p3{ 3,3 }; // (x,y) = (3,3)の位置の点
float r = 1; // 円の半径
Vector2 v13 = p3 - p1; // 終点p3 から 始点p1を引くとp1からp3へ向かう方向ベクトルになる
mathGraph.DrawLine(p1.x, p1.y, p1.x + Vector2::up.x * 3, p1.y + Vector2::up.y * 3, GetColor(0, 255, 255)); // upベクトルを3倍した線を描く
mathGraph.DrawLine(p1.x, p1.y, p1.x + v13.x * 2, p1.y + v13.y * 2, GetColor(255, 0, 255)); // 線分p1p3の2倍した線を描く
mathGraph.DrawLine(p1.x, p1.y, p1.x + v13.x, p1.y + v13.y, GetColor(255, 255, 255)); // 線分p1p3を描く
mathGraph.DrawCircle(p3.x, p3.y, r, GetColor(0, 255, 0), FALSE); // 半径rの円(中心:p3)を描く(FALSEで塗りつぶし無し)
ScreenFlip(); // 裏で描いておいたスクリーンを表画面にフリップ入れ替え
}
// キー入力待ちをする
WaitKey();
// DXライブラリの後始末
DxLib_End();
// ソフトの終了
return 0;
}
MyMath.hを新規作成してπなどの定義や円と円の当たり判定の関数を定義します。#ifndef MYMATH_H_
#define MYMATH_H_
#include "Vector2.h" // 線との当たり判定にVector2を使う
#include <cmath>
// 数学関連クラス
class MyMath
{
public:
static const float Sqrt2; // = 1.41421356237f; // √2
static const float PI; // = 3.14159265359f; // 円周率
static const float Deg2Rad; // = PI / 180f; // 度からラジアンに変換する定数
/// <summary>
/// 円と円が重なっているかを調べる
/// </summary>
/// <param name="pc1">円1の中心pc1</param>
/// <param name="radius1">円1の半径</param>
/// <param name="pc2">円2の中心pc2</param>
/// <param name="radius2">円2の半径</param>
/// <returns>重なっていればtrue、重なっていなければfalseを返却する</returns>
static bool CircleCircleIntersection(
Vector2 pc1, float radius1,
Vector2 pc2, float radius2)
{
return ((pc1.x - pc2.x) * (pc1.x - pc2.x) + (pc1.y - pc2.y) * (pc1.y - pc2.y))
< ((radius1 + radius2) * (radius1 + radius2));
}
};
#endif
MyMath.cppを新規作成してπなどのstatic定義の初期値を設定します。#include "MyMath.h"
const float MyMath::Sqrt2 = 1.41421356237f;//(floatは有効桁は実質7桁まで正確だがそれ以降は環境によって誤差出るよ)
const float MyMath::PI = 3.14159265359f; // 円周率
const float MyMath::Deg2Rad = PI / 180; // 度からラジアンに変換する定数
main.cppを変更して円と円の当たり判定を試してみます。
#include "DxLib.h"
#include "Screen.h"
#include "Vector2.h"
#include "MathGraph2D.h"
#include "MyMath.h"
int WINAPI WinMain(HINSTANCE hInstance, HINSTANCE hPrevInstance, LPSTR lpCmdLine, int nCmdShow)
{
// 画面モードの設定
SetWindowSize(Screen::Width, Screen::Height);// ウィンドウサイズ960×540(こことSetGraphModeのサイズが異なると画像がゆがむ)
SetGraphMode(Screen::Width, Screen::Height, 32); // 画面サイズ960×540のカラービット数32ビットで起動
SetMainWindowText("数学のベクトルの練習");//この行でエラーになったら【設定】マルチバイト文字セットが間違ってるかも
ChangeWindowMode(TRUE);//フルスクリーン表示かウィンドウ表示か
SetAlwaysRunFlag(TRUE); // ウィンドウが非アクティブでも動作させる
// DXライブラリの初期化
if (DxLib_Init() < 0)
{
// エラーが発生したら直ちに終了
return -1;
}
SetMouseDispFlag(TRUE);// ここをFALSEにするとマウスカーソル非表示
//表示しているスクリーンの後ろで隠れて次に描く画像を先に描くモード
// これとペアでScreenFlip();でつぎのページと入れ替えでちらつきを防ぐ
SetDrawScreen(DX_SCREEN_BACK);
SetUseTransColor(FALSE); // 画像の指定色を透過する機能を無効化
ScreenFlip();
// 数学っぽくわかりやすくマス目を描いて、原点を画面の中心にして、10倍のスケールでみやすく描く
MathGraph2D mathGraph{ {Screen::Width / 2 ,Screen::Height / 2 },10.0f,{1.0f,1.0f} };
// アニメーション(パラパラ漫画)するにはWhile文
while (ProcessMessage() == 0)
{// ProcessMessage() == 0になるのは×ボタン押したときなど
ClearDrawScreen(); // 画面をまっさらにリセット
mathGraph.DrawGrid(GetColor(100, 100, 100)); // 100,100,100のグレーのグリッドでマス目を描く
Vector2 p1{ 1,1 }; // (x,y) = (1,1)の位置の点
Vector2 p2{ 2,2 }; // (x,y) = (2,2)の位置の点
Vector2 p3{ 3,3 }; // (x,y) = (3,3)の位置の点
float r = 1; // 円の半径
Vector2 pc1{ 6,5 }; // 円1の中心
float r1 = 2; // 円1の半径
Vector2 pc2{ 10,9 }; // 円2の中心
float r2 = 3; // 円1の半径
Vector2 v13 = p3 - p1; // 終点p3 から 始点p1を引くとp1からp3へ向かう方向ベクトルになる
// 円1と円2が当たっているかの判定
bool isCollision12 = MyMath::CircleCircleIntersection(pc1, r1, pc2, r2);
mathGraph.DrawCircle(pc1.x, pc1.y, r1, (isCollision12) ? GetColor(255, 0, 0): GetColor(255, 255, 255), FALSE); // 円1を描く
mathGraph.DrawCircle(pc2.x, pc2.y, r2, (isCollision12) ? GetColor(255, 0, 0) : GetColor(255, 255, 255), FALSE); // 円2を描く
mathGraph.DrawLine(p1.x, p1.y, p1.x + Vector2::up.x * 3, p1.y + Vector2::up.y * 3, GetColor(0, 255, 255)); // upベクトルを3倍した線を描く
mathGraph.DrawLine(p1.x, p1.y, p1.x + v13.x * 2, p1.y + v13.y * 2, GetColor(255, 0, 255)); // 線分p1p3の2倍した線を描く
mathGraph.DrawLine(p1.x, p1.y, p1.x + v13.x, p1.y + v13.y, GetColor(255, 255, 255)); // 線分p1p3を描く
mathGraph.DrawCircle(p3.x, p3.y, r, GetColor(0, 255, 0), FALSE); // 半径rの円(中心:p3)を描く(FALSEで塗りつぶし無し)
ScreenFlip(); // 裏で描いておいたスクリーンを表画面にフリップ入れ替え
}
// キー入力待ちをする
WaitKey();
// DXライブラリの後始末
DxLib_End();
// ソフトの終了
return 0;
}
main.cppを変更して円2の中心を{10,9}ではなく{8,9}に変えます。
#include "DxLib.h"
#include "Screen.h"
#include "Vector2.h"
#include "MathGraph2D.h"
#include "MyMath.h"
int WINAPI WinMain(HINSTANCE hInstance, HINSTANCE hPrevInstance, LPSTR lpCmdLine, int nCmdShow)
{
// 画面モードの設定
SetWindowSize(Screen::Width, Screen::Height);// ウィンドウサイズ960×540(こことSetGraphModeのサイズが異なると画像がゆがむ)
SetGraphMode(Screen::Width, Screen::Height, 32); // 画面サイズ960×540のカラービット数32ビットで起動
SetMainWindowText("数学のベクトルの練習");//この行でエラーになったら【設定】マルチバイト文字セットが間違ってるかも
ChangeWindowMode(TRUE);//フルスクリーン表示かウィンドウ表示か
SetAlwaysRunFlag(TRUE); // ウィンドウが非アクティブでも動作させる
// DXライブラリの初期化
if (DxLib_Init() < 0)
{
// エラーが発生したら直ちに終了
return -1;
}
SetMouseDispFlag(TRUE);// ここをFALSEにするとマウスカーソル非表示
//表示しているスクリーンの後ろで隠れて次に描く画像を先に描くモード
// これとペアでScreenFlip();でつぎのページと入れ替えでちらつきを防ぐ
SetDrawScreen(DX_SCREEN_BACK);
SetUseTransColor(FALSE); // 画像の指定色を透過する機能を無効化
ScreenFlip();
// 数学っぽくわかりやすくマス目を描いて、原点を画面の中心にして、10倍のスケールでみやすく描く
MathGraph2D mathGraph{ {Screen::Width / 2 ,Screen::Height / 2 },10.0f,{1.0f,1.0f} };
// アニメーション(パラパラ漫画)するにはWhile文
while (ProcessMessage() == 0)
{// ProcessMessage() == 0になるのは×ボタン押したときなど
ClearDrawScreen(); // 画面をまっさらにリセット
mathGraph.DrawGrid(GetColor(100, 100, 100)); // 100,100,100のグレーのグリッドでマス目を描く
Vector2 p1{ 1,1 }; // (x,y) = (1,1)の位置の点
Vector2 p2{ 2,2 }; // (x,y) = (2,2)の位置の点
Vector2 p3{ 3,3 }; // (x,y) = (3,3)の位置の点
float r = 1; // 円の半径
Vector2 pc1{ 6,5 }; // 円1の中心
float r1 = 2; // 円1の半径
Vector2 pc2{ 8,9 }; // 円2の中心
float r2 = 3; // 円1の半径
Vector2 v13 = p3 - p1; // 終点p3 から 始点p1を引くとp1からp3へ向かう方向ベクトルになる
// 円1と円2が当たっているかの判定
bool isCollision12 = MyMath::CircleCircleIntersection(pc1, r1, pc2, r2);
mathGraph.DrawCircle(pc1.x, pc1.y, r1, (isCollision12) ? GetColor(255, 0, 0): GetColor(255, 255, 255), FALSE); // 円1を描く
mathGraph.DrawCircle(pc2.x, pc2.y, r2, (isCollision12) ? GetColor(255, 0, 0) : GetColor(255, 255, 255), FALSE); // 円2を描く
mathGraph.DrawLine(p1.x, p1.y, p1.x + Vector2::up.x * 3, p1.y + Vector2::up.y * 3, GetColor(0, 255, 255)); // upベクトルを3倍した線を描く
mathGraph.DrawLine(p1.x, p1.y, p1.x + v13.x * 2, p1.y + v13.y * 2, GetColor(255, 0, 255)); // 線分p1p3の2倍した線を描く
mathGraph.DrawLine(p1.x, p1.y, p1.x + v13.x, p1.y + v13.y, GetColor(255, 255, 255)); // 線分p1p3を描く
mathGraph.DrawCircle(p3.x, p3.y, r, GetColor(0, 255, 0), FALSE); // 半径rの円(中心:p3)を描く(FALSEで塗りつぶし無し)
ScreenFlip(); // 裏で描いておいたスクリーンを表画面にフリップ入れ替え
}
// キー入力待ちをする
WaitKey();
// DXライブラリの後始末
DxLib_End();
// ソフトの終了
return 0;
}
Vector2.hに関数を追加で定義します。#ifndef VECTOR2_H_
#define VECTOR2_H_
#include <array> //基本配列と同じ(有限個数)。生配列より便利な機能がある.size()関数とかstd::vector系関数が使える
#include <limits> // std::numeric_limitsで無限大などを使う https://cpprefjp.github.io/reference/limits/numeric_limits.html
#include <cmath> // std::の数学系関数に必要
//【注意】std::vectorとは全く違う。数学で習う【ベクトル】です。ごっちゃにしないで。
//★【UnityのVector演算コード】https://github.com/Unity-Technologies /UnityCsReference/blob/02d565cf3dd0f6b15069ba976064c75dc2705b08/Runtime/Export/Math/Vector3.cs
//★【UnityのMath演算コード】https://github.com/Unity-Technologies /UnityCsReference /blob/master/Runtime/Export/Math/Mathf.cs
// 2変数x,yを持つ構造体。2つの数字をまとめて扱うならXY座標以外にも使えるよ。x,y別々に足したり引いたり面倒でしょう。
struct Vector2
{
union { // ★共用体unionテクニック https://inemaru.hatenablog.com/entry/2016/03/02/005408
struct { // [参考ビットサイズ] https://marycore.jp/prog/c-lang/data-type-ranges-and-bit-byte-sizes/
float x;
float y;
}; //[匿名共用体とは] https://code.i-harness.com/ja-jp/q/4d437c
std::array<float, 2> xy; // float xy[2];と同じ意味 float 2個ぶんのデータサイズでx,y 2個ぶんと一致するので★unionで共用
}; // unionは異なる複数のものをメモリ上の同一の番地に割り当てられる⇒x,y分けて記述するの面倒なとき配列xy[2]をfor文i=0~2で回せる
// float型のポインタへ(float*)キャストすればx,yデータの配列の先頭のアドレスを返す
inline operator float* () const { return (float*)this; }
// float型のポインタへ(const float*)キャストすればx,yデータの配列の先頭のアドレスを返す
inline operator const float* () const { return (const float*)this; }
// 初期化コンストラクタ
Vector2(float x = 0.0f, float y = 0.0f) //初期化
{
this->xy = { x,y }; // たった1行で書ける
//this->x = x;
//this->y = y; 2行が上のxyzの様にたった1行で書けるようになる
}
// Unityのstatic変数を参考に https://docs.unity3d.com/ja/current/ScriptReference/Vector3.html
static const Vector2 zero;// = { 0.f, 0.f };
static const Vector2 one; // = { 1.f, 1.f };
static const Vector2 up; // = { 0.f, 1.f };
static const Vector2 down;// = { 0.f, -1.f };
static const Vector2 left; // = { -1.f, 0.f };
static const Vector2 right;// = { 1.f, 0.f };
//[負の値の最小値] https://stackoverflow.com/questions/20016600/negative-infinity
static const Vector2 negativeInfinity;// = { -std::numeric_limits<float>::infinity(), .. };
//[極大値]https://cpprefjp.github.io/reference/limits/numeric_limits/lowest.html
static const Vector2 positiveInfinity;// = { std::numeric_limits<float>::infinity(), .. };
// ベクトルの長さ(0から点(x,y,z)までの距離)
inline float magnitude() const //[後ろにconstをつけないと..] https://www7b.biglobe.ne.jp/~robe/cpphtml/html02/cpp02010.html
{
return std::sqrt(x * x + y * y); // √(x*x + y*y)
};
// ベクトルの 2 乗の長さを返します(平方根しないぶん計算速い)
inline float sqrMagnitude() const //[後ろにconstをつけないと..] https://www7b.biglobe.ne.jp/~robe/cpphtml/html02/cpp02010.html
{
return x * x + y * y; // x*x + y*y
};
/*----- 演算子オーバーロード -----*/
// 逆ベクトル
inline Vector2 operator -() const
{
return Vector2{ -this->x, -this->y };
}
// Vectorをそのまま足し合わせる
inline Vector2 operator + () const
{
return *this;
}
Vector2& operator += (const Vector2 add_v2)
{
this->x += add_v2.x;
this->y += add_v2.y;
return *this; //*thisを返すことで v1 + v2 + v3見たく数珠繋ぎできる
}
Vector2& operator -= (const Vector2 minus_v2)
{
this->x -= minus_v2.x;
this->y -= minus_v2.y;
return *this;
}
Vector2& operator *= (float multiply_num)
{
this->x *= multiply_num;
this->y *= multiply_num;
return *this;
}
// 0.fで割ったときは±無限大を返す
inline Vector2& operator /= (float divide_num)
{
if (divide_num == 0.0f) // 0で割ったら±無限大を返す
{
*this = Vector2{ ((this->x < 0) ? 1 : -1) * std::numeric_limits<float>::infinity(),
((this->y < 0) ? 1 : -1) * std::numeric_limits<float>::infinity() };
return *this;
}
this->x /= divide_num;
this->y /= divide_num;
return *this;
}
// 代入演算子 x,y,zを全部 change_numに変える
Vector2& operator = (float change_num)
{
this->x = change_num;
this->y = change_num;
return *this;
}
// 一致演算子 x,y,zを全部一致するか 一つでも違えばfalse
bool operator == (const Vector2& v2_other)
{
if (this->x != v2_other.x) return false;
if (this->y != v2_other.y) return false;
return true;
}
// 不一致演算子 一致演算子の逆
bool operator != (const Vector2& v2_other)
{
return !(*this == v2_other);
}
};
// Vector2どうしの足し算 割り算 掛け算 割り算などの 基本演算の グローバル定義
// Vector同士の足し算 x,y個別に足し合わせる
inline Vector2 operator + (const Vector2& left, const Vector2& right)
{
Vector2 v2; //注意 vec1 = vec1 + vec2のとき vec1の数値が書き変わったら嫌だからv3を新たに用意
v2.x = left.x + right.x; //[コレはダメ] left.x = left.x + right.x;
v2.y = left.y + right.y;
return v2;
}
// Vector同士の引き算 x,y個別に足し合わせる
inline Vector2 operator - (const Vector2& left, const Vector2& right)
{
Vector2 v2; //注意 vec1 = vec1 - vec2のとき vec1の数値が書き変わったら嫌だからv2を新たに用意
v2.x = left.x - right.x; //[コレはダメ] left.x = left.x - right.x;
v2.y = left.y - right.y;
return v2;
}
// Vectorと数値の掛け算 x,y個別に掛け合わせる
inline Vector2 operator * (const Vector2& left, float right)
{
Vector2 v2;
v2.x = left.x * right;
v2.y = left.y * right;
return v2;
}
// 数値とVectorの掛け算 x,y個別に掛け合わせる
inline Vector2 operator * (float left, const Vector2& right)
{
Vector2 v2;
v2.x = left * right.x;
v2.y = left * right.y;
return v2;
}
// Vectorと数値の割り算 x,y,z個別に割り合わせる
// 0.fで割ると±無限大を返す
inline Vector2 operator / (const Vector2& left, float right)
{
if (right == 0.0f) // 0で割ったら±無限大を返す
return Vector2{ ((left.x < 0) ? 1 : -1) * std::numeric_limits<float>::infinity(),
((left.y < 0) ? 1 : -1) * std::numeric_limits<float>::infinity() };
Vector2 v2;
v2.x = left.x / right;
v2.y = left.y / right;
return v2;
}
// 比較不等号 < 演算子
inline bool operator < (const Vector2& left, const Vector2& right)
{
if (left.x != right.x) return left.x < right.x;
return left.y < right.y;
}
// 比較不等号 > 演算子
inline bool operator > (const Vector2& left, const Vector2& right)
{
if (left.x != right.x) return left.x > right.x;
return left.y > right.y;
}
// 比較不等号 <= 演算子
inline bool operator <= (const Vector2& left, const Vector2& right)
{
return !(left > right);
}
// 比較不等号 >= 演算子
inline bool operator >= (const Vector2& left, const Vector2& right)
{
return !(left < right);
}
// ベクトルの 2 乗の長さを返します(平方根しないぶん計算速い)
inline float sqrMagnitude(const Vector2& vec)
{
return vec.x * vec.x + vec.y * vec.y; // x*x + y*y
}
// ベクトルの長さ(原点0から点(x,y)までの距離)
inline float magnitude(const Vector2& vec)
{
return std::sqrt(sqrMagnitude(vec)); // √x*x + y*y
}
#endif
MyMath.hを変更して円と円の距離をsqrMagnitude関数(円どうしの距離の2乗)を使った形に置き換えてみましょ う。#ifndef MYMATH_H_
#define MYMATH_H_
#include "Vector2.h" // 線との当たり判定にVector2を使う
#include <cmath>
// 数学関連クラス
class MyMath
{
public:
static const float Sqrt2; // = 1.41421356237f; // √2
static const float PI; // = 3.14159265359f; // 円周率
static const float Deg2Rad; // = PI / 180f; // 度からラジアンに変換する定数
/// <summary>
/// 円と円が重なっているかを調べる
/// </summary>
/// <param name="pc1">円1の中心pc1</param>
/// <param name="radius1">円1の半径</param>
/// <param name="pc2">円2の中心pc2</param>
/// <param name="radius2">円2の半径</param>
/// <returns>重なっていればtrue、重なっていなければfalseを返却する</returns>
static bool CircleCircleIntersection(
Vector2 pc1, float radius1,
Vector2 pc2, float radius2)
{
return (pc1 - pc2).sqrMagnitude() < ((radius1 + radius2) * (radius1 + radius2));
}
};
#endif
Vector2.hに関数を追加で定義します。#ifndef VECTOR2_H_
#define VECTOR2_H_
#include <array> //基本配列と同じ(有限個数)。生配列より便利な機能がある.size()関数とかstd::vector系関数が使える
#include <limits> // std::numeric_limitsで無限大などを使う https://cpprefjp.github.io/reference/limits/numeric_limits.html
#include <cmath> // std::の数学系関数に必要
//【注意】std::vectorとは全く違う。数学で習う【ベクトル】です。ごっちゃにしないで。
//★【UnityのVector演算コード】https://github.com/Unity-Technologies /UnityCsReference/blob/02d565cf3dd0f6b15069ba976064c75dc2705b08/Runtime/Export/Math/Vector3.cs
//★【UnityのMath演算コード】https://github.com/Unity-Technologies /UnityCsReference /blob/master/Runtime/Export/Math/Mathf.cs
// 2変数x,yを持つ構造体。2つの数字をまとめて扱うならXY座標以外にも使えるよ。x,y別々に足したり引いたり面倒でしょう。
struct Vector2
{
union { // ★共用体unionテクニック https://inemaru.hatenablog.com/entry/2016/03/02/005408
struct { // [参考ビットサイズ] https://marycore.jp/prog/c-lang/data-type-ranges-and-bit-byte-sizes/
float x;
float y;
}; //[匿名共用体とは] https://code.i-harness.com/ja-jp/q/4d437c
std::array<float, 2> xy; // float xy[2];と同じ意味 float 2個ぶんのデータサイズでx,y 2個ぶんと一致するので★unionで共用
}; // unionは異なる複数のものをメモリ上の同一の番地に割り当てられる⇒x,y分けて記述するの面倒なとき配列xy[2]をfor文i=0~2で回せる
// float型のポインタへ(float*)キャストすればx,yデータの配列の先頭のアドレスを返す
inline operator float* () const { return (float*)this; }
// float型のポインタへ(const float*)キャストすればx,yデータの配列の先頭のアドレスを返す
inline operator const float* () const { return (const float*)this; }
// 初期化コンストラクタ
Vector2(float x = 0.0f, float y = 0.0f) //初期化
{
this->xy = { x,y }; // たった1行で書ける
//this->x = x;
//this->y = y; 2行が上のxyzの様にたった1行で書けるようになる
}
// Unityのstatic変数を参考に https://docs.unity3d.com/ja/current/ScriptReference/Vector3.html
static const Vector2 zero;// = { 0.f, 0.f };
static const Vector2 one; // = { 1.f, 1.f };
static const Vector2 up; // = { 0.f, 1.f };
static const Vector2 down;// = { 0.f, -1.f };
static const Vector2 left; // = { -1.f, 0.f };
static const Vector2 right;// = { 1.f, 0.f };
//[負の値の最小値] https://stackoverflow.com/questions/20016600/negative-infinity
static const Vector2 negativeInfinity;// = { -std::numeric_limits<float>::infinity(), .. };
//[極大値]https://cpprefjp.github.io/reference/limits/numeric_limits/lowest.html
static const Vector2 positiveInfinity;// = { std::numeric_limits<float>::infinity(), .. };
// ベクトルの長さ(0から点(x,y,z)までの距離)
inline float magnitude() const //[後ろにconstをつけないと..] https://www7b.biglobe.ne.jp/~robe/cpphtml/html02/cpp02010.html
{
return std::sqrt(x * x + y * y); // √(x*x + y*y)
};
// ベクトルの 2 乗の長さを返します(平方根しないぶん計算速い)
inline float sqrMagnitude() const //[後ろにconstをつけないと..] https://www7b.biglobe.ne.jp/~robe/cpphtml/html02/cpp02010.html
{
return x * x + y * y; // x*x + y*y
};
// 正規化したベクトルを返す
Vector2 normalized() const //[後ろにconstをつけないと..] https://www7b.biglobe.ne.jp/~robe/cpphtml/html02/cpp02010.html
{
float mag = magnitude();
if (mag < 0.00001f) // ほぼ0ベクトルか?
return *this;
else
return Vector2{ x / mag, y / mag }; // x / |x|, y / |y|
}
/*----- 演算子オーバーロード -----*/
// 逆ベクトル
inline Vector2 operator -() const
{
return Vector2{ -this->x, -this->y };
}
// Vectorをそのまま足し合わせる
inline Vector2 operator + () const
{
return *this;
}
Vector2& operator += (const Vector2 add_v2)
{
this->x += add_v2.x;
this->y += add_v2.y;
return *this; //*thisを返すことで v1 + v2 + v3見たく数珠繋ぎできる
}
Vector2& operator -= (const Vector2 minus_v2)
{
this->x -= minus_v2.x;
this->y -= minus_v2.y;
return *this;
}
Vector2& operator *= (float multiply_num)
{
this->x *= multiply_num;
this->y *= multiply_num;
return *this;
}
// 0.fで割ったときは±無限大を返す
inline Vector2& operator /= (float divide_num)
{
if (divide_num == 0.0f) // 0で割ったら±無限大を返す
{
*this = Vector2{ ((this->x < 0) ? 1 : -1) * std::numeric_limits<float>::infinity(),
((this->y < 0) ? 1 : -1) * std::numeric_limits<float>::infinity() };
return *this;
}
this->x /= divide_num;
this->y /= divide_num;
return *this;
}
// 代入演算子 x,y,zを全部 change_numに変える
Vector2& operator = (float change_num)
{
this->x = change_num;
this->y = change_num;
return *this;
}
// 一致演算子 x,y,zを全部一致するか 一つでも違えばfalse
bool operator == (const Vector2& v2_other)
{
if (this->x != v2_other.x) return false;
if (this->y != v2_other.y) return false;
return true;
}
// 不一致演算子 一致演算子の逆
bool operator != (const Vector2& v2_other)
{
return !(*this == v2_other);
}
};
// Vector2どうしの足し算 割り算 掛け算 割り算などの 基本演算の グローバル定義
// Vector同士の足し算 x,y個別に足し合わせる
inline Vector2 operator + (const Vector2& left, const Vector2& right)
{
Vector2 v2; //注意 vec1 = vec1 + vec2のとき vec1の数値が書き変わったら嫌だからv3を新たに用意
v2.x = left.x + right.x; //[コレはダメ] left.x = left.x + right.x;
v2.y = left.y + right.y;
return v2;
}
// Vector同士の引き算 x,y個別に足し合わせる
inline Vector2 operator - (const Vector2& left, const Vector2& right)
{
Vector2 v2; //注意 vec1 = vec1 - vec2のとき vec1の数値が書き変わったら嫌だからv2を新たに用意
v2.x = left.x - right.x; //[コレはダメ] left.x = left.x - right.x;
v2.y = left.y - right.y;
return v2;
}
// Vectorと数値の掛け算 x,y個別に掛け合わせる
inline Vector2 operator * (const Vector2& left, float right)
{
Vector2 v2;
v2.x = left.x * right;
v2.y = left.y * right;
return v2;
}
// 数値とVectorの掛け算 x,y個別に掛け合わせる
inline Vector2 operator * (float left, const Vector2& right)
{
Vector2 v2;
v2.x = left * right.x;
v2.y = left * right.y;
return v2;
}
// Vectorと数値の割り算 x,y,z個別に割り合わせる
// 0.fで割ると±無限大を返す
inline Vector2 operator / (const Vector2& left, float right)
{
if (right == 0.0f) // 0で割ったら±無限大を返す
return Vector2{ ((left.x < 0) ? 1 : -1) * std::numeric_limits<float>::infinity(),
((left.y < 0) ? 1 : -1) * std::numeric_limits<float>::infinity() };
Vector2 v2;
v2.x = left.x / right;
v2.y = left.y / right;
return v2;
}
// 比較不等号 < 演算子
inline bool operator < (const Vector2& left, const Vector2& right)
{
if (left.x != right.x) return left.x < right.x;
return left.y < right.y;
}
// 比較不等号 > 演算子
inline bool operator > (const Vector2& left, const Vector2& right)
{
if (left.x != right.x) return left.x > right.x;
return left.y > right.y;
}
// 比較不等号 <= 演算子
inline bool operator <= (const Vector2& left, const Vector2& right)
{
return !(left > right);
}
// 比較不等号 >= 演算子
inline bool operator >= (const Vector2& left, const Vector2& right)
{
return !(left < right);
}
// ベクトルの 2 乗の長さを返します(平方根しないぶん計算速い)
inline float sqrMagnitude(const Vector2& vec)
{
return vec.x * vec.x + vec.y * vec.y; // x*x + y*y
}
// ベクトルの長さ(原点0から点(x,y)までの距離)
inline float magnitude(const Vector2& vec)
{
return std::sqrt(sqrMagnitude(vec)); // √x*x + y*y
}
// 2つのベクトルの内積
inline float dot(const Vector2& left, const Vector2& right)
{
return left.x * right.x + left.y * right.y; //普通にx同士,y同士掛けるだけ
}
// 2つのベクトルの外積
inline float cross(const Vector2& left, const Vector2& right)
{
return left.x * right.y - left.y * right.x;// 外積のたすき掛け
}
#endif
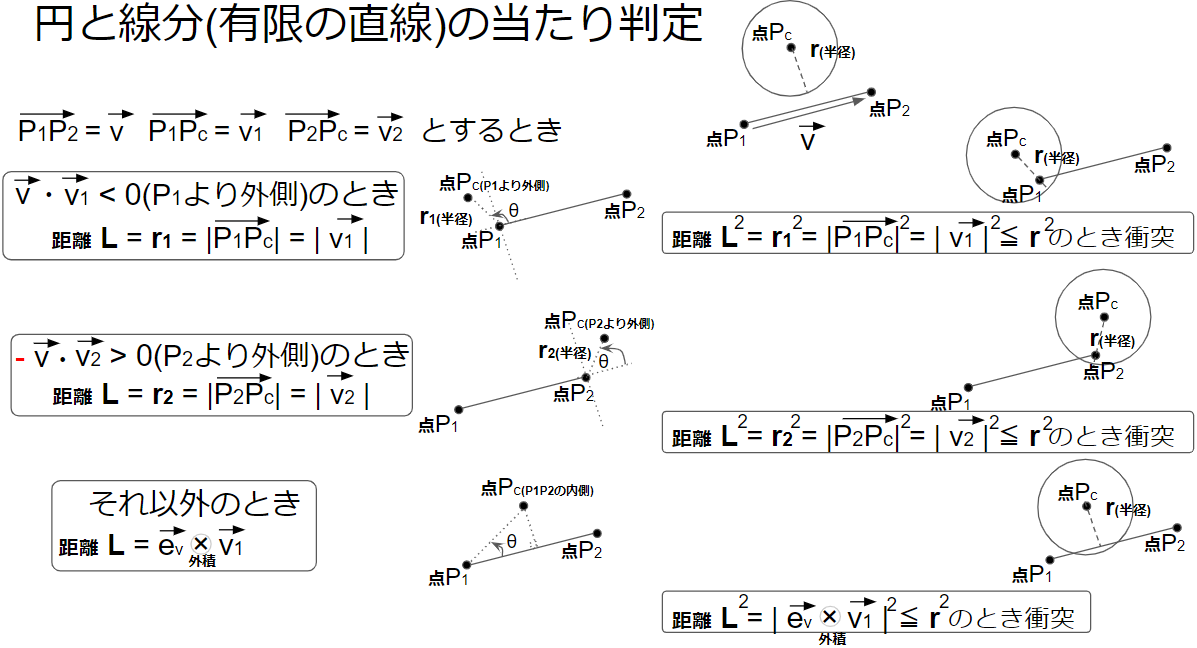
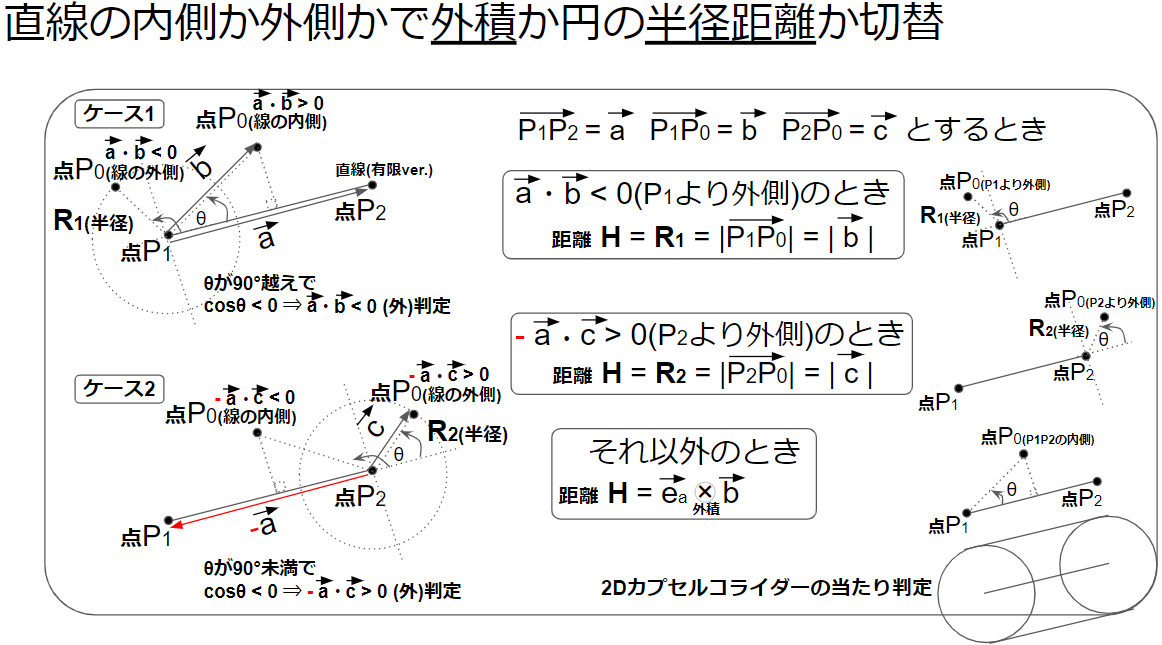
MyMath.hを変更して円と線が接触しているか判定する関数CircleSegment関数を追加してみましょ う。#ifndef MYMATH_H_
#define MYMATH_H_
#include "Vector2.h" // 線との当たり判定にVector2を使う
#include <cmath>
// 数学関連クラス
class MyMath
{
public:
static const float Sqrt2; // = 1.41421356237f; // √2
static const float PI; // = 3.14159265359f; // 円周率
static const float Deg2Rad; // = PI / 180f; // 度からラジアンに変換する定数
/// <summary>
/// 円と円が重なっているかを調べる
/// </summary>
/// <param name="pc1">円1の中心pc1</param>
/// <param name="radius1">円1の半径</param>
/// <param name="pc2">円2の中心pc2</param>
/// <param name="radius2">円2の半径</param>
/// <returns>重なっていればtrue、重なっていなければfalseを返却する</returns>
static bool CircleCircleIntersection(
Vector2 pc1, float radius1,
Vector2 pc2, float radius2)
{
return (pc1 - pc2).sqrMagnitude() < ((radius1 + radius2) * (radius1 + radius2));
}
/// <summary>
/// 円と線が重なっているかを調べる
/// </summary>
/// <param name="pc">円の中心</param>
/// <param name="r">円の半径</param>
/// <param name="p1">線の端p1</param>
/// <param name="p2">線の端p2</param>
/// <returns>重なっていればtrue、重なっていなければfalseを返却する</returns>
static bool CircleSegment(Vector2 pc, float r, Vector2 p1, Vector2 p2)
{
Vector2 v12 = p2 - p1; // 線p1p2の始点p1から終点p2へ向かうベクトル
Vector2 v1 = pc - p1; // 点p1から円の中心pcへ向かうベクトル
Vector2 v2 = pc - p2; // 点p2から円の中心pcへ向かうベクトル
Vector2 ev12 = v12.normalized(); // 単位ベクトル 線p1p2のp1からp2へ向かう単位ベクトル
float L; // 円と線の距離
//円の中心pcが線p1p2の外側にあるかの判定のため内積を計算して線の外側の場合を考慮する
if (dot(v12, v1) < 0) //点pcが線p1p2の外側にあるときは 内積 < 0
L = v1.magnitude(); //点pcと直線p1p2の距離は単なる直線距離でいい
else if (dot(-v1, v2) < 0) //点pcが線p1p2の外側にあるときは 内積 < 0
L = v2.magnitude(); //点pcと直線p1p2の距離は単なる直線距離でいい
else //外積を求めれば点pcと直線p1_p2の距離Lが求まる
L = std::abs(cross(ev12, v1)); // |外積| (外積の絶対値をabsで求める)
if (L < r) //衝突条件 L < r(L <= rにするかは地面から丁度半径r離れた位置で触れていると判定したいか次第)
return true;
else
return false;
}
};
#endif
main.cppを変更して円と線の当たり判定をしてみます。
#include "DxLib.h"
#include "Screen.h"
#include "Vector2.h"
#include "MathGraph2D.h"
#include "MyMath.h"
int WINAPI WinMain(HINSTANCE hInstance, HINSTANCE hPrevInstance, LPSTR lpCmdLine, int nCmdShow)
{
// 画面モードの設定
SetWindowSize(Screen::Width, Screen::Height);// ウィンドウサイズ960×540(こことSetGraphModeのサイズが異なると画像がゆがむ)
SetGraphMode(Screen::Width, Screen::Height, 32); // 画面サイズ960×540のカラービット数32ビットで起動
SetMainWindowText("数学のベクトルの練習");//この行でエラーになったら【設定】マルチバイト文字セットが間違ってるかも
ChangeWindowMode(TRUE);//フルスクリーン表示かウィンドウ表示か
SetAlwaysRunFlag(TRUE); // ウィンドウが非アクティブでも動作させる
// DXライブラリの初期化
if (DxLib_Init() < 0)
{
// エラーが発生したら直ちに終了
return -1;
}
SetMouseDispFlag(TRUE);// ここをFALSEにするとマウスカーソル非表示
//表示しているスクリーンの後ろで隠れて次に描く画像を先に描くモード
// これとペアでScreenFlip();でつぎのページと入れ替えでちらつきを防ぐ
SetDrawScreen(DX_SCREEN_BACK);
SetUseTransColor(FALSE); // 画像の指定色を透過する機能を無効化
ScreenFlip();
// 数学っぽくわかりやすくマス目を描いて、原点を画面の中心にして、10倍のスケールでみやすく描く
MathGraph2D mathGraph{ {Screen::Width / 2 ,Screen::Height / 2 },10.0f,{1.0f,1.0f} };
// アニメーション(パラパラ漫画)するにはWhile文
while (ProcessMessage() == 0)
{// ProcessMessage() == 0になるのは×ボタン押したときなど
ClearDrawScreen(); // 画面をまっさらにリセット
mathGraph.DrawGrid(GetColor(100, 100, 100)); // 100,100,100のグレーのグリッドでマス目を描く
Vector2 p1{ 1,1 }; // (x,y) = (1,1)の位置の点
Vector2 p2{ 7,13 }; // (x,y) = (7,13)の位置の点
Vector2 p3{ 3,3 }; // (x,y) = (3,3)の位置の点
float r = 1; // 円の半径
Vector2 pc1{ 6,5 }; // 円1の中心
float r1 = 2; // 円1の半径
Vector2 pc2{ 8,9 }; // 円2の中心
float r2 = 3; // 円1の半径
Vector2 v13 = p3 - p1; // 終点p3 から 始点p1を引くとp1からp3へ向かう方向ベクトルになる
// 円1と円2が当たっているかの判定
bool isCollision12 = MyMath::CircleCircleIntersection(pc1, r1, pc2, r2);
// 円1と線p1p2が当たっているかの判定
bool isCollision1_12 = MyMath::CircleSegment(pc1, r1, p1, p2);
// 円2と線p1p2が当たっているかの判定
bool isCollision2_12 = MyMath::CircleSegment(pc2, r2, p1, p2);
mathGraph.DrawCircle(pc1.x, pc1.y, r1, (isCollision1_12) ? GetColor(255, 0, 0): GetColor(255, 255, 255), FALSE); // 円1を描く
mathGraph.DrawCircle(pc2.x, pc2.y, r2, (isCollision2_12) ? GetColor(255, 0, 0) : GetColor(255, 255, 255), FALSE); // 円2を描く
mathGraph.DrawLine(p1.x, p1.y, p2.x, p2.y, (isCollision1_12 || isCollision2_12) ? GetColor(255, 0, 0) : GetColor(255, 255, 255)); // 線分p1p2
mathGraph.DrawPoint(p1.x, p1.y, 3, GetColor(255, 0, 0), TRUE);
std::string p1_String = "p1=(" + std::to_string((int)p1.x) + "," + std::to_string((int)p1.y) + ")";
mathGraph.DrawString(p1.x, p1.y, p1_String.c_str(), GetColor(255, 0, 0));
mathGraph.DrawPoint(p2.x, p2.y, 3, GetColor(0, 0, 255), TRUE);
std::string p0_String = "p2=(" + std::to_string((int)p2.x) + "," + std::to_string((int)p2.y) + ")";
mathGraph.DrawString(p2.x, p2.y, p0_String.c_str(), GetColor(0, 0, 255));
mathGraph.DrawLine(p1.x, p1.y, p1.x + Vector2::up.x * 3, p1.y + Vector2::up.y * 3, GetColor(0, 255, 255)); // upベクトルを3倍した線を描く
mathGraph.DrawLine(p1.x, p1.y, p1.x + v13.x * 2, p1.y + v13.y * 2, GetColor(255, 0, 255)); // 線分p1p3の2倍した線を描く
mathGraph.DrawLine(p1.x, p1.y, p1.x + v13.x, p1.y + v13.y, GetColor(255, 255, 255)); // 線分p1p3を描く
mathGraph.DrawCircle(p3.x, p3.y, r, GetColor(0, 255, 0), FALSE); // 半径rの円(中心:p3)を描く(FALSEで塗りつぶし無し)
ScreenFlip(); // 裏で描いておいたスクリーンを表画面にフリップ入れ替え
}
// キー入力待ちをする
WaitKey();
// DXライブラリの後始末
DxLib_End();
// ソフトの終了
return 0;
}
MyMath.hを変更して円と線が接触したら押し戻した位置をreturnする関数CircleBoundを追加してみましょ う。#ifndef MYMATH_H_
#define MYMATH_H_
#include "Vector2.h" // 線との当たり判定にVector2を使う
#include <cmath>
// 数学関連クラス
class MyMath
{
public:
static const float Sqrt2; // = 1.41421356237f; // √2
static const float PI; // = 3.14159265359f; // 円周率
static const float Deg2Rad; // = PI / 180f; // 度からラジアンに変換する定数
/// <summary>
/// 円と円が重なっているかを調べる
/// </summary>
/// <param name="pc1">円1の中心pc1</param>
/// <param name="radius1">円1の半径</param>
/// <param name="pc2">円2の中心pc2</param>
/// <param name="radius2">円2の半径</param>
/// <returns>重なっていればtrue、重なっていなければfalseを返却する</returns>
static bool CircleCircleIntersection(
Vector2 pc1, float radius1,
Vector2 pc2, float radius2)
{
return (pc1 - pc2).sqrMagnitude() < ((radius1 + radius2) * (radius1 + radius2));
}
/// <summary>
/// 円と線が重なっているかを調べる
/// </summary>
/// <param name="pc">円の中心</param>
/// <param name="r">円の半径</param>
/// <param name="p1">線の端p1</param>
/// <param name="p2">線の端p2</param>
/// <returns>重なっていればtrue、重なっていなければfalseを返却する</returns>
static bool CircleSegment(Vector2 pc, float r, Vector2 p1, Vector2 p2)
{
Vector2 v12 = p2 - p1; // 線p1p2の始点p1から終点p2へ向かうベクトル
Vector2 v1 = pc - p1; // 点p1から円の中心pcへ向かうベクトル
Vector2 v2 = pc - p2; // 点p2から円の中心pcへ向かうベクトル
Vector2 ev12 = v12.normalized(); // 単位ベクトル 線p1p2のp1からp2へ向かう単位ベクトル
float L; // 円と線の距離
//円の中心pcが線p1p2の外側にあるかの判定のため内積を計算して線の外側の場合を考慮する
if (dot(v12, v1) < 0) //点pcが線p1p2の外側にあるときは 内積 < 0
L = v1.magnitude(); //点pcと直線p1p2の距離は単なる直線距離でいい
else if (dot(-v1, v2) < 0) //点pcが線p1p2の外側にあるときは 内積 < 0
L = v2.magnitude(); //点pcと直線p1p2の距離は単なる直線距離でいい
else //外積を求めれば点pcと直線p1_p2の距離Lが求まる
L = std::abs(cross(ev12, v1)); // |外積| (外積の絶対値をabsで求める)
if (L < r) //衝突条件 L < r(L <= rにするかは地面から丁度半径r離れた位置で触れていると判定したいか次第)
return true;
else
return false;
}
/// <summary>
/// 円と線が重なっているかを調べる
/// </summary>
/// <param name="pc">円の中心</param>
/// <param name="r">円の半径</param>
/// <param name="p1">線の端p1</param>
/// <param name="p2">線の端p2</param>
/// <returns>押し戻しした円の中心の点</returns>
static Vector2 CircleBound(Vector2 pc, float r, Vector2 p1, Vector2 p2)
{
Vector2 v12 = p2 - p1; // 線p1p2の始点p1から終点p2へ向かうベクトル
Vector2 v1 = pc - p1; // 点p1から円の中心pcへ向かうベクトル
Vector2 v2 = pc - p2; // 点p2から円の中心pcへ向かうベクトル
Vector2 ev12 = v12.normalized(); // 単位ベクトル 線p1p2のp1からp2へ向かう単位ベクトル
//円の中心pcが線p1p2の外側にあるかの判定のため内積を計算して線の外側の場合を考慮する
if (dot(v12, v1) < 0) //点pcが線p1p2の外側にあるときは 内積 < 0
return p1 + v1.normalized() * (r + 0.001f); // 半径よりちょっとだけ0.001f離れた位置まで押し戻す
else if (dot(-v1, v2) < 0) //点p0が線p1p2の外側にあるときは 内積 < 0
return p2 + v2.normalized() * (r + 0.001f); // 半径よりちょっとだけ0.001f離れた位置まで押し戻す
else //外積を求めれば点pcと直線p1_p2の距離Lが求まる
{
float L = dot(ev12, v1); // 内積で点p1から交点Qまでの距離を求める
Vector2 Q = p1 + L * ev12; // 円と線の衝突点Q
Vector2 e = (pc - Q).normalized(); // 跳ね返り方向のの半径1の単位ベクトル
return Q + e * (r + 0.001f); // 押し戻し処理
}
}
};
#endif
main.cppを変更して円と線の当たり判定をして接触している際はMyMath::CircleBoundで円を押し戻 した位置を描く処理を追加してみます。
#include "DxLib.h"
#include "Screen.h"
#include "Vector2.h"
#include "MathGraph2D.h"
#include "MyMath.h"
int WINAPI WinMain(HINSTANCE hInstance, HINSTANCE hPrevInstance, LPSTR lpCmdLine, int nCmdShow)
{
// 画面モードの設定
SetWindowSize(Screen::Width, Screen::Height);// ウィンドウサイズ960×540(こことSetGraphModeのサイズが異なると画像がゆがむ)
SetGraphMode(Screen::Width, Screen::Height, 32); // 画面サイズ960×540のカラービット数32ビットで起動
SetMainWindowText("数学のベクトルの練習");//この行でエラーになったら【設定】マルチバイト文字セットが間違ってるかも
ChangeWindowMode(TRUE);//フルスクリーン表示かウィンドウ表示か
SetAlwaysRunFlag(TRUE); // ウィンドウが非アクティブでも動作させる
// DXライブラリの初期化
if (DxLib_Init() < 0)
{
// エラーが発生したら直ちに終了
return -1;
}
SetMouseDispFlag(TRUE);// ここをFALSEにするとマウスカーソル非表示
//表示しているスクリーンの後ろで隠れて次に描く画像を先に描くモード
// これとペアでScreenFlip();でつぎのページと入れ替えでちらつきを防ぐ
SetDrawScreen(DX_SCREEN_BACK);
SetUseTransColor(FALSE); // 画像の指定色を透過する機能を無効化
ScreenFlip();
// 数学っぽくわかりやすくマス目を描いて、原点を画面の中心にして、10倍のスケールでみやすく描く
MathGraph2D mathGraph{ {Screen::Width / 2 ,Screen::Height / 2 },10.0f,{1.0f,1.0f} };
// アニメーション(パラパラ漫画)するにはWhile文
while (ProcessMessage() == 0)
{// ProcessMessage() == 0になるのは×ボタン押したときなど
ClearDrawScreen(); // 画面をまっさらにリセット
mathGraph.DrawGrid(GetColor(100, 100, 100)); // 100,100,100のグレーのグリッドでマス目を描く
Vector2 p1{ 1,1 }; // (x,y) = (1,1)の位置の点
Vector2 p2{ 8,8 }; // (x,y) = (8,8)の位置の点
Vector2 p3{ 3,3 }; // (x,y) = (3,3)の位置の点
float r = 1; // 円の半径
Vector2 pc1{ 6,5 }; // 円1の中心
float r1 = 2; // 円1の半径
Vector2 pc2{ 8,9 }; // 円2の中心
float r2 = 3; // 円1の半径
Vector2 v13 = p3 - p1; // 終点p3 から 始点p1を引くとp1からp3へ向かう方向ベクトルになる
// 円1と円2が当たっているかの判定
bool isCollision12 = MyMath::CircleCircleIntersection(pc1, r1, pc2, r2);
// 円1と線p1p2が当たっているかの判定
bool isCollision1_12 = MyMath::CircleSegment(pc1, r1, p1, p2);
// 円2と線p1p2が当たっているかの判定
bool isCollision2_12 = MyMath::CircleSegment(pc2, r2, p1, p2);
Vector2 pb1 = pc1; // 線に押し戻された円1の中心
if (isCollision1_12)
pb1 = MyMath::CircleBound(pc1, r1, p1, p2);
Vector2 pb2 = pc2; // 線に押し戻された円2の中心
if (isCollision2_12)
pb2 = MyMath::CircleBound(pc2, r2, p1, p2);
mathGraph.DrawCircle(pc1.x, pc1.y, r1, (isCollision1_12) ? GetColor(255, 0, 0): GetColor(255, 255, 255), FALSE); // 円1を描く
mathGraph.DrawCircle(pc2.x, pc2.y, r2, (isCollision2_12) ? GetColor(255, 0, 0) : GetColor(255, 255, 255), FALSE); // 円2を描く
if (pb1 != pc1) // 線に当たって押し戻された円1を描く
mathGraph.DrawCircle(pb1.x, pb1.y, r1, GetColor(255, 0, 255), FALSE);
if (pb2 != pc2) // 線に当たって押し戻された円2を描く
mathGraph.DrawCircle(pb2.x, pb2.y, r2, GetColor(255, 0, 255), FALSE);
mathGraph.DrawLine(p1.x, p1.y, p2.x, p2.y, (isCollision1_12 || isCollision2_12) ? GetColor(255, 0, 0) : GetColor(255, 255, 255)); // 線分p1p2
mathGraph.DrawPoint(p1.x, p1.y, 3, GetColor(255, 0, 0), TRUE);
std::string p1_String = "p1=(" + std::to_string((int)p1.x) + "," + std::to_string((int)p1.y) + ")";
mathGraph.DrawString(p1.x, p1.y, p1_String.c_str(), GetColor(255, 0, 0));
mathGraph.DrawPoint(p2.x, p2.y, 3, GetColor(0, 0, 255), TRUE);
std::string p0_String = "p2=(" + std::to_string((int)p2.x) + "," + std::to_string((int)p2.y) + ")";
mathGraph.DrawString(p2.x, p2.y, p0_String.c_str(), GetColor(0, 0, 255));
mathGraph.DrawLine(p1.x, p1.y, p1.x + Vector2::up.x * 3, p1.y + Vector2::up.y * 3, GetColor(0, 255, 255)); // upベクトルを3倍した線を描く
mathGraph.DrawLine(p1.x, p1.y, p1.x + v13.x * 2, p1.y + v13.y * 2, GetColor(255, 0, 255)); // 線分p1p3の2倍した線を描く
mathGraph.DrawLine(p1.x, p1.y, p1.x + v13.x, p1.y + v13.y, GetColor(255, 255, 255)); // 線分p1p3を描く
mathGraph.DrawCircle(p3.x, p3.y, r, GetColor(0, 255, 0), FALSE); // 半径rの円(中心:p3)を描く(FALSEで塗りつぶし無し)
ScreenFlip(); // 裏で描いておいたスクリーンを表画面にフリップ入れ替え
}
// キー入力待ちをする
WaitKey();
// DXライブラリの後始末
DxLib_End();
// ソフトの終了
return 0;
}
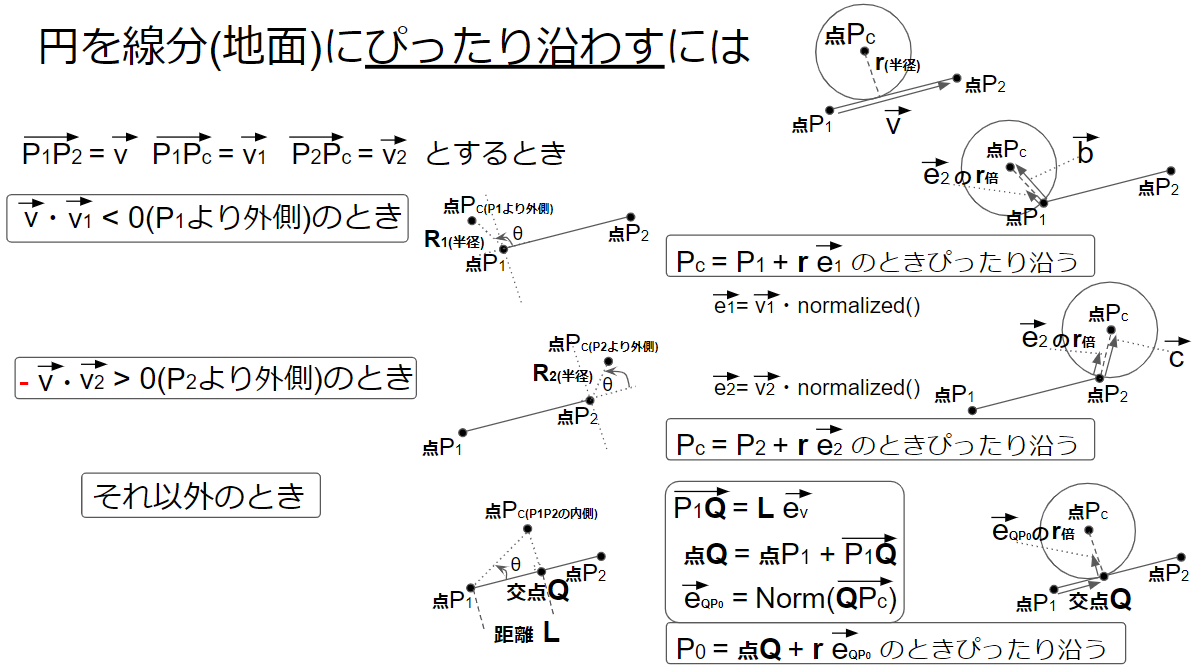
MyMath.hを変更して線p1p2に対して点p0から垂直に下した交点Qとp0からQへの距離Lと点p0から線p1p2への最 短距離Hを求める関数LineProjectionを追加してみましょ う。#ifndef MYMATH_H_
#define MYMATH_H_
#include "Vector2.h" // 線との当たり判定にVector2を使う
#include <cmath>
// 数学関連クラス
class MyMath
{
public:
static const float Sqrt2; // = 1.41421356237f; // √2
static const float PI; // = 3.14159265359f; // 円周率
static const float Deg2Rad; // = PI / 180f; // 度からラジアンに変換する定数
/// <summary>
/// 円と円が重なっているかを調べる
/// </summary>
/// <param name="pc1">円1の中心pc1</param>
/// <param name="radius1">円1の半径</param>
/// <param name="pc2">円2の中心pc2</param>
/// <param name="radius2">円2の半径</param>
/// <returns>重なっていればtrue、重なっていなければfalseを返却する</returns>
static bool CircleCircleIntersection(
Vector2 pc1, float radius1,
Vector2 pc2, float radius2)
{
return (pc1 - pc2).sqrMagnitude() < ((radius1 + radius2) * (radius1 + radius2));
}
/// <summary>
/// 円と線が重なっているかを調べる
/// </summary>
/// <param name="pc">円の中心</param>
/// <param name="r">円の半径</param>
/// <param name="p1">線の端p1</param>
/// <param name="p2">線の端p2</param>
/// <returns>重なっていればtrue、重なっていなければfalseを返却する</returns>
static bool CircleSegment(Vector2 pc, float r, Vector2 p1, Vector2 p2)
{
Vector2 v12 = p2 - p1; // 線p1p2の始点p1から終点p2へ向かうベクトル
Vector2 v1 = pc - p1; // 点p1から円の中心pcへ向かうベクトル
Vector2 v2 = pc - p2; // 点p2から円の中心pcへ向かうベクトル
Vector2 ev12 = v12.normalized(); // 単位ベクトル 線p1p2のp1からp2へ向かう単位ベクトル
float L; // 円と線の距離
//円の中心pcが線p1p2の外側にあるかの判定のため内積を計算して線の外側の場合を考慮する
if (dot(v12, v1) < 0) //点pcが線p1p2の外側にあるときは 内積 < 0
L = v1.magnitude(); //点pcと直線p1p2の距離は単なる直線距離でいい
else if (dot(-v1, v2) < 0) //点pcが線p1p2の外側にあるときは 内積 < 0
L = v2.magnitude(); //点pcと直線p1p2の距離は単なる直線距離でいい
else //外積を求めれば点pcと直線p1_p2の距離Lが求まる
L = std::abs(cross(ev12, v1)); // |外積| (外積の絶対値をabsで求める)
if (L < r) //衝突条件 L < r(L <= rにするかは地面から丁度半径r離れた位置で触れていると判定したいか次第)
return true;
else
return false;
}
/// <summary>
/// 円と線が重なっているかを調べる
/// </summary>
/// <param name="pc">円の中心</param>
/// <param name="r">円の半径</param>
/// <param name="p1">線の端p1</param>
/// <param name="p2">線の端p2</param>
/// <returns>押し戻しした円の中心の点</returns>
static Vector2 CircleBound(Vector2 pc, float r, Vector2 p1, Vector2 p2)
{
Vector2 v12 = p2 - p1; // 線p1p2の始点p1から終点p2へ向かうベクトル
Vector2 v1 = pc - p1; // 点p1から円の中心pcへ向かうベクトル
Vector2 v2 = pc - p2; // 点p2から円の中心pcへ向かうベクトル
Vector2 ev12 = v12.normalized(); // 単位ベクトル 線p1p2のp1からp2へ向かう単位ベクトル
//円の中心pcが線p1p2の外側にあるかの判定のため内積を計算して線の外側の場合を考慮する
if (dot(v12, v1) < 0) //点pcが線p1p2の外側にあるときは 内積 < 0
return p1 + v1.normalized() * (r + 0.001f); // 半径よりちょっとだけ0.001f離れた位置まで押し戻す
else if (dot(-v1, v2) < 0) //点p0が線p1p2の外側にあるときは 内積 < 0
return p2 + v2.normalized() * (r + 0.001f); // 半径よりちょっとだけ0.001f離れた位置まで押し戻す
else //外積を求めれば点pcと直線p1_p2の距離Lが求まる
{
float L = dot(ev12, v1); // 内積で点p1から交点Qまでの距離を求める
Vector2 Q = p1 + L * ev12; // 円と線の衝突点Q
Vector2 e = (pc - Q).normalized(); // 跳ね返り方向のの半径1の単位ベクトル
return Q + e * (r + 0.001f); // 押し戻し処理
}
}
/// <summary>
/// 斜面a(線p1→p2),線b(p1→p0)のとき斜面a上に点p0から垂直に下した射影点(点Q)の位置とp0からQへの長さLとp0と線aとの距離Hを求める
/// </summary>
/// <param name="p0">線bの先っぽp0</param>
/// <param name="p1">aとbの起点p1</param>
/// <param name="p2">斜面aの端p2</param>
/// <param name="L">p1からQまでの距離</param>
/// <param name="H">p0と直線p1p2の距離(= 高さ[線の内側]か端っこの点からの半径[線の外側])</param>
/// <returns>線aに線bから下した交点Q</returns>
static Vector2 LineProjection(Vector2 p0, Vector2 p1, Vector2 p2, float& L, float& H, Vector2& nearest)
{
// ベクトルaとベクトルbを求める。ただマイナスするだけ。
Vector2 a = p2 - p1;
Vector2 b = p0 - p1;
Vector2 c = p0 - p2; // p2→p0のベクトル
// 正規化ベクトルを求める
Vector2 ea = a.normalized(); // a / |a|
bool isOutside = false; // p0が線の外側か?
//点p0が線p1p2の外側にあるかの判定のため内積を計算して線の外側の場合を考慮する
if (dot(a, b) < 0) // 点p0が線p1p2の外側にあるときは 内積 < 0
{
H = b.magnitude(); // 点p0と直線p1p2の距離は単なるベクトルbの直線距離でいい
nearest = p1; // 一番近い点はp1
isOutside = true; // p1側の外側
}
else if (dot(-a, c) < 0) // 点p0が線p1p2の外側にあるときは 内積 < 0
{
H = c.magnitude(); // 点p0と直線p1p2の距離は単なるベクトルcの直線距離でいい
nearest = p2; // 一番近い点はp2
isOutside = true; // p2側の外側
}
else
{ // 外積を求めれば点p0と直線p1_p2の距離Lが求まる
Vector2 ea_cross_b = cross(ea, b);
H = ea_cross_b.magnitude();
}
L = dot(ea, b); // 長さLは内積で求まる
Vector2 resultQ = p1 + L * ea;
if (!isOutside)
nearest = resultQ; // 一番近い点はQ
return resultQ;
}
};
#endif
main.cppがちらかってきたので一旦、今まで書いてきたVector関連のコードを消してから今回のコードを入れま しょう。
#include "DxLib.h"
#include "Screen.h"
#include "Vector2.h"
#include "MathGraph2D.h"
#include "MyMath.h"
int WINAPI WinMain(HINSTANCE hInstance, HINSTANCE hPrevInstance, LPSTR lpCmdLine, int nCmdShow)
{
// 画面モードの設定
SetWindowSize(Screen::Width, Screen::Height);// ウィンドウサイズ960×540(こことSetGraphModeのサイズが異なると画像がゆがむ)
SetGraphMode(Screen::Width, Screen::Height, 32); // 画面サイズ960×540のカラービット数32ビットで起動
SetMainWindowText("数学のベクトルの練習");//この行でエラーになったら【設定】マルチバイト文字セットが間違ってるかも
ChangeWindowMode(TRUE);//フルスクリーン表示かウィンドウ表示か
SetAlwaysRunFlag(TRUE); // ウィンドウが非アクティブでも動作させる
// DXライブラリの初期化
if (DxLib_Init() < 0)
{
// エラーが発生したら直ちに終了
return -1;
}
SetMouseDispFlag(TRUE);// ここをFALSEにするとマウスカーソル非表示
//表示しているスクリーンの後ろで隠れて次に描く画像を先に描くモード
// これとペアでScreenFlip();でつぎのページと入れ替えでちらつきを防ぐ
SetDrawScreen(DX_SCREEN_BACK);
SetUseTransColor(FALSE); // 画像の指定色を透過する機能を無効化
ScreenFlip();
// 数学っぽくわかりやすくマス目を描いて、原点を画面の中心にして、10倍のスケールでみやすく描く
MathGraph2D mathGraph{ {Screen::Width / 2 ,Screen::Height / 2 },10.0f,{1.0f,1.0f} };
// アニメーション(パラパラ漫画)するにはWhile文
while (ProcessMessage() == 0)
{// ProcessMessage() == 0になるのは×ボタン押したときなど
ClearDrawScreen(); // 画面をまっさらにリセット
mathGraph.DrawGrid(GetColor(100, 100, 100)); // 100,100,100のグレーのグリッドでマス目を描く
Vector2 p1{ 1,1 }; // (x,y) = (1,1)の位置の点
Vector2 p2{ 8,8 }; // (x,y) = (8,8)の位置の点
Vector2 p3{ 3,3 }; // (x,y) = (3,3)の位置の点
float r = 1; // 円の半径
Vector2 pc1{ 6,5 }; // 円1の中心
float r1 = 2; // 円1の半径
Vector2 pc2{ 8,9 }; // 円2の中心
float r2 = 3; // 円1の半径
Vector2 v13 = p3 - p1; // 終点p3 から 始点p1を引くとp1からp3へ向かう方向ベクトルになる
// 円1と円2が当たっているかの判定
bool isCollision12 = MyMath::CircleCircleIntersection(pc1, r1, pc2, r2);
// 円1と線p1p2が当たっているかの判定
bool isCollision1_12 = MyMath::CircleSegment(pc1, r1, p1, p2);
// 円2と線p1p2が当たっているかの判定
bool isCollision2_12 = MyMath::CircleSegment(pc2, r2, p1, p2);
Vector2 pb1 = pc1; // 線に押し戻された円1の中心
if (isCollision1_12)
pb1 = MyMath::CircleBound(pc1, r1, p1, p2);
Vector2 pb2 = pc2; // 線に押し戻された円2の中心
if (isCollision2_12)
pb2 = MyMath::CircleBound(pc2, r2, p1, p2);
mathGraph.DrawCircle(pc1.x, pc1.y, r1, (isCollision1_12) ? GetColor(255, 0, 0): GetColor(255, 255, 255), FALSE); // 円1を描く
mathGraph.DrawCircle(pc2.x, pc2.y, r2, (isCollision2_12) ? GetColor(255, 0, 0) : GetColor(255, 255, 255), FALSE); // 円2を描く
if (pb1 != pc1) // 線に当たって押し戻された円1を描く
mathGraph.DrawCircle(pb1.x, pb1.y, r1, GetColor(255, 0, 255), FALSE);
if (pb2 != pc2) // 線に当たって押し戻された円2を描く
mathGraph.DrawCircle(pb2.x, pb2.y, r2, GetColor(255, 0, 255), FALSE);
mathGraph.DrawLine(p1.x, p1.y, p2.x, p2.y, (isCollision1_12 || isCollision2_12) ? GetColor(255, 0, 0) : GetColor(255, 255, 255)); // 線分p1p2
mathGraph.DrawPoint(p1.x, p1.y, 3, GetColor(255, 0, 0), TRUE);
std::string p1_String = "p1=(" + std::to_string((int)p1.x) + "," + std::to_string((int)p1.y) + ")";
mathGraph.DrawString(p1.x, p1.y, p1_String.c_str(), GetColor(255, 0, 0));
mathGraph.DrawPoint(p2.x, p2.y, 3, GetColor(0, 0, 255), TRUE);
std::string p0_String = "p2=(" + std::to_string((int)p2.x) + "," + std::to_string((int)p2.y) + ")";
mathGraph.DrawString(p2.x, p2.y, p0_String.c_str(), GetColor(0, 0, 255));
mathGraph.DrawLine(p1.x, p1.y, p1.x + Vector2::up.x * 3, p1.y + Vector2::up.y * 3, GetColor(0, 255, 255)); // upベクトルを3倍した線を描く
mathGraph.DrawLine(p1.x, p1.y, p1.x + v13.x * 2, p1.y + v13.y * 2, GetColor(255, 0, 255)); // 線分p1p3の2倍した線を描く
mathGraph.DrawLine(p1.x, p1.y, p1.x + v13.x, p1.y + v13.y, GetColor(255, 255, 255)); // 線分p1p3を描く
mathGraph.DrawCircle(p3.x, p3.y, r, GetColor(0, 255, 0), FALSE); // 半径rの円(中心:p3)を描く(FALSEで塗りつぶし無し)
ScreenFlip(); // 裏で描いておいたスクリーンを表画面にフリップ入れ替え
}
// キー入力待ちをする
WaitKey();
// DXライブラリの後始末
DxLib_End();
// ソフトの終了
return 0;
}
main.cppを変更してMyMath::LineProjectionで線に点から垂直に下した位置と最短距離の表示処 理を追加してみます。
#include "DxLib.h"
#include "Screen.h"
#include "Vector2.h"
#include "MathGraph2D.h"
#include "MyMath.h"
int WINAPI WinMain(HINSTANCE hInstance, HINSTANCE hPrevInstance, LPSTR lpCmdLine, int nCmdShow)
{
// 画面モードの設定
SetWindowSize(Screen::Width, Screen::Height);// ウィンドウサイズ960×540(こことSetGraphModeのサイズが異なると画像がゆがむ)
SetGraphMode(Screen::Width, Screen::Height, 32); // 画面サイズ960×540のカラービット数32ビットで起動
SetMainWindowText("数学のベクトルの練習");//この行でエラーになったら【設定】マルチバイト文字セットが間違ってるかも
ChangeWindowMode(TRUE);//フルスクリーン表示かウィンドウ表示か
SetAlwaysRunFlag(TRUE); // ウィンドウが非アクティブでも動作させる
// DXライブラリの初期化
if (DxLib_Init() < 0)
{
// エラーが発生したら直ちに終了
return -1;
}
SetMouseDispFlag(TRUE);// ここをFALSEにするとマウスカーソル非表示
//表示しているスクリーンの後ろで隠れて次に描く画像を先に描くモード
// これとペアでScreenFlip();でつぎのページと入れ替えでちらつきを防ぐ
SetDrawScreen(DX_SCREEN_BACK);
SetUseTransColor(FALSE); // 画像の指定色を透過する機能を無効化
ScreenFlip();
// 数学っぽくわかりやすくマス目を描いて、原点を画面の中心にして、10倍のスケールでみやすく描く
MathGraph2D mathGraph{ {Screen::Width / 2 ,Screen::Height / 2 },10.0f,{1.0f,1.0f} };
// アニメーション(パラパラ漫画)するにはWhile文
while (ProcessMessage() == 0)
{// ProcessMessage() == 0になるのは×ボタン押したときなど
ClearDrawScreen(); // 画面をまっさらにリセット
mathGraph.DrawGrid(GetColor(100, 100, 100)); // 100,100,100のグレーのグリッドでマス目を描く
Vector2 p0{ 5,8 };
Vector2 p1{ 2,2 };
Vector2 p2{ 10,3 };
float L = 0; // 点p1から交点Qへの距離
float H = 0; // 線分p1p2と点p0の最短距離H
Vector2 nearest; // 点p0から一番近い直線p1p2上の点
Vector2 Q = MyMath::LineProjection(p0,p1,p2,L,H, nearest); // 点p0から線分p1p2に垂直に下した交点Q
mathGraph.DrawLine(p1.x, p1.y, p2.x, p2.y, GetColor(255, 255, 255)); // 線分p1p2
mathGraph.DrawLine(p1.x, p1.y, p0.x, p0.y, GetColor(150, 150, 150)); // 線分p1p0
mathGraph.DrawLine(p0.x, p0.y, nearest.x, nearest.y, GetColor(255, 255, 0)); // p0からの最短距離を描く
mathGraph.DrawLine(p1.x, p1.y, Q.x, Q.y, GetColor(0, 255, 255)); // p0からQへの距離Lを描く
mathGraph.DrawPoint(p0.x, p0.y, 3, GetColor(255, 0, 0), TRUE);
std::string p0_String = "p0=(" + std::to_string((int)p0.x) + "," + std::to_string((int)p0.y) + ")";
mathGraph.DrawString(p0.x, p0.y, p0_String.c_str(), GetColor(255, 0, 0));
mathGraph.DrawPoint(p1.x, p1.y, 3, GetColor(0, 255, 0), TRUE);
std::string p1_String = "p1=(" + std::to_string((int)p1.x) + "," + std::to_string((int)p1.y) + ")";
mathGraph.DrawString(p1.x, p1.y, p1_String.c_str(), GetColor(0, 255, 0));
mathGraph.DrawPoint(p2.x, p2.y, 3, GetColor(0, 0, 255), TRUE);
std::string p2_String = "p2=(" + std::to_string((int)p2.x) + "," + std::to_string((int)p2.y) + ")";
mathGraph.DrawString(p2.x, p2.y, p2_String.c_str(), GetColor(0, 0, 255));
mathGraph.DrawPoint(Q.x, Q.y, 3, GetColor(255, 0, 255), TRUE);
std::string Q_String = "Q=(" + std::to_string(Q.x) + "," + std::to_string(Q.y) + ")";
mathGraph.DrawString(Q.x, Q.y-5, Q_String.c_str(), GetColor(255, 0, 255));
std::string H_String = "最短距離H=" + std::to_string(H);
mathGraph.DrawString(nearest.x, nearest.y - 10, H_String.c_str(), GetColor(255, 255, 0));
std::string L_String = "L=" + std::to_string(L);
mathGraph.DrawString(Q.x, Q.y - 3, L_String.c_str(), GetColor(0, 255, 255));
ScreenFlip(); // 裏で描いておいたスクリーンを表画面にフリップ入れ替え
}
// キー入力待ちをする
WaitKey();
// DXライブラリの後始末
DxLib_End();
// ソフトの終了
return 0;
}
main.cppの数値を変更してp1側の外側の場合の最短距離も試しておきましょう。
#include "DxLib.h"
#include "Screen.h"
#include "Vector2.h"
#include "MathGraph2D.h"
#include "MyMath.h"
int WINAPI WinMain(HINSTANCE hInstance, HINSTANCE hPrevInstance, LPSTR lpCmdLine, int nCmdShow)
{
// 画面モードの設定
SetWindowSize(Screen::Width, Screen::Height);// ウィンドウサイズ960×540(こことSetGraphModeのサイズが異なると画像がゆがむ)
SetGraphMode(Screen::Width, Screen::Height, 32); // 画面サイズ960×540のカラービット数32ビットで起動
SetMainWindowText("数学のベクトルの練習");//この行でエラーになったら【設定】マルチバイト文字セットが間違ってるかも
ChangeWindowMode(TRUE);//フルスクリーン表示かウィンドウ表示か
SetAlwaysRunFlag(TRUE); // ウィンドウが非アクティブでも動作させる
// DXライブラリの初期化
if (DxLib_Init() < 0)
{
// エラーが発生したら直ちに終了
return -1;
}
SetMouseDispFlag(TRUE);// ここをFALSEにするとマウスカーソル非表示
//表示しているスクリーンの後ろで隠れて次に描く画像を先に描くモード
// これとペアでScreenFlip();でつぎのページと入れ替えでちらつきを防ぐ
SetDrawScreen(DX_SCREEN_BACK);
SetUseTransColor(FALSE); // 画像の指定色を透過する機能を無効化
ScreenFlip();
// 数学っぽくわかりやすくマス目を描いて、原点を画面の中心にして、10倍のスケールでみやすく描く
MathGraph2D mathGraph{ {Screen::Width / 2 ,Screen::Height / 2 },10.0f,{1.0f,1.0f} };
// アニメーション(パラパラ漫画)するにはWhile文
while (ProcessMessage() == 0)
{// ProcessMessage() == 0になるのは×ボタン押したときなど
ClearDrawScreen(); // 画面をまっさらにリセット
mathGraph.DrawGrid(GetColor(100, 100, 100)); // 100,100,100のグレーのグリッドでマス目を描く
Vector2 p0{ -3,8 };
Vector2 p1{ 2,2 };
Vector2 p2{ 10,3 };
float L = 0; // 点p1から交点Qへの距離
float H = 0; // 線分p1p2と点p0の最短距離H
Vector2 nearest; // 点p0から一番近い直線p1p2上の点
Vector2 Q = MyMath::LineProjection(p0,p1,p2,L,H, nearest); // 点p0から線分p1p2に垂直に下した交点Q
mathGraph.DrawLine(p1.x, p1.y, p2.x, p2.y, GetColor(255, 255, 255)); // 線分p1p2
mathGraph.DrawLine(p1.x, p1.y, p0.x, p0.y, GetColor(150, 150, 150)); // 線分p1p0
mathGraph.DrawLine(p0.x, p0.y, nearest.x, nearest.y, GetColor(255, 255, 0)); // p0からの最短距離を描く
mathGraph.DrawLine(p1.x, p1.y, Q.x, Q.y, GetColor(0, 255, 255)); // p0からQへの距離Lを描く
mathGraph.DrawPoint(p0.x, p0.y, 3, GetColor(255, 0, 0), TRUE);
std::string p0_String = "p0=(" + std::to_string((int)p0.x) + "," + std::to_string((int)p0.y) + ")";
mathGraph.DrawString(p0.x, p0.y, p0_String.c_str(), GetColor(255, 0, 0));
mathGraph.DrawPoint(p1.x, p1.y, 3, GetColor(0, 255, 0), TRUE);
std::string p1_String = "p1=(" + std::to_string((int)p1.x) + "," + std::to_string((int)p1.y) + ")";
mathGraph.DrawString(p1.x, p1.y, p1_String.c_str(), GetColor(0, 255, 0));
mathGraph.DrawPoint(p2.x, p2.y, 3, GetColor(0, 0, 255), TRUE);
std::string p2_String = "p2=(" + std::to_string((int)p2.x) + "," + std::to_string((int)p2.y) + ")";
mathGraph.DrawString(p2.x, p2.y, p2_String.c_str(), GetColor(0, 0, 255));
mathGraph.DrawPoint(Q.x, Q.y, 3, GetColor(255, 0, 255), TRUE);
std::string Q_String = "Q=(" + std::to_string(Q.x) + "," + std::to_string(Q.y) + ")";
mathGraph.DrawString(Q.x, Q.y-5, Q_String.c_str(), GetColor(255, 0, 255));
std::string H_String = "最短距離H=" + std::to_string(H);
mathGraph.DrawString(nearest.x, nearest.y - 10, H_String.c_str(), GetColor(255, 255, 0));
std::string L_String = "L=" + std::to_string(L);
mathGraph.DrawString(Q.x, Q.y - 3, L_String.c_str(), GetColor(0, 255, 255));
ScreenFlip(); // 裏で描いておいたスクリーンを表画面にフリップ入れ替え
}
// キー入力待ちをする
WaitKey();
// DXライブラリの後始末
DxLib_End();
// ソフトの終了
return 0;
}
main.cppの数値を変更してp2側の外側の場合の最短距離も試しておきましょう。
#include "DxLib.h"
#include "Screen.h"
#include "Vector2.h"
#include "MathGraph2D.h"
#include "MyMath.h"
int WINAPI WinMain(HINSTANCE hInstance, HINSTANCE hPrevInstance, LPSTR lpCmdLine, int nCmdShow)
{
// 画面モードの設定
SetWindowSize(Screen::Width, Screen::Height);// ウィンドウサイズ960×540(こことSetGraphModeのサイズが異なると画像がゆがむ)
SetGraphMode(Screen::Width, Screen::Height, 32); // 画面サイズ960×540のカラービット数32ビットで起動
SetMainWindowText("数学のベクトルの練習");//この行でエラーになったら【設定】マルチバイト文字セットが間違ってるかも
ChangeWindowMode(TRUE);//フルスクリーン表示かウィンドウ表示か
SetAlwaysRunFlag(TRUE); // ウィンドウが非アクティブでも動作させる
// DXライブラリの初期化
if (DxLib_Init() < 0)
{
// エラーが発生したら直ちに終了
return -1;
}
SetMouseDispFlag(TRUE);// ここをFALSEにするとマウスカーソル非表示
//表示しているスクリーンの後ろで隠れて次に描く画像を先に描くモード
// これとペアでScreenFlip();でつぎのページと入れ替えでちらつきを防ぐ
SetDrawScreen(DX_SCREEN_BACK);
SetUseTransColor(FALSE); // 画像の指定色を透過する機能を無効化
ScreenFlip();
// 数学っぽくわかりやすくマス目を描いて、原点を画面の中心にして、10倍のスケールでみやすく描く
MathGraph2D mathGraph{ {Screen::Width / 2 ,Screen::Height / 2 },10.0f,{1.0f,1.0f} };
// アニメーション(パラパラ漫画)するにはWhile文
while (ProcessMessage() == 0)
{// ProcessMessage() == 0になるのは×ボタン押したときなど
ClearDrawScreen(); // 画面をまっさらにリセット
mathGraph.DrawGrid(GetColor(100, 100, 100)); // 100,100,100のグレーのグリッドでマス目を描く
Vector2 p0{ 15,8 };
Vector2 p1{ 2,2 };
Vector2 p2{ 10,3 };
float L = 0; // 点p1から交点Qへの距離
float H = 0; // 線分p1p2と点p0の最短距離H
Vector2 nearest; // 点p0から一番近い直線p1p2上の点
Vector2 Q = MyMath::LineProjection(p0,p1,p2,L,H, nearest); // 点p0から線分p1p2に垂直に下した交点Q
mathGraph.DrawLine(p1.x, p1.y, p2.x, p2.y, GetColor(255, 255, 255)); // 線分p1p2
mathGraph.DrawLine(p1.x, p1.y, p0.x, p0.y, GetColor(150, 150, 150)); // 線分p1p0
mathGraph.DrawLine(p0.x, p0.y, nearest.x, nearest.y, GetColor(255, 255, 0)); // p0からの最短距離を描く
mathGraph.DrawLine(p1.x, p1.y, Q.x, Q.y, GetColor(0, 255, 255)); // p0からQへの距離Lを描く
mathGraph.DrawPoint(p0.x, p0.y, 3, GetColor(255, 0, 0), TRUE);
std::string p0_String = "p0=(" + std::to_string((int)p0.x) + "," + std::to_string((int)p0.y) + ")";
mathGraph.DrawString(p0.x, p0.y, p0_String.c_str(), GetColor(255, 0, 0));
mathGraph.DrawPoint(p1.x, p1.y, 3, GetColor(0, 255, 0), TRUE);
std::string p1_String = "p1=(" + std::to_string((int)p1.x) + "," + std::to_string((int)p1.y) + ")";
mathGraph.DrawString(p1.x, p1.y, p1_String.c_str(), GetColor(0, 255, 0));
mathGraph.DrawPoint(p2.x, p2.y, 3, GetColor(0, 0, 255), TRUE);
std::string p2_String = "p2=(" + std::to_string((int)p2.x) + "," + std::to_string((int)p2.y) + ")";
mathGraph.DrawString(p2.x, p2.y, p2_String.c_str(), GetColor(0, 0, 255));
mathGraph.DrawPoint(Q.x, Q.y, 3, GetColor(255, 0, 255), TRUE);
std::string Q_String = "Q=(" + std::to_string(Q.x) + "," + std::to_string(Q.y) + ")";
mathGraph.DrawString(Q.x, Q.y-5, Q_String.c_str(), GetColor(255, 0, 255));
std::string H_String = "最短距離H=" + std::to_string(H);
mathGraph.DrawString(nearest.x, nearest.y - 10, H_String.c_str(), GetColor(255, 255, 0));
std::string L_String = "L=" + std::to_string(L);
mathGraph.DrawString(Q.x, Q.y - 3, L_String.c_str(), GetColor(0, 255, 255));
ScreenFlip(); // 裏で描いておいたスクリーンを表画面にフリップ入れ替え
}
// キー入力待ちをする
WaitKey();
// DXライブラリの後始末
DxLib_End();
// ソフトの終了
return 0;
}
MyMath.hを変更して線分line0と線分line1が交差するかを求める関数LineIntersection(判定のみ ver.)を追加してみましょう。#ifndef MYMATH_H_
#define MYMATH_H_
#include "Vector2.h" // 線との当たり判定にVector2を使う
#include <cmath>
// 数学関連クラス
class MyMath
{
public:
static const float Sqrt2; // = 1.41421356237f; // √2
static const float PI; // = 3.14159265359f; // 円周率
static const float Deg2Rad; // = PI / 180f; // 度からラジアンに変換する定数
/// <summary>
/// 円と円が重なっているかを調べる
/// </summary>
/// <param name="pc1">円1の中心pc1</param>
/// <param name="radius1">円1の半径</param>
/// <param name="pc2">円2の中心pc2</param>
/// <param name="radius2">円2の半径</param>
/// <returns>重なっていればtrue、重なっていなければfalseを返却する</returns>
static bool CircleCircleIntersection(
Vector2 pc1, float radius1,
Vector2 pc2, float radius2)
{
return (pc1 - pc2).sqrMagnitude() < ((radius1 + radius2) * (radius1 + radius2));
}
/// <summary>
/// 円と線が重なっているかを調べる
/// </summary>
/// <param name="pc">円の中心</param>
/// <param name="r">円の半径</param>
/// <param name="p1">線の端p1</param>
/// <param name="p2">線の端p2</param>
/// <returns>重なっていればtrue、重なっていなければfalseを返却する</returns>
static bool CircleSegment(Vector2 pc, float r, Vector2 p1, Vector2 p2)
{
Vector2 v12 = p2 - p1; // 線p1p2の始点p1から終点p2へ向かうベクトル
Vector2 v1 = pc - p1; // 点p1から円の中心pcへ向かうベクトル
Vector2 v2 = pc - p2; // 点p2から円の中心pcへ向かうベクトル
Vector2 ev12 = v12.normalized(); // 単位ベクトル 線p1p2のp1からp2へ向かう単位ベクトル
float L; // 円と線の距離
//円の中心pcが線p1p2の外側にあるかの判定のため内積を計算して線の外側の場合を考慮する
if (dot(v12, v1) < 0) //点pcが線p1p2の外側にあるときは 内積 < 0
L = v1.magnitude(); //点pcと直線p1p2の距離は単なる直線距離でいい
else if (dot(-v1, v2) < 0) //点pcが線p1p2の外側にあるときは 内積 < 0
L = v2.magnitude(); //点pcと直線p1p2の距離は単なる直線距離でいい
else //外積を求めれば点pcと直線p1_p2の距離Lが求まる
L = std::abs(cross(ev12, v1)); // |外積| (外積の絶対値をabsで求める)
if (L < r) //衝突条件 L < r(L <= rにするかは地面から丁度半径r離れた位置で触れていると判定したいか次第)
return true;
else
return false;
}
/// <summary>
/// 円と線が重なっているかを調べる
/// </summary>
/// <param name="pc">円の中心</param>
/// <param name="r">円の半径</param>
/// <param name="p1">線の端p1</param>
/// <param name="p2">線の端p2</param>
/// <returns>押し戻しした円の中心の点</returns>
static Vector2 CircleBound(Vector2 pc, float r, Vector2 p1, Vector2 p2)
{
Vector2 v12 = p2 - p1; // 線p1p2の始点p1から終点p2へ向かうベクトル
Vector2 v1 = pc - p1; // 点p1から円の中心pcへ向かうベクトル
Vector2 v2 = pc - p2; // 点p2から円の中心pcへ向かうベクトル
Vector2 ev12 = v12.normalized(); // 単位ベクトル 線p1p2のp1からp2へ向かう単位ベクトル
//円の中心pcが線p1p2の外側にあるかの判定のため内積を計算して線の外側の場合を考慮する
if (dot(v12, v1) < 0) //点pcが線p1p2の外側にあるときは 内積 < 0
return p1 + v1.normalized() * (r + 0.001f); // 半径よりちょっとだけ0.001f離れた位置まで押し戻す
else if (dot(-v1, v2) < 0) //点p0が線p1p2の外側にあるときは 内積 < 0
return p2 + v2.normalized() * (r + 0.001f); // 半径よりちょっとだけ0.001f離れた位置まで押し戻す
else //外積を求めれば点pcと直線p1_p2の距離Lが求まる
{
float L = dot(ev12, v1); // 内積で点p1から交点Qまでの距離を求める
Vector2 Q = p1 + L * ev12; // 円と線の衝突点Q
Vector2 e = (pc - Q).normalized(); // 跳ね返り方向のの半径1の単位ベクトル
return Q + e * (r + 0.001f); // 押し戻し処理
}
}
/// <summary>
/// 斜面a(線p1→p2),線b(p1→p0)のとき斜面a上に点p0から垂直に下した射影点(点Q)の位置とp0からQへの長さLとp0と線aとの距離Hを求める
/// </summary>
/// <param name="p0">線bの先っぽp0</param>
/// <param name="p1">aとbの起点p1</param>
/// <param name="p2">斜面aの端p2</param>
/// <param name="L">p1からQまでの距離</param>
/// <param name="H">p0と直線p1p2の距離(= 高さ[線の内側]か端っこの点からの半径[線の外側])</param>
/// <returns>線aに線bから下した交点Q</returns>
static Vector2 LineProjection(Vector2 p0, Vector2 p1, Vector2 p2, float& L, float& H, Vector2& nearest)
{
// ベクトルaとベクトルbを求める。ただマイナスするだけ。
Vector2 a = p2 - p1;
Vector2 b = p0 - p1;
Vector2 c = p0 - p2; // p2→p0のベクトル
// 正規化ベクトルを求める
Vector2 ea = a.normalized(); // a / |a|
bool isOutside = false; // p0が線の外側か?
//点p0が線p1p2の外側にあるかの判定のため内積を計算して線の外側の場合を考慮する
if (dot(a, b) < 0) // 点p0が線p1p2の外側にあるときは 内積 < 0
{
H = b.magnitude(); // 点p0と直線p1p2の距離は単なるベクトルbの直線距離でいい
nearest = p1; // 一番近い点はp1
isOutside = true; // p1側の外側
}
else if (dot(-a, c) < 0) // 点p0が線p1p2の外側にあるときは 内積 < 0
{
H = c.magnitude(); // 点p0と直線p1p2の距離は単なるベクトルcの直線距離でいい
nearest = p2; // 一番近い点はp2
isOutside = true; // p2側の外側
}
else
{ // 外積を求めれば点p0と直線p1_p2の距離Lが求まる
Vector2 ea_cross_b = cross(ea, b);
H = ea_cross_b.magnitude();
}
L = dot(ea, b); // 長さLは内積で求まる
Vector2 resultQ = p1 + L * ea;
if (!isOutside)
nearest = resultQ; // 一番近い点はQ
return resultQ;
}
/// <summary>
/// 線line0と線line1が重なっているかを調べる
/// </summary>
/// <param name="line0start">線line0の始点</param>
/// <param name="line0end">線line0の終点</param>
/// <param name="line1start">線line1の始点</param>
/// <param name="line1end">線line1の終点</param>
/// <returns>線line0と線line1が交差しているならtrue,してないならfalse</returns>
static bool LineIntersection(Vector2 line0start, Vector2 line0end, Vector2 line1start, Vector2 line1end)
{
Vector2 v0 = line0end - line0start; // line0の始点startから終点endへのベクトル
Vector2 v1 = line1end - line1start; // line1の始点startから終点endへのベクトル
Vector2 v01 = line1start - line0start; // line0の始点からline1の始点へのベクトル 0start→1start
float t1 = cross(v01, v0) / cross(v0, v1);
float t0 = cross(v01, v1) / cross(v0, v1);
// 線分line0と線分line1が【交差しているか判定】
if (0 < t1 && t1 < 1 && 0 < t0 && t0 < 1) return true; //【交差している】
return false; // 線分line0と線分line1は【交差していない】
}
};
#endif

main.cppがちらかってきたので一旦、今まで書いてきたVector関連のコードを消してから今回のコードを入れま しょう。
#include "DxLib.h"
#include "Screen.h"
#include "Vector2.h"
#include "MathGraph2D.h"
#include "MyMath.h"
int WINAPI WinMain(HINSTANCE hInstance, HINSTANCE hPrevInstance, LPSTR lpCmdLine, int nCmdShow)
{
// 画面モードの設定
SetWindowSize(Screen::Width, Screen::Height);// ウィンドウサイズ960×540(こことSetGraphModeのサイズが異なると画像がゆがむ)
SetGraphMode(Screen::Width, Screen::Height, 32); // 画面サイズ960×540のカラービット数32ビットで起動
SetMainWindowText("数学のベクトルの練習");//この行でエラーになったら【設定】マルチバイト文字セットが間違ってるかも
ChangeWindowMode(TRUE);//フルスクリーン表示かウィンドウ表示か
SetAlwaysRunFlag(TRUE); // ウィンドウが非アクティブでも動作させる
// DXライブラリの初期化
if (DxLib_Init() < 0)
{
// エラーが発生したら直ちに終了
return -1;
}
SetMouseDispFlag(TRUE);// ここをFALSEにするとマウスカーソル非表示
//表示しているスクリーンの後ろで隠れて次に描く画像を先に描くモード
// これとペアでScreenFlip();でつぎのページと入れ替えでちらつきを防ぐ
SetDrawScreen(DX_SCREEN_BACK);
SetUseTransColor(FALSE); // 画像の指定色を透過する機能を無効化
ScreenFlip();
// 数学っぽくわかりやすくマス目を描いて、原点を画面の中心にして、10倍のスケールでみやすく描く
MathGraph2D mathGraph{ {Screen::Width / 2 ,Screen::Height / 2 },10.0f,{1.0f,1.0f} };
// アニメーション(パラパラ漫画)するにはWhile文
while (ProcessMessage() == 0)
{// ProcessMessage() == 0になるのは×ボタン押したときなど
ClearDrawScreen(); // 画面をまっさらにリセット
mathGraph.DrawGrid(GetColor(100, 100, 100)); // 100,100,100のグレーのグリッドでマス目を描く
Vector2 p0{ 15,8 };
Vector2 p1{ 2,2 };
Vector2 p2{ 10,3 };
float L = 0; // 点p1から交点Qへの距離
float H = 0; // 線分p1p2と点p0の最短距離H
Vector2 nearest; // 点p0から一番近い直線p1p2上の点
Vector2 Q = MyMath::LineProjection(p0,p1,p2,L,H, nearest); // 点p0から線分p1p2に垂直に下した交点Q
mathGraph.DrawLine(p1.x, p1.y, p2.x, p2.y, GetColor(255, 255, 255)); // 線分p1p2
mathGraph.DrawLine(p1.x, p1.y, p0.x, p0.y, GetColor(150, 150, 150)); // 線分p1p0
mathGraph.DrawLine(p0.x, p0.y, nearest.x, nearest.y, GetColor(255, 255, 0)); // p0からの最短距離を描く
mathGraph.DrawLine(p1.x, p1.y, Q.x, Q.y, GetColor(0, 255, 255)); // p0からQへの距離Lを描く
mathGraph.DrawPoint(p0.x, p0.y, 3, GetColor(255, 0, 0), TRUE);
std::string p0_String = "p0=(" + std::to_string((int)p0.x) + "," + std::to_string((int)p0.y) + ")";
mathGraph.DrawString(p0.x, p0.y, p0_String.c_str(), GetColor(255, 0, 0));
mathGraph.DrawPoint(p1.x, p1.y, 3, GetColor(0, 255, 0), TRUE);
std::string p1_String = "p1=(" + std::to_string((int)p1.x) + "," + std::to_string((int)p1.y) + ")";
mathGraph.DrawString(p1.x, p1.y, p1_String.c_str(), GetColor(0, 255, 0));
mathGraph.DrawPoint(p2.x, p2.y, 3, GetColor(0, 0, 255), TRUE);
std::string p2_String = "p2=(" + std::to_string((int)p2.x) + "," + std::to_string((int)p2.y) + ")";
mathGraph.DrawString(p2.x, p2.y, p2_String.c_str(), GetColor(0, 0, 255));
mathGraph.DrawPoint(Q.x, Q.y, 3, GetColor(255, 0, 255), TRUE);
std::string Q_String = "Q=(" + std::to_string(Q.x) + "," + std::to_string(Q.y) + ")";
mathGraph.DrawString(Q.x, Q.y-5, Q_String.c_str(), GetColor(255, 0, 255));
std::string H_String = "最短距離H=" + std::to_string(H);
mathGraph.DrawString(nearest.x, nearest.y - 10, H_String.c_str(), GetColor(255, 255, 0));
std::string L_String = "L=" + std::to_string(L);
mathGraph.DrawString(Q.x, Q.y - 3, L_String.c_str(), GetColor(0, 255, 255));
ScreenFlip(); // 裏で描いておいたスクリーンを表画面にフリップ入れ替え
}
// キー入力待ちをする
WaitKey();
// DXライブラリの後始末
DxLib_End();
// ソフトの終了
return 0;
}
main.cppを変更してMyMath::LineIntersectionで線分line0と線分line1が交差する かの判定を追加してみます。
#include "DxLib.h"
#include "Screen.h"
#include "Vector2.h"
#include "MathGraph2D.h"
#include "MyMath.h"
int WINAPI WinMain(HINSTANCE hInstance, HINSTANCE hPrevInstance, LPSTR lpCmdLine, int nCmdShow)
{
// 画面モードの設定
SetWindowSize(Screen::Width, Screen::Height);// ウィンドウサイズ960×540(こことSetGraphModeのサイズが異なると画像がゆがむ)
SetGraphMode(Screen::Width, Screen::Height, 32); // 画面サイズ960×540のカラービット数32ビットで起動
SetMainWindowText("数学のベクトルの練習");//この行でエラーになったら【設定】マルチバイト文字セットが間違ってるかも
ChangeWindowMode(TRUE);//フルスクリーン表示かウィンドウ表示か
SetAlwaysRunFlag(TRUE); // ウィンドウが非アクティブでも動作させる
// DXライブラリの初期化
if (DxLib_Init() < 0)
{
// エラーが発生したら直ちに終了
return -1;
}
SetMouseDispFlag(TRUE);// ここをFALSEにするとマウスカーソル非表示
//表示しているスクリーンの後ろで隠れて次に描く画像を先に描くモード
// これとペアでScreenFlip();でつぎのページと入れ替えでちらつきを防ぐ
SetDrawScreen(DX_SCREEN_BACK);
SetUseTransColor(FALSE); // 画像の指定色を透過する機能を無効化
ScreenFlip();
// 数学っぽくわかりやすくマス目を描いて、原点を画面の中心にして、10倍のスケールでみやすく描く
MathGraph2D mathGraph{ {Screen::Width / 2 ,Screen::Height / 2 },10.0f,{1.0f,1.0f} };
// アニメーション(パラパラ漫画)するにはWhile文
while (ProcessMessage() == 0)
{// ProcessMessage() == 0になるのは×ボタン押したときなど
ClearDrawScreen(); // 画面をまっさらにリセット
mathGraph.DrawGrid(GetColor(100, 100, 100)); // 100,100,100のグレーのグリッドでマス目を描く
// 線分line0
Vector2 p0{ 5,5 };
Vector2 p1{ 15,11 };
// 線分line1
Vector2 p2{ 5,10 };
Vector2 p3{ 15,6 };
bool isCollision01 = MyMath::LineIntersection(p0, p1, p2, p3);
mathGraph.DrawArrow(p0.x, p0.y, 0, 0, p1.x, p1.y, 0.8f, 1.0f, (isCollision01) ? GetColor(255, 0, 0) : GetColor(255, 255, 255)); // 線分line0
mathGraph.DrawArrow(p2.x, p2.y, 0, 0, p3.x, p3.y, 0.8f, 1.0f, (isCollision01) ? GetColor(255, 0, 0) : GetColor(255, 255, 255)); // 線分line1
mathGraph.DrawPoint(p0.x, p0.y, 3, GetColor(255, 0, 0), TRUE);
std::string p0_String = "p0=(" + std::to_string((int)p0.x) + "," + std::to_string((int)p0.y) + ")";
mathGraph.DrawString(p0.x, p0.y, p0_String.c_str(), GetColor(255, 0, 0));
mathGraph.DrawPoint(p1.x, p1.y, 3, GetColor(0, 255, 0), TRUE);
std::string p1_String = "p1=(" + std::to_string((int)p1.x) + "," + std::to_string((int)p1.y) + ")";
mathGraph.DrawString(p1.x, p1.y, p1_String.c_str(), GetColor(0, 255, 0));
mathGraph.DrawPoint(p2.x, p2.y, 3, GetColor(0, 0, 255), TRUE);
std::string p2_String = "p2=(" + std::to_string((int)p2.x) + "," + std::to_string((int)p2.y) + ")";
mathGraph.DrawString(p2.x, p2.y, p2_String.c_str(), GetColor(0, 0, 255));
mathGraph.DrawPoint(p3.x, p3.y, 3, GetColor(0, 255, 255), TRUE);
std::string p3_String = "p3=(" + std::to_string((int)p3.x) + "," + std::to_string((int)p3.y) + ")";
mathGraph.DrawString(p3.x, p3.y, p3_String.c_str(), GetColor(0, 255, 255));
ScreenFlip(); // 裏で描いておいたスクリーンを表画面にフリップ入れ替え
}
// キー入力待ちをする
WaitKey();
// DXライブラリの後始末
DxLib_End();
// ソフトの終了
return 0;
}
main.cppの点p1の位置を変更して線分line0と線分line1が交差しない場合(t0 < 0)の判定を試してみます。
#include "DxLib.h"
#include "Screen.h"
#include "Vector2.h"
#include "MathGraph2D.h"
#include "MyMath.h"
int WINAPI WinMain(HINSTANCE hInstance, HINSTANCE hPrevInstance, LPSTR lpCmdLine, int nCmdShow)
{
// 画面モードの設定
SetWindowSize(Screen::Width, Screen::Height);// ウィンドウサイズ960×540(こことSetGraphModeのサイズが異なると画像がゆがむ)
SetGraphMode(Screen::Width, Screen::Height, 32); // 画面サイズ960×540のカラービット数32ビットで起動
SetMainWindowText("数学のベクトルの練習");//この行でエラーになったら【設定】マルチバイト文字セットが間違ってるかも
ChangeWindowMode(TRUE);//フルスクリーン表示かウィンドウ表示か
SetAlwaysRunFlag(TRUE); // ウィンドウが非アクティブでも動作させる
// DXライブラリの初期化
if (DxLib_Init() < 0)
{
// エラーが発生したら直ちに終了
return -1;
}
SetMouseDispFlag(TRUE);// ここをFALSEにするとマウスカーソル非表示
//表示しているスクリーンの後ろで隠れて次に描く画像を先に描くモード
// これとペアでScreenFlip();でつぎのページと入れ替えでちらつきを防ぐ
SetDrawScreen(DX_SCREEN_BACK);
SetUseTransColor(FALSE); // 画像の指定色を透過する機能を無効化
ScreenFlip();
// 数学っぽくわかりやすくマス目を描いて、原点を画面の中心にして、10倍のスケールでみやすく描く
MathGraph2D mathGraph{ {Screen::Width / 2 ,Screen::Height / 2 },10.0f,{1.0f,1.0f} };
// アニメーション(パラパラ漫画)するにはWhile文
while (ProcessMessage() == 0)
{// ProcessMessage() == 0になるのは×ボタン押したときなど
ClearDrawScreen(); // 画面をまっさらにリセット
mathGraph.DrawGrid(GetColor(100, 100, 100)); // 100,100,100のグレーのグリッドでマス目を描く
// 線分line0
Vector2 p0{ 11,9 };
Vector2 p1{ 15,11 };
// 線分line1
Vector2 p2{ 5,10 };
Vector2 p3{ 15,6 };
bool isCollision01 = MyMath::LineIntersection(p0, p1, p2, p3);
mathGraph.DrawArrow(p0.x, p0.y, 0, 0, p1.x, p1.y, 0.8f, 1.0f, (isCollision01) ? GetColor(255, 0, 0) : GetColor(255, 255, 255)); // 線分line0
mathGraph.DrawArrow(p2.x, p2.y, 0, 0, p3.x, p3.y, 0.8f, 1.0f, (isCollision01) ? GetColor(255, 0, 0) : GetColor(255, 255, 255)); // 線分line1
mathGraph.DrawPoint(p0.x, p0.y, 3, GetColor(255, 0, 0), TRUE);
std::string p0_String = "p0=(" + std::to_string((int)p0.x) + "," + std::to_string((int)p0.y) + ")";
mathGraph.DrawString(p0.x, p0.y, p0_String.c_str(), GetColor(255, 0, 0));
mathGraph.DrawPoint(p1.x, p1.y, 3, GetColor(0, 255, 0), TRUE);
std::string p1_String = "p1=(" + std::to_string((int)p1.x) + "," + std::to_string((int)p1.y) + ")";
mathGraph.DrawString(p1.x, p1.y, p1_String.c_str(), GetColor(0, 255, 0));
mathGraph.DrawPoint(p2.x, p2.y, 3, GetColor(0, 0, 255), TRUE);
std::string p2_String = "p2=(" + std::to_string((int)p2.x) + "," + std::to_string((int)p2.y) + ")";
mathGraph.DrawString(p2.x, p2.y, p2_String.c_str(), GetColor(0, 0, 255));
mathGraph.DrawPoint(p3.x, p3.y, 3, GetColor(0, 255, 255), TRUE);
std::string p3_String = "p3=(" + std::to_string((int)p3.x) + "," + std::to_string((int)p3.y) + ")";
mathGraph.DrawString(p3.x, p3.y, p3_String.c_str(), GetColor(0, 255, 255));
ScreenFlip(); // 裏で描いておいたスクリーンを表画面にフリップ入れ替え
}
// キー入力待ちをする
WaitKey();
// DXライブラリの後始末
DxLib_End();
// ソフトの終了
return 0;
}
main.cppの点p1の位置を変更して線分line0と線分line1が交差しない場合(1 < t0)の判定を試してみます。
#include "DxLib.h"
#include "Screen.h"
#include "Vector2.h"
#include "MathGraph2D.h"
#include "MyMath.h"
int WINAPI WinMain(HINSTANCE hInstance, HINSTANCE hPrevInstance, LPSTR lpCmdLine, int nCmdShow)
{
// 画面モードの設定
SetWindowSize(Screen::Width, Screen::Height);// ウィンドウサイズ960×540(こことSetGraphModeのサイズが異なると画像がゆがむ)
SetGraphMode(Screen::Width, Screen::Height, 32); // 画面サイズ960×540のカラービット数32ビットで起動
SetMainWindowText("数学のベクトルの練習");//この行でエラーになったら【設定】マルチバイト文字セットが間違ってるかも
ChangeWindowMode(TRUE);//フルスクリーン表示かウィンドウ表示か
SetAlwaysRunFlag(TRUE); // ウィンドウが非アクティブでも動作させる
// DXライブラリの初期化
if (DxLib_Init() < 0)
{
// エラーが発生したら直ちに終了
return -1;
}
SetMouseDispFlag(TRUE);// ここをFALSEにするとマウスカーソル非表示
//表示しているスクリーンの後ろで隠れて次に描く画像を先に描くモード
// これとペアでScreenFlip();でつぎのページと入れ替えでちらつきを防ぐ
SetDrawScreen(DX_SCREEN_BACK);
SetUseTransColor(FALSE); // 画像の指定色を透過する機能を無効化
ScreenFlip();
// 数学っぽくわかりやすくマス目を描いて、原点を画面の中心にして、10倍のスケールでみやすく描く
MathGraph2D mathGraph{ {Screen::Width / 2 ,Screen::Height / 2 },10.0f,{1.0f,1.0f} };
// アニメーション(パラパラ漫画)するにはWhile文
while (ProcessMessage() == 0)
{// ProcessMessage() == 0になるのは×ボタン押したときなど
ClearDrawScreen(); // 画面をまっさらにリセット
mathGraph.DrawGrid(GetColor(100, 100, 100)); // 100,100,100のグレーのグリッドでマス目を描く
// 線分line0
Vector2 p0{ 5,5 };
Vector2 p1{ 9,7 };
// 線分line1
Vector2 p2{ 5,10 };
Vector2 p3{ 15,6 };
bool isCollision01 = MyMath::LineIntersection(p0, p1, p2, p3);
mathGraph.DrawArrow(p0.x, p0.y, 0, 0, p1.x, p1.y, 0.8f, 1.0f, (isCollision01) ? GetColor(255, 0, 0) : GetColor(255, 255, 255)); // 線分line0
mathGraph.DrawArrow(p2.x, p2.y, 0, 0, p3.x, p3.y, 0.8f, 1.0f, (isCollision01) ? GetColor(255, 0, 0) : GetColor(255, 255, 255)); // 線分line1
mathGraph.DrawPoint(p0.x, p0.y, 3, GetColor(255, 0, 0), TRUE);
std::string p0_String = "p0=(" + std::to_string((int)p0.x) + "," + std::to_string((int)p0.y) + ")";
mathGraph.DrawString(p0.x, p0.y, p0_String.c_str(), GetColor(255, 0, 0));
mathGraph.DrawPoint(p1.x, p1.y, 3, GetColor(0, 255, 0), TRUE);
std::string p1_String = "p1=(" + std::to_string((int)p1.x) + "," + std::to_string((int)p1.y) + ")";
mathGraph.DrawString(p1.x, p1.y, p1_String.c_str(), GetColor(0, 255, 0));
mathGraph.DrawPoint(p2.x, p2.y, 3, GetColor(0, 0, 255), TRUE);
std::string p2_String = "p2=(" + std::to_string((int)p2.x) + "," + std::to_string((int)p2.y) + ")";
mathGraph.DrawString(p2.x, p2.y, p2_String.c_str(), GetColor(0, 0, 255));
mathGraph.DrawPoint(p3.x, p3.y, 3, GetColor(0, 255, 255), TRUE);
std::string p3_String = "p3=(" + std::to_string((int)p3.x) + "," + std::to_string((int)p3.y) + ")";
mathGraph.DrawString(p3.x, p3.y, p3_String.c_str(), GetColor(0, 255, 255));
ScreenFlip(); // 裏で描いておいたスクリーンを表画面にフリップ入れ替え
}
// キー入力待ちをする
WaitKey();
// DXライブラリの後始末
DxLib_End();
// ソフトの終了
return 0;
}
main.cppの点p1の位置を変更して線分line0と線分line1が交差しない場合(t1 < 0)の判定を試してみます。
#include "DxLib.h"
#include "Screen.h"
#include "Vector2.h"
#include "MathGraph2D.h"
#include "MyMath.h"
int WINAPI WinMain(HINSTANCE hInstance, HINSTANCE hPrevInstance, LPSTR lpCmdLine, int nCmdShow)
{
// 画面モードの設定
SetWindowSize(Screen::Width, Screen::Height);// ウィンドウサイズ960×540(こことSetGraphModeのサイズが異なると画像がゆがむ)
SetGraphMode(Screen::Width, Screen::Height, 32); // 画面サイズ960×540のカラービット数32ビットで起動
SetMainWindowText("数学のベクトルの練習");//この行でエラーになったら【設定】マルチバイト文字セットが間違ってるかも
ChangeWindowMode(TRUE);//フルスクリーン表示かウィンドウ表示か
SetAlwaysRunFlag(TRUE); // ウィンドウが非アクティブでも動作させる
// DXライブラリの初期化
if (DxLib_Init() < 0)
{
// エラーが発生したら直ちに終了
return -1;
}
SetMouseDispFlag(TRUE);// ここをFALSEにするとマウスカーソル非表示
//表示しているスクリーンの後ろで隠れて次に描く画像を先に描くモード
// これとペアでScreenFlip();でつぎのページと入れ替えでちらつきを防ぐ
SetDrawScreen(DX_SCREEN_BACK);
SetUseTransColor(FALSE); // 画像の指定色を透過する機能を無効化
ScreenFlip();
// 数学っぽくわかりやすくマス目を描いて、原点を画面の中心にして、10倍のスケールでみやすく描く
MathGraph2D mathGraph{ {Screen::Width / 2 ,Screen::Height / 2 },10.0f,{1.0f,1.0f} };
// アニメーション(パラパラ漫画)するにはWhile文
while (ProcessMessage() == 0)
{// ProcessMessage() == 0になるのは×ボタン押したときなど
ClearDrawScreen(); // 画面をまっさらにリセット
mathGraph.DrawGrid(GetColor(100, 100, 100)); // 100,100,100のグレーのグリッドでマス目を描く
// 線分line0
Vector2 p0{ 5,5 };
Vector2 p1{ 15,11 };
// 線分line1
Vector2 p2{ 12,8 };
Vector2 p3{ 15,6 };
bool isCollision01 = MyMath::LineIntersection(p0, p1, p2, p3);
mathGraph.DrawArrow(p0.x, p0.y, 0, 0, p1.x, p1.y, 0.8f, 1.0f, (isCollision01) ? GetColor(255, 0, 0) : GetColor(255, 255, 255)); // 線分line0
mathGraph.DrawArrow(p2.x, p2.y, 0, 0, p3.x, p3.y, 0.8f, 1.0f, (isCollision01) ? GetColor(255, 0, 0) : GetColor(255, 255, 255)); // 線分line1
mathGraph.DrawPoint(p0.x, p0.y, 3, GetColor(255, 0, 0), TRUE);
std::string p0_String = "p0=(" + std::to_string((int)p0.x) + "," + std::to_string((int)p0.y) + ")";
mathGraph.DrawString(p0.x, p0.y, p0_String.c_str(), GetColor(255, 0, 0));
mathGraph.DrawPoint(p1.x, p1.y, 3, GetColor(0, 255, 0), TRUE);
std::string p1_String = "p1=(" + std::to_string((int)p1.x) + "," + std::to_string((int)p1.y) + ")";
mathGraph.DrawString(p1.x, p1.y, p1_String.c_str(), GetColor(0, 255, 0));
mathGraph.DrawPoint(p2.x, p2.y, 3, GetColor(0, 0, 255), TRUE);
std::string p2_String = "p2=(" + std::to_string((int)p2.x) + "," + std::to_string((int)p2.y) + ")";
mathGraph.DrawString(p2.x, p2.y, p2_String.c_str(), GetColor(0, 0, 255));
mathGraph.DrawPoint(p3.x, p3.y, 3, GetColor(0, 255, 255), TRUE);
std::string p3_String = "p3=(" + std::to_string((int)p3.x) + "," + std::to_string((int)p3.y) + ")";
mathGraph.DrawString(p3.x, p3.y, p3_String.c_str(), GetColor(0, 255, 255));
ScreenFlip(); // 裏で描いておいたスクリーンを表画面にフリップ入れ替え
}
// キー入力待ちをする
WaitKey();
// DXライブラリの後始末
DxLib_End();
// ソフトの終了
return 0;
}
main.cppの点p1の位置を変更して線分line0と線分line1が交差しない場合(1 < t1)の判定を試してみます。
#include "DxLib.h"
#include "Screen.h"
#include "Vector2.h"
#include "MathGraph2D.h"
#include "MyMath.h"
int WINAPI WinMain(HINSTANCE hInstance, HINSTANCE hPrevInstance, LPSTR lpCmdLine, int nCmdShow)
{
// 画面モードの設定
SetWindowSize(Screen::Width, Screen::Height);// ウィンドウサイズ960×540(こことSetGraphModeのサイズが異なると画像がゆがむ)
SetGraphMode(Screen::Width, Screen::Height, 32); // 画面サイズ960×540のカラービット数32ビットで起動
SetMainWindowText("数学のベクトルの練習");//この行でエラーになったら【設定】マルチバイト文字セットが間違ってるかも
ChangeWindowMode(TRUE);//フルスクリーン表示かウィンドウ表示か
SetAlwaysRunFlag(TRUE); // ウィンドウが非アクティブでも動作させる
// DXライブラリの初期化
if (DxLib_Init() < 0)
{
// エラーが発生したら直ちに終了
return -1;
}
SetMouseDispFlag(TRUE);// ここをFALSEにするとマウスカーソル非表示
//表示しているスクリーンの後ろで隠れて次に描く画像を先に描くモード
// これとペアでScreenFlip();でつぎのページと入れ替えでちらつきを防ぐ
SetDrawScreen(DX_SCREEN_BACK);
SetUseTransColor(FALSE); // 画像の指定色を透過する機能を無効化
ScreenFlip();
// 数学っぽくわかりやすくマス目を描いて、原点を画面の中心にして、10倍のスケールでみやすく描く
MathGraph2D mathGraph{ {Screen::Width / 2 ,Screen::Height / 2 },10.0f,{1.0f,1.0f} };
// アニメーション(パラパラ漫画)するにはWhile文
while (ProcessMessage() == 0)
{// ProcessMessage() == 0になるのは×ボタン押したときなど
ClearDrawScreen(); // 画面をまっさらにリセット
mathGraph.DrawGrid(GetColor(100, 100, 100)); // 100,100,100のグレーのグリッドでマス目を描く
// 線分line0
Vector2 p0{ 5,5 };
Vector2 p1{ 15,11 };
// 線分line1
Vector2 p2{ 5,10 };
Vector2 p3{ 9,9 };
bool isCollision01 = MyMath::LineIntersection(p0, p1, p2, p3);
mathGraph.DrawArrow(p0.x, p0.y, 0, 0, p1.x, p1.y, 0.8f, 1.0f, (isCollision01) ? GetColor(255, 0, 0) : GetColor(255, 255, 255)); // 線分line0
mathGraph.DrawArrow(p2.x, p2.y, 0, 0, p3.x, p3.y, 0.8f, 1.0f, (isCollision01) ? GetColor(255, 0, 0) : GetColor(255, 255, 255)); // 線分line1
mathGraph.DrawPoint(p0.x, p0.y, 3, GetColor(255, 0, 0), TRUE);
std::string p0_String = "p0=(" + std::to_string((int)p0.x) + "," + std::to_string((int)p0.y) + ")";
mathGraph.DrawString(p0.x, p0.y, p0_String.c_str(), GetColor(255, 0, 0));
mathGraph.DrawPoint(p1.x, p1.y, 3, GetColor(0, 255, 0), TRUE);
std::string p1_String = "p1=(" + std::to_string((int)p1.x) + "," + std::to_string((int)p1.y) + ")";
mathGraph.DrawString(p1.x, p1.y, p1_String.c_str(), GetColor(0, 255, 0));
mathGraph.DrawPoint(p2.x, p2.y, 3, GetColor(0, 0, 255), TRUE);
std::string p2_String = "p2=(" + std::to_string((int)p2.x) + "," + std::to_string((int)p2.y) + ")";
mathGraph.DrawString(p2.x, p2.y, p2_String.c_str(), GetColor(0, 0, 255));
mathGraph.DrawPoint(p3.x, p3.y, 3, GetColor(0, 255, 255), TRUE);
std::string p3_String = "p3=(" + std::to_string((int)p3.x) + "," + std::to_string((int)p3.y) + ")";
mathGraph.DrawString(p3.x, p3.y, p3_String.c_str(), GetColor(0, 255, 255));
ScreenFlip(); // 裏で描いておいたスクリーンを表画面にフリップ入れ替え
}
// キー入力待ちをする
WaitKey();
// DXライブラリの後始末
DxLib_End();
// ソフトの終了
return 0;
}
MyMath.hを変更して光線ray0と線分line1が交差するかを求める関数RayLineCollision(判定のみ ver.)を追加してみましょう。#ifndef MYMATH_H_
#define MYMATH_H_
#include "Vector2.h" // 線との当たり判定にVector2を使う
#include <cmath>
// 数学関連クラス
class MyMath
{
public:
static const float Sqrt2; // = 1.41421356237f; // √2
static const float PI; // = 3.14159265359f; // 円周率
static const float Deg2Rad; // = PI / 180f; // 度からラジアンに変換する定数
(中略).....
/// <summary>
/// 光線ray0と線line1が重なっているかを調べる
/// </summary>
/// <param name="ray0start">光線ray0の始点</param>
/// <param name="ray0dir">光線ray0の方向ベクトル</param>
/// <param name="line1start">線line1の始点</param>
/// <param name="line1end">線line1の終点</param>
/// <returns>光線ray0と線line1が交差しているならtrue,してないならfalse</returns>
static bool RayLineCollision(Vector2 ray0start, Vector2 ray0dir, Vector2 line1start, Vector2 line1end)
{
Vector2 v0 = ray0dir; // 光線ray0のベクトル
Vector2 v1 = line1end - line1start; // line1の始点startから終点endへのベクトル
Vector2 v01 = line1start - ray0start; // line0の始点からline1の始点へのベクトル 0start→1start
float t1 = cross(v01, v0) / cross(v0, v1);
float t0 = cross(v01, v1) / cross(v0, v1);
// 光線ray0と線分line1が【交差しているか判定】
if (0 < t1 && t1 < 1 && 0 < t0) return true; //【交差している】
return false; // 光線ray0と線分line1は【交差していない】
}
};
#endif
main.cppの点p0をray0posに、点p1の代わりにレイ光線の方向ray0dirに変更して、線分line1と交差するかの判定を試してみます。
#include "DxLib.h"
#include "Screen.h"
#include "Vector2.h"
#include "MathGraph2D.h"
#include "MyMath.h"
int WINAPI WinMain(HINSTANCE hInstance, HINSTANCE hPrevInstance, LPSTR lpCmdLine, int nCmdShow)
{
// 画面モードの設定
SetWindowSize(Screen::Width, Screen::Height);// ウィンドウサイズ960×540(こことSetGraphModeのサイズが異なると画像がゆがむ)
SetGraphMode(Screen::Width, Screen::Height, 32); // 画面サイズ960×540のカラービット数32ビットで起動
SetMainWindowText("数学のベクトルの練習");//この行でエラーになったら【設定】マルチバイト文字セットが間違ってるかも
ChangeWindowMode(TRUE);//フルスクリーン表示かウィンドウ表示か
SetAlwaysRunFlag(TRUE); // ウィンドウが非アクティブでも動作させる
// DXライブラリの初期化
if (DxLib_Init() < 0)
{
// エラーが発生したら直ちに終了
return -1;
}
SetMouseDispFlag(TRUE);// ここをFALSEにするとマウスカーソル非表示
//表示しているスクリーンの後ろで隠れて次に描く画像を先に描くモード
// これとペアでScreenFlip();でつぎのページと入れ替えでちらつきを防ぐ
SetDrawScreen(DX_SCREEN_BACK);
SetUseTransColor(FALSE); // 画像の指定色を透過する機能を無効化
ScreenFlip();
// 数学っぽくわかりやすくマス目を描いて、原点を画面の中心にして、10倍のスケールでみやすく描く
MathGraph2D mathGraph{ {Screen::Width / 2 ,Screen::Height / 2 },10.0f,{1.0f,1.0f} };
// アニメーション(パラパラ漫画)するにはWhile文
while (ProcessMessage() == 0)
{// ProcessMessage() == 0になるのは×ボタン押したときなど
ClearDrawScreen(); // 画面をまっさらにリセット
mathGraph.DrawGrid(GetColor(100, 100, 100)); // 100,100,100のグレーのグリッドでマス目を描く
// ray0光線レイ
Vector2 ray0pos{ 5,5 }; // レイ光線の始点
Vector2 ray0dir{ 1,1 }; // レイ光線の方向
// 線分line1
Vector2 p2{ 5,10 };
Vector2 p3{ 15,6 };
bool isCollision01 = MyMath::RayLineCollision(ray0pos, ray0dir, p2, p3);
mathGraph.DrawArrow(ray0pos.x, ray0pos.y, 0, 0, ray0pos.x + ray0dir.x, ray0pos.y + ray0dir.y, 0.8f, 1.0f, (isCollision01) ? GetColor(255, 0, 0) : GetColor(255, 255, 255)); // 光線ray0
mathGraph.DrawArrow(p2.x, p2.y, 0, 0, p3.x, p3.y, 0.8f, 1.0f, (isCollision01) ? GetColor(255, 0, 0) : GetColor(255, 255, 255)); // 線分line1
mathGraph.DrawPoint(ray0pos.x, ray0pos.y, 3, GetColor(255, 0, 0), TRUE);
std::string p0_String = "ray0=(" + std::to_string((int)ray0pos.x) + "," + std::to_string((int)ray0pos.y) + ")";
mathGraph.DrawString(ray0pos.x, ray0pos.y, p0_String.c_str(), GetColor(255, 0, 0));
mathGraph.DrawPoint(p1.x, p1.y, 3, GetColor(0, 255, 0), TRUE);
std::string p1_String = "p1=(" + std::to_string((int)p1.x) + "," + std::to_string((int)p1.y) + ")";
mathGraph.DrawString(p1.x, p1.y, p1_String.c_str(), GetColor(0, 255, 0));
mathGraph.DrawPoint(p2.x, p2.y, 3, GetColor(0, 0, 255), TRUE);
std::string p2_String = "p2=(" + std::to_string((int)p2.x) + "," + std::to_string((int)p2.y) + ")";
mathGraph.DrawString(p2.x, p2.y, p2_String.c_str(), GetColor(0, 0, 255));
mathGraph.DrawPoint(p3.x, p3.y, 3, GetColor(0, 255, 255), TRUE);
std::string p3_String = "p3=(" + std::to_string((int)p3.x) + "," + std::to_string((int)p3.y) + ")";
mathGraph.DrawString(p3.x, p3.y, p3_String.c_str(), GetColor(0, 255, 255));
ScreenFlip(); // 裏で描いておいたスクリーンを表画面にフリップ入れ替え
}
// キー入力待ちをする
WaitKey();
// DXライブラリの後始末
DxLib_End();
// ソフトの終了
return 0;
}
main.cppのレイ光線の方向ray0dirを(-1,1)=135°の方向に変更して、線分line1と交差するかの 判定を試してみます。
#include "DxLib.h"
#include "Screen.h"
#include "Vector2.h"
#include "MathGraph2D.h"
#include "MyMath.h"
int WINAPI WinMain(HINSTANCE hInstance, HINSTANCE hPrevInstance, LPSTR lpCmdLine, int nCmdShow)
{
// 画面モードの設定
SetWindowSize(Screen::Width, Screen::Height);// ウィンドウサイズ960×540(こことSetGraphModeのサイズが異なると画像がゆがむ)
SetGraphMode(Screen::Width, Screen::Height, 32); // 画面サイズ960×540のカラービット数32ビットで起動
SetMainWindowText("数学のベクトルの練習");//この行でエラーになったら【設定】マルチバイト文字セットが間違ってるかも
ChangeWindowMode(TRUE);//フルスクリーン表示かウィンドウ表示か
SetAlwaysRunFlag(TRUE); // ウィンドウが非アクティブでも動作させる
// DXライブラリの初期化
if (DxLib_Init() < 0)
{
// エラーが発生したら直ちに終了
return -1;
}
SetMouseDispFlag(TRUE);// ここをFALSEにするとマウスカーソル非表示
//表示しているスクリーンの後ろで隠れて次に描く画像を先に描くモード
// これとペアでScreenFlip();でつぎのページと入れ替えでちらつきを防ぐ
SetDrawScreen(DX_SCREEN_BACK);
SetUseTransColor(FALSE); // 画像の指定色を透過する機能を無効化
ScreenFlip();
// 数学っぽくわかりやすくマス目を描いて、原点を画面の中心にして、10倍のスケールでみやすく描く
MathGraph2D mathGraph{ {Screen::Width / 2 ,Screen::Height / 2 },10.0f,{1.0f,1.0f} };
// アニメーション(パラパラ漫画)するにはWhile文
while (ProcessMessage() == 0)
{// ProcessMessage() == 0になるのは×ボタン押したときなど
ClearDrawScreen(); // 画面をまっさらにリセット
mathGraph.DrawGrid(GetColor(100, 100, 100)); // 100,100,100のグレーのグリッドでマス目を描く
// ray0光線レイ
Vector2 ray0pos{ 5,5 }; // レイ光線の始点
Vector2 ray0dir{ -1,1 }; // レイ光線の方向
// 線分line1
Vector2 p2{ 5,10 };
Vector2 p3{ 15,6 };
bool isCollision01 = MyMath::RayLineCollision(ray0pos, ray0dir, p2, p3);
mathGraph.DrawArrow(ray0pos.x, ray0pos.y, 0, 0, ray0pos.x + ray0dir.x, ray0pos.y + ray0dir.y, 0.8f, 1.0f, (isCollision01) ? GetColor(255, 0, 0) : GetColor(255, 255, 255)); // 光線ray0
mathGraph.DrawArrow(p2.x, p2.y, 0, 0, p3.x, p3.y, 0.8f, 1.0f, (isCollision01) ? GetColor(255, 0, 0) : GetColor(255, 255, 255)); // 線分line1
mathGraph.DrawPoint(ray0pos.x, ray0pos.y, 3, GetColor(255, 0, 0), TRUE);
std::string p0_String = "ray0=(" + std::to_string((int)ray0pos.x) + "," + std::to_string((int)ray0pos.y) + ")";
mathGraph.DrawString(ray0pos.x, ray0pos.y, p0_String.c_str(), GetColor(255, 0, 0));
mathGraph.DrawPoint(p2.x, p2.y, 3, GetColor(0, 0, 255), TRUE);
std::string p2_String = "p2=(" + std::to_string((int)p2.x) + "," + std::to_string((int)p2.y) + ")";
mathGraph.DrawString(p2.x, p2.y, p2_String.c_str(), GetColor(0, 0, 255));
mathGraph.DrawPoint(p3.x, p3.y, 3, GetColor(0, 255, 255), TRUE);
std::string p3_String = "p3=(" + std::to_string((int)p3.x) + "," + std::to_string((int)p3.y) + ")";
mathGraph.DrawString(p3.x, p3.y, p3_String.c_str(), GetColor(0, 255, 255));
ScreenFlip(); // 裏で描いておいたスクリーンを表画面にフリップ入れ替え
}
ScreenFlip(); // 裏で描いておいたスクリーンを表画面にフリップ入れ替え
}
// キー入力待ちをする
WaitKey();
// DXライブラリの後始末
DxLib_End();
// ソフトの終了
return 0;
}
MyMath.hを変更して光線ray0と線分line1の交点を求める関数RayLineCollision(交点も求める ver.)を変更してみましょう。#ifndef MYMATH_H_
#define MYMATH_H_
#include "Vector2.h" // 線との当たり判定にVector2を使う
#include <cmath>
// 数学関連クラス
class MyMath
{
public:
static const float Sqrt2; // = 1.41421356237f; // √2
static const float PI; // = 3.14159265359f; // 円周率
static const float Deg2Rad; // = PI / 180f; // 度からラジアンに変換する定数
(中略).....
/// <summary>
/// 光線ray0と線line1が重なっているかを調べる
/// </summary>
/// <param name="result"光線ray0と線line1の交点を求めてresultで返す</param>
/// <param name="ray0start">光線ray0の始点</param>
/// <param name="ray0dir">光線ray0の方向ベクトル</param>
/// <param name="line1start">線line1の始点</param>
/// <param name="line1end">線line1の終点</param>
/// <returns>光線ray0と線line1が交差しているならtrue,してないならfalse</returns>
static bool RayLineCollision(Vector2& result, Vector2 ray0start, Vector2 ray0dir, Vector2 line1start, Vector2 line1end)
{
Vector2 v0 = ray0dir; // 光線ray0のベクトル
Vector2 v1 = line1end - line1start; // line1の始点startから終点endへのベクトル
Vector2 v01 = line1start - ray0start; // line0の始点からline1の始点へのベクトル 0start→1start
float t1 = cross(v01, v0) / cross(v0, v1);
float t0 = cross(v01, v1) / cross(v0, v1);
result = ray0start + v0 * t0; //交点resultを求めて【&result参照で返却】
// 光線ray0と線分line1が【交差しているか判定】
if (0 < t1 && t1 < 1 && 0 < t0) return true; //【交差している】
return false; // 光線ray0と線分line1は【交差していない】
}
};
#endif
main.cppに交点Qを追加して関数の引数に渡して、線分line1と光線ray0の交点を求めて表示してみましょう。
#include "DxLib.h"
#include "Screen.h"
#include "Vector2.h"
#include "MathGraph2D.h"
#include "MyMath.h"
int WINAPI WinMain(HINSTANCE hInstance, HINSTANCE hPrevInstance, LPSTR lpCmdLine, int nCmdShow)
{
// 画面モードの設定
SetWindowSize(Screen::Width, Screen::Height);// ウィンドウサイズ960×540(こことSetGraphModeのサイズが異なると画像がゆがむ)
SetGraphMode(Screen::Width, Screen::Height, 32); // 画面サイズ960×540のカラービット数32ビットで起動
SetMainWindowText("数学のベクトルの練習");//この行でエラーになったら【設定】マルチバイト文字セットが間違ってるかも
ChangeWindowMode(TRUE);//フルスクリーン表示かウィンドウ表示か
SetAlwaysRunFlag(TRUE); // ウィンドウが非アクティブでも動作させる
// DXライブラリの初期化
if (DxLib_Init() < 0)
{
// エラーが発生したら直ちに終了
return -1;
}
SetMouseDispFlag(TRUE);// ここをFALSEにするとマウスカーソル非表示
//表示しているスクリーンの後ろで隠れて次に描く画像を先に描くモード
// これとペアでScreenFlip();でつぎのページと入れ替えでちらつきを防ぐ
SetDrawScreen(DX_SCREEN_BACK);
SetUseTransColor(FALSE); // 画像の指定色を透過する機能を無効化
ScreenFlip();
// 数学っぽくわかりやすくマス目を描いて、原点を画面の中心にして、10倍のスケールでみやすく描く
MathGraph2D mathGraph{ {Screen::Width / 2 ,Screen::Height / 2 },10.0f,{1.0f,1.0f} };
// アニメーション(パラパラ漫画)するにはWhile文
while (ProcessMessage() == 0)
{// ProcessMessage() == 0になるのは×ボタン押したときなど
ClearDrawScreen(); // 画面をまっさらにリセット
mathGraph.DrawGrid(GetColor(100, 100, 100)); // 100,100,100のグレーのグリッドでマス目を描く
// ray0光線レイ
Vector2 ray0pos{ 5,5 }; // レイ光線の始点
Vector2 ray0dir{ -1,1 }; // レイ光線の方向
// 線分line1
Vector2 p2{ 5,10 };
Vector2 p3{ 15,6 };
Vector2 Q; // 光線ray0とline1の交点
bool isCollision01 = MyMath::RayLineCollision(Q, ray0pos, ray0dir, p2, p3);
mathGraph.DrawArrow(ray0pos.x, ray0pos.y, 0, 0, ray0pos.x + ray0dir.x, ray0pos.y + ray0dir.y, 0.8f, 1.0f, (isCollision01) ? GetColor(255, 0, 0) : GetColor(255, 255, 255)); // 光線ray0
mathGraph.DrawArrow(p2.x, p2.y, 0, 0, p3.x, p3.y, 0.8f, 1.0f, (isCollision01) ? GetColor(255, 0, 0) : GetColor(255, 255, 255)); // 線分line1
mathGraph.DrawPoint(ray0pos.x, ray0pos.y, 3, GetColor(255, 0, 0), TRUE);
std::string p0_String = "ray0=(" + std::to_string((int)ray0pos.x) + "," + std::to_string((int)ray0pos.y) + ")";
mathGraph.DrawString(ray0pos.x, ray0pos.y, p0_String.c_str(), GetColor(255, 0, 0));
mathGraph.DrawPoint(p2.x, p2.y, 3, GetColor(0, 0, 255), TRUE);
std::string p2_String = "p2=(" + std::to_string((int)p2.x) + "," + std::to_string((int)p2.y) + ")";
mathGraph.DrawString(p2.x, p2.y, p2_String.c_str(), GetColor(0, 0, 255));
mathGraph.DrawPoint(p3.x, p3.y, 3, GetColor(0, 255, 255), TRUE);
std::string p3_String = "p3=(" + std::to_string((int)p3.x) + "," + std::to_string((int)p3.y) + ")";
mathGraph.DrawString(p3.x, p3.y, p3_String.c_str(), GetColor(0, 255, 255));
mathGraph.DrawPoint(Q.x, Q.y, 3, GetColor(255, 165, 0), TRUE);
std::string Q_String = "Q=(" + std::to_string(Q.x) + "," + std::to_string(Q.y) + ")";
mathGraph.DrawString(Q.x, Q.y - 10, Q_String.c_str(), GetColor(255, 165, 0));
ScreenFlip(); // 裏で描いておいたスクリーンを表画面にフリップ入れ替え
}
// キー入力待ちをする
WaitKey();
// DXライブラリの後始末
DxLib_End();
// ソフトの終了
return 0;
}
main.cppの交点Qが光線ray0と逆方向(-1,-1)の場合の交点を表示してみましょう。
#include "DxLib.h"
#include "Screen.h"
#include "Vector2.h"
#include "MathGraph2D.h"
#include "MyMath.h"
int WINAPI WinMain(HINSTANCE hInstance, HINSTANCE hPrevInstance, LPSTR lpCmdLine, int nCmdShow)
{
// 画面モードの設定
SetWindowSize(Screen::Width, Screen::Height);// ウィンドウサイズ960×540(こことSetGraphModeのサイズが異なると画像がゆがむ)
SetGraphMode(Screen::Width, Screen::Height, 32); // 画面サイズ960×540のカラービット数32ビットで起動
SetMainWindowText("数学のベクトルの練習");//この行でエラーになったら【設定】マルチバイト文字セットが間違ってるかも
ChangeWindowMode(TRUE);//フルスクリーン表示かウィンドウ表示か
SetAlwaysRunFlag(TRUE); // ウィンドウが非アクティブでも動作させる
// DXライブラリの初期化
if (DxLib_Init() < 0)
{
// エラーが発生したら直ちに終了
return -1;
}
SetMouseDispFlag(TRUE);// ここをFALSEにするとマウスカーソル非表示
//表示しているスクリーンの後ろで隠れて次に描く画像を先に描くモード
// これとペアでScreenFlip();でつぎのページと入れ替えでちらつきを防ぐ
SetDrawScreen(DX_SCREEN_BACK);
SetUseTransColor(FALSE); // 画像の指定色を透過する機能を無効化
ScreenFlip();
// 数学っぽくわかりやすくマス目を描いて、原点を画面の中心にして、10倍のスケールでみやすく描く
MathGraph2D mathGraph{ {Screen::Width / 2 ,Screen::Height / 2 },10.0f,{1.0f,1.0f} };
// アニメーション(パラパラ漫画)するにはWhile文
while (ProcessMessage() == 0)
{// ProcessMessage() == 0になるのは×ボタン押したときなど
ClearDrawScreen(); // 画面をまっさらにリセット
mathGraph.DrawGrid(GetColor(100, 100, 100)); // 100,100,100のグレーのグリッドでマス目を描く
// ray0光線レイ
Vector2 ray0pos{ 5,5 }; // レイ光線の始点
Vector2 ray0dir{ -1,-1 }; // レイ光線の方向
// 線分line1
Vector2 p2{ 5,10 };
Vector2 p3{ 15,6 };
Vector2 Q; // 光線ray0とline1の交点
bool isCollision01 = MyMath::RayLineCollision(Q, ray0pos, ray0dir, p2, p3);
mathGraph.DrawArrow(ray0pos.x, ray0pos.y, 0, 0, ray0pos.x + ray0dir.x, ray0pos.y + ray0dir.y, 0.8f, 1.0f, (isCollision01) ? GetColor(255, 0, 0) : GetColor(255, 255, 255)); // 光線ray0
mathGraph.DrawArrow(p2.x, p2.y, 0, 0, p3.x, p3.y, 0.8f, 1.0f, (isCollision01) ? GetColor(255, 0, 0) : GetColor(255, 255, 255)); // 線分line1
mathGraph.DrawPoint(ray0pos.x, ray0pos.y, 3, GetColor(255, 0, 0), TRUE);
std::string p0_String = "ray0=(" + std::to_string((int)ray0pos.x) + "," + std::to_string((int)ray0pos.y) + ")";
mathGraph.DrawString(ray0pos.x, ray0pos.y, p0_String.c_str(), GetColor(255, 0, 0));
mathGraph.DrawPoint(p2.x, p2.y, 3, GetColor(0, 0, 255), TRUE);
std::string p2_String = "p2=(" + std::to_string((int)p2.x) + "," + std::to_string((int)p2.y) + ")";
mathGraph.DrawString(p2.x, p2.y, p2_String.c_str(), GetColor(0, 0, 255));
mathGraph.DrawPoint(p3.x, p3.y, 3, GetColor(0, 255, 255), TRUE);
std::string p3_String = "p3=(" + std::to_string((int)p3.x) + "," + std::to_string((int)p3.y) + ")";
mathGraph.DrawString(p3.x, p3.y, p3_String.c_str(), GetColor(0, 255, 255));
mathGraph.DrawPoint(Q.x, Q.y, 3, GetColor(255, 165, 0), TRUE);
std::string Q_String = "Q=(" + std::to_string(Q.x) + "," + std::to_string(Q.y) + ")";
mathGraph.DrawString(Q.x, Q.y - 10, Q_String.c_str(), GetColor(255, 165, 0));
ScreenFlip(); // 裏で描いておいたスクリーンを表画面にフリップ入れ替え
}
// キー入力待ちをする
WaitKey();
// DXライブラリの後始末
DxLib_End();
// ソフトの終了
return 0;
}
main.cppを変更して、光線ray0の方向が(1,1)で壁(線)とぶつかる場合にその交点Qを表示してみましょう。
#include "DxLib.h"
#include "Screen.h"
#include "Vector2.h"
#include "MathGraph2D.h"
#include "MyMath.h"
int WINAPI WinMain(HINSTANCE hInstance, HINSTANCE hPrevInstance, LPSTR lpCmdLine, int nCmdShow)
{
// 画面モードの設定
SetWindowSize(Screen::Width, Screen::Height);// ウィンドウサイズ960×540(こことSetGraphModeのサイズが異なると画像がゆがむ)
SetGraphMode(Screen::Width, Screen::Height, 32); // 画面サイズ960×540のカラービット数32ビットで起動
SetMainWindowText("数学のベクトルの練習");//この行でエラーになったら【設定】マルチバイト文字セットが間違ってるかも
ChangeWindowMode(TRUE);//フルスクリーン表示かウィンドウ表示か
SetAlwaysRunFlag(TRUE); // ウィンドウが非アクティブでも動作させる
// DXライブラリの初期化
if (DxLib_Init() < 0)
{
// エラーが発生したら直ちに終了
return -1;
}
SetMouseDispFlag(TRUE);// ここをFALSEにするとマウスカーソル非表示
//表示しているスクリーンの後ろで隠れて次に描く画像を先に描くモード
// これとペアでScreenFlip();でつぎのページと入れ替えでちらつきを防ぐ
SetDrawScreen(DX_SCREEN_BACK);
SetUseTransColor(FALSE); // 画像の指定色を透過する機能を無効化
ScreenFlip();
// 数学っぽくわかりやすくマス目を描いて、原点を画面の中心にして、10倍のスケールでみやすく描く
MathGraph2D mathGraph{ {Screen::Width / 2 ,Screen::Height / 2 },10.0f,{1.0f,1.0f} };
// アニメーション(パラパラ漫画)するにはWhile文
while (ProcessMessage() == 0)
{// ProcessMessage() == 0になるのは×ボタン押したときなど
ClearDrawScreen(); // 画面をまっさらにリセット
mathGraph.DrawGrid(GetColor(100, 100, 100)); // 100,100,100のグレーのグリッドでマス目を描く
// ray0光線レイ
Vector2 ray0pos{ 5,5 }; // レイ光線の始点
Vector2 ray0dir{ 1,1 }; // レイ光線の方向
// 線分line1
Vector2 p2{ 5,10 };
Vector2 p3{ 15,6 };
Vector2 Q; // 光線ray0とline1の交点
bool isCollision01 = MyMath::RayLineCollision(Q, ray0pos, ray0dir, p2, p3);
mathGraph.DrawArrow(ray0pos.x, ray0pos.y, 0, 0, ray0pos.x + ray0dir.x, ray0pos.y + ray0dir.y, 0.8f, 1.0f, (isCollision01) ? GetColor(255, 0, 0) : GetColor(255, 255, 255)); // 光線ray0
mathGraph.DrawArrow(p2.x, p2.y, 0, 0, p3.x, p3.y, 0.8f, 1.0f, (isCollision01) ? GetColor(255, 0, 0) : GetColor(255, 255, 255)); // 線分line1
mathGraph.DrawPoint(ray0pos.x, ray0pos.y, 3, GetColor(255, 0, 0), TRUE);
std::string p0_String = "ray0=(" + std::to_string((int)ray0pos.x) + "," + std::to_string((int)ray0pos.y) + ")";
mathGraph.DrawString(ray0pos.x, ray0pos.y, p0_String.c_str(), GetColor(255, 0, 0));
mathGraph.DrawPoint(p2.x, p2.y, 3, GetColor(0, 0, 255), TRUE);
std::string p2_String = "p2=(" + std::to_string((int)p2.x) + "," + std::to_string((int)p2.y) + ")";
mathGraph.DrawString(p2.x, p2.y, p2_String.c_str(), GetColor(0, 0, 255));
mathGraph.DrawPoint(p3.x, p3.y, 3, GetColor(0, 255, 255), TRUE);
std::string p3_String = "p3=(" + std::to_string((int)p3.x) + "," + std::to_string((int)p3.y) + ")";
mathGraph.DrawString(p3.x, p3.y, p3_String.c_str(), GetColor(0, 255, 255));
mathGraph.DrawPoint(Q.x, Q.y, 3, GetColor(255, 165, 0), TRUE);
std::string Q_String = "Q=(" + std::to_string(Q.x) + "," + std::to_string(Q.y) + ")";
mathGraph.DrawString(Q.x, Q.y - 10, Q_String.c_str(), GetColor(255, 165, 0));
ScreenFlip(); // 裏で描いておいたスクリーンを表画面にフリップ入れ替え
}
// キー入力待ちをする
WaitKey();
// DXライブラリの後始末
DxLib_End();
// ソフトの終了
return 0;
}
MyMath.hを変更して線分line0と線分line1の交点を関数LineIntersection(交点も求める ver.)で求められるようにしてみましょう。#ifndef MYMATH_H_
#define MYMATH_H_
#include "Vector2.h" // 線との当たり判定にVector2を使う
#include <cmath>
// 数学関連クラス
class MyMath
{
public:
static const float Sqrt2; // = 1.41421356237f; // √2
static const float PI; // = 3.14159265359f; // 円周率
static const float Deg2Rad; // = PI / 180f; // 度からラジアンに変換する定数
(中略).....
/// <summary>
/// 線line0と線line1が重なっているかを調べる
/// </summary>
/// <param name="result">線line0と線line1の交点を求めてresultで返す</param>
/// <param name="line0start">線line0の始点</param>
/// <param name="line0end">線line0の終点</param>
/// <param name="line1start">線line1の始点</param>
/// <param name="line1end">線line1の終点</param>
/// <returns>線line0と線line1が交差しているならtrue,してないならfalse</returns>
static bool LineIntersection(Vector2& result, Vector2 line0start, Vector2 line0end, Vector2 line1start, Vector2 line1end)
{
Vector2 v0 = line0end - line0start; // line0の始点startから終点endへのベクトル
Vector2 v1 = line1end - line1start; // line1の始点startから終点endへのベクトル
Vector2 v01 = line1start - line0start; // line0の始点からline1の始点へのベクトル 0start→1start
float t1 = cross(v01, v0) / cross(v0, v1);
float t0 = cross(v01, v1) / cross(v0, v1);
result = line0start + v0 * t0; //交点resultを求めて【&result参照で返却】
// 線分line0と線分line1が【交差しているか判定】
if (0 < t1 && t1 < 1 && 0 < t0 && t0 < 1) return true; //【交差している】
return false; // 線分line0と線分line1は【交差していない】
}
};
#endif
main.cppを変更して、線分line0と線分line1の交点を求めて表示してみましょう。
#include "DxLib.h"
#include "Screen.h"
#include "Vector2.h"
#include "MathGraph2D.h"
#include "MyMath.h"
int WINAPI WinMain(HINSTANCE hInstance, HINSTANCE hPrevInstance, LPSTR lpCmdLine, int nCmdShow)
{
// 画面モードの設定
SetWindowSize(Screen::Width, Screen::Height);// ウィンドウサイズ960×540(こことSetGraphModeのサイズが異なると画像がゆがむ)
SetGraphMode(Screen::Width, Screen::Height, 32); // 画面サイズ960×540のカラービット数32ビットで起動
SetMainWindowText("数学のベクトルの練習");//この行でエラーになったら【設定】マルチバイト文字セットが間違ってるかも
ChangeWindowMode(TRUE);//フルスクリーン表示かウィンドウ表示か
SetAlwaysRunFlag(TRUE); // ウィンドウが非アクティブでも動作させる
// DXライブラリの初期化
if (DxLib_Init() < 0)
{
// エラーが発生したら直ちに終了
return -1;
}
SetMouseDispFlag(TRUE);// ここをFALSEにするとマウスカーソル非表示
//表示しているスクリーンの後ろで隠れて次に描く画像を先に描くモード
// これとペアでScreenFlip();でつぎのページと入れ替えでちらつきを防ぐ
SetDrawScreen(DX_SCREEN_BACK);
SetUseTransColor(FALSE); // 画像の指定色を透過する機能を無効化
ScreenFlip();
// 数学っぽくわかりやすくマス目を描いて、原点を画面の中心にして、10倍のスケールでみやすく描く
MathGraph2D mathGraph{ {Screen::Width / 2 ,Screen::Height / 2 },10.0f,{1.0f,1.0f} };
// アニメーション(パラパラ漫画)するにはWhile文
while (ProcessMessage() == 0)
{// ProcessMessage() == 0になるのは×ボタン押したときなど
ClearDrawScreen(); // 画面をまっさらにリセット
mathGraph.DrawGrid(GetColor(100, 100, 100)); // 100,100,100のグレーのグリッドでマス目を描く
// line0
Vector2 p0{ 5,5 }; // line0の始点
Vector2 p1{ 15,11 }; // line0の終点
// 線分line1
Vector2 p2{ 5,10 };
Vector2 p3{ 15,6 };
Vector2 Q; // line0とline1の交点
bool isCollision01 = MyMath::LineIntersection(Q, p0, p1, p2, p3);
mathGraph.DrawArrow(p0.x, p0.y, 0, 0, p1.x, p1.y, 0.8f, 1.0f, (isCollision01) ? GetColor(255, 0, 0) : GetColor(255, 255, 255)); // 線分line0
mathGraph.DrawArrow(p2.x, p2.y, 0, 0, p3.x, p3.y, 0.8f, 1.0f, (isCollision01) ? GetColor(255, 0, 0) : GetColor(255, 255, 255)); // 線分line1
mathGraph.DrawPoint(p0.x, p0.y, 3, GetColor(255, 0, 0), TRUE);
std::string p0_String = "p0=(" + std::to_string((int)p0.x) + "," + std::to_string((int)p0.y) + ")";
mathGraph.DrawString(p0.x, p0.y, p0_String.c_str(), GetColor(255, 0, 0));
mathGraph.DrawPoint(p1.x, p1.y, 3, GetColor(0, 255, 0), TRUE);
std::string p1_String = "p1=(" + std::to_string((int)p1.x) + "," + std::to_string((int)p1.y) + ")";
mathGraph.DrawString(p1.x, p1.y, p1_String.c_str(), GetColor(0, 255, 0));
mathGraph.DrawPoint(p2.x, p2.y, 3, GetColor(0, 0, 255), TRUE);
std::string p2_String = "p2=(" + std::to_string((int)p2.x) + "," + std::to_string((int)p2.y) + ")";
mathGraph.DrawString(p2.x, p2.y, p2_String.c_str(), GetColor(0, 0, 255));
mathGraph.DrawPoint(p3.x, p3.y, 3, GetColor(0, 255, 255), TRUE);
std::string p3_String = "p3=(" + std::to_string((int)p3.x) + "," + std::to_string((int)p3.y) + ")";
mathGraph.DrawString(p3.x, p3.y, p3_String.c_str(), GetColor(0, 255, 255));
mathGraph.DrawPoint(Q.x, Q.y, 3, GetColor(255, 165, 0), TRUE);
std::string Q_String = "Q=(" + std::to_string(Q.x) + "," + std::to_string(Q.y) + ")";
mathGraph.DrawString(Q.x, Q.y - 10, Q_String.c_str(), GetColor(255, 165, 0));
ScreenFlip(); // 裏で描いておいたスクリーンを表画面にフリップ入れ替え
}
// キー入力待ちをする
WaitKey();
// DXライブラリの後始末
DxLib_End();
// ソフトの終了
return 0;
}
MyMath.hを変更して線(壁)wall0と線分line1の交点とline1の反射点を関数LineReflectionで求められるようにしてみましょう。#ifndef MYMATH_H_
#define MYMATH_H_
#include "Vector2.h" // 線との当たり判定にVector2を使う
#include <cmath>
// 数学関連クラス
class MyMath
{
public:
static const float Sqrt2; // = 1.41421356237f; // √2
static const float PI; // = 3.14159265359f; // 円周率
static const float Deg2Rad; // = PI / 180f; // 度からラジアンに変換する定数
(中略).....
/// <summary>
/// 壁wall0(start→end)に対する線line1(start→end)の反射位置を求める
/// </summary>
/// <param name="reflectPoint">壁から反射したポイント点がreturnされる</param>
/// <param name="collisionPoint">壁に衝突したポイント点がreturnされる</param>
/// <param name="wall0start">壁の起点wall0start</param>
/// <param name="wall0end">壁の終点wall0end</param>
/// <param name="line1start">線bの起点line1start</param>
/// <param name="line1end">線bの終点line1end</param>
/// <returns>線line0(start→end)が壁wall0に接触するか?</returns>
static bool LineReflection(Vector2& reflectPoint, Vector2& collisionPoint,
Vector2 wall0start, Vector2 wall0end, Vector2 line1start, Vector2 line1end)
{
Vector2 wall0 = wall0end - wall0start;
Vector2 line1 = line1end - line1start;
Vector2 e0 = wall0.normalized(); // 壁(wall0start→wall0end)の単位ベクトル
Vector2 v01 = line1end - wall0start;
float cross_e0_v01 = cross(e0, v01);
float L = std::abs(cross_e0_v01); // |外積| (外積の絶対値をabsで求める)
Vector2 n; // 壁の法線ベクトル
if(cross_e0_v01 < 0) // 外積がプラスかマイナスかで壁のサイドが変わるので法線ベクトルnの方向切替
n = Vector2(-wall0.y, wall0.x).normalized(); // 法線ベクトル (-y,x)の単位ベクトル
else
n = Vector2(wall0.y, -wall0.x).normalized(); // 法線ベクトル (y,-x)の単位ベクトル
// 壁wall0と線分line1が交差しているか調べ、その交点をcollisionPointに得る
bool isCollision = LineIntersection(collisionPoint, wall0start, wall0end, line1start, line1end);
reflectPoint = line1end + 2 * L * n; // 壁wall0(start→end)に対する線line1(start→end)の終点line1endの反射点
return isCollision; // 壁wall0と線分line1が交差するかをreturnする
}
};
#endif
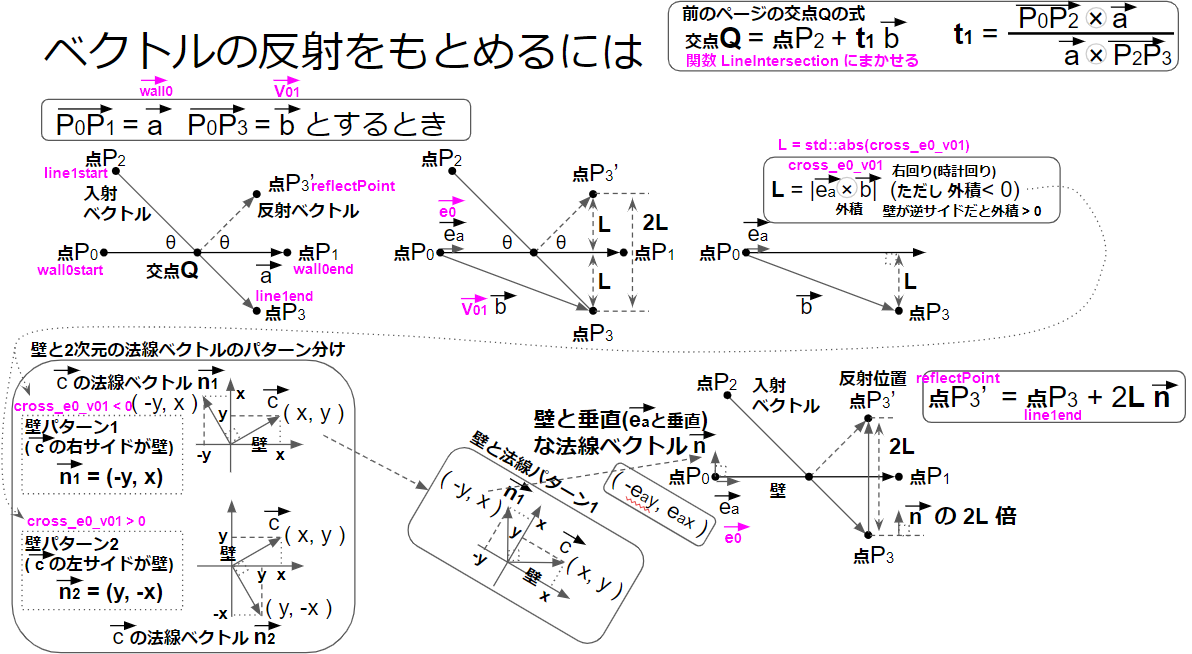
main.cppを変更して、壁(線)line0 に対する 線分line1の交点Q と line1の終点p3の反射点R を求めて表示してみましょう。
#include "DxLib.h"
#include "Screen.h"
#include "Vector2.h"
#include "MathGraph2D.h"
#include "MyMath.h"
int WINAPI WinMain(HINSTANCE hInstance, HINSTANCE hPrevInstance, LPSTR lpCmdLine, int nCmdShow)
{
// 画面モードの設定
SetWindowSize(Screen::Width, Screen::Height);// ウィンドウサイズ960×540(こことSetGraphModeのサイズが異なると画像がゆがむ)
SetGraphMode(Screen::Width, Screen::Height, 32); // 画面サイズ960×540のカラービット数32ビットで起動
SetMainWindowText("数学のベクトルの練習");//この行でエラーになったら【設定】マルチバイト文字セットが間違ってるかも
ChangeWindowMode(TRUE);//フルスクリーン表示かウィンドウ表示か
SetAlwaysRunFlag(TRUE); // ウィンドウが非アクティブでも動作させる
// DXライブラリの初期化
if (DxLib_Init() < 0)
{
// エラーが発生したら直ちに終了
return -1;
}
SetMouseDispFlag(TRUE);// ここをFALSEにするとマウスカーソル非表示
//表示しているスクリーンの後ろで隠れて次に描く画像を先に描くモード
// これとペアでScreenFlip();でつぎのページと入れ替えでちらつきを防ぐ
SetDrawScreen(DX_SCREEN_BACK);
SetUseTransColor(FALSE); // 画像の指定色を透過する機能を無効化
ScreenFlip();
// 数学っぽくわかりやすくマス目を描いて、原点を画面の中心にして、10倍のスケールでみやすく描く
MathGraph2D mathGraph{ {Screen::Width / 2 ,Screen::Height / 2 },10.0f,{1.0f,1.0f} };
// アニメーション(パラパラ漫画)するにはWhile文
while (ProcessMessage() == 0)
{// ProcessMessage() == 0になるのは×ボタン押したときなど
ClearDrawScreen(); // 画面をまっさらにリセット
mathGraph.DrawGrid(GetColor(100, 100, 100)); // 100,100,100のグレーのグリッドでマス目を描く
// line0
Vector2 p0{ 5,5 }; // line0の始点
Vector2 p1{ 15,11 }; // line0の終点
// 線分line1
Vector2 p2{ 5,10 };
Vector2 p3{ 15,6 };
Vector2 Q; // line0とline1の交点
Vector2 R; // line0を壁wall0とした場合のline1の終点p3の壁line0に対する反射点Rと交点Qを求める
bool isCollision01 = MyMath::LineReflection(R, Q, p0, p1, p2, p3);
mathGraph.DrawArrow(p0.x, p0.y, 0, 0, p1.x, p1.y, 0.8f, 1.0f, (isCollision01) ? GetColor(255, 0, 0) : GetColor(255, 255, 255)); // 線分line0
mathGraph.DrawArrow(p2.x, p2.y, 0, 0, p3.x, p3.y, 0.8f, 1.0f, (isCollision01) ? GetColor(255, 0, 0) : GetColor(255, 255, 255)); // 線分line1
// 反射ベクトル(交点Q→反射点R)を描く
if (isCollision01)
mathGraph.DrawArrow(Q.x, Q.y, 0, 0, R.x, R.y, 0.8f, 1.0f, GetColor(255, 255, 0));
mathGraph.DrawPoint(p0.x, p0.y, 3, GetColor(255, 0, 0), TRUE);
std::string p0_String = "p0=(" + std::to_string((int)p0.x) + "," + std::to_string((int)p0.y) + ")";
mathGraph.DrawString(p0.x, p0.y, p0_String.c_str(), GetColor(255, 0, 0));
mathGraph.DrawPoint(p1.x, p1.y, 3, GetColor(0, 255, 0), TRUE);
std::string p1_String = "p1=(" + std::to_string((int)p1.x) + "," + std::to_string((int)p1.y) + ")";
mathGraph.DrawString(p1.x, p1.y, p1_String.c_str(), GetColor(0, 255, 0));
mathGraph.DrawPoint(p2.x, p2.y, 3, GetColor(0, 0, 255), TRUE);
std::string p2_String = "p2=(" + std::to_string((int)p2.x) + "," + std::to_string((int)p2.y) + ")";
mathGraph.DrawString(p2.x, p2.y, p2_String.c_str(), GetColor(0, 0, 255));
mathGraph.DrawPoint(p3.x, p3.y, 3, GetColor(0, 255, 255), TRUE);
std::string p3_String = "p3=(" + std::to_string((int)p3.x) + "," + std::to_string((int)p3.y) + ")";
mathGraph.DrawString(p3.x, p3.y, p3_String.c_str(), GetColor(0, 255, 255));
mathGraph.DrawPoint(Q.x, Q.y, 3, GetColor(255, 165, 0), TRUE);
std::string Q_String = "Q=(" + std::to_string(Q.x) + "," + std::to_string(Q.y) + ")";
mathGraph.DrawString(Q.x, Q.y - 10, Q_String.c_str(), GetColor(255, 165, 0));
mathGraph.DrawPoint(R.x, R.y, 3, GetColor(255, 255, 0), TRUE);
std::string R_String = "R=(" + std::to_string(R.x) + "," + std::to_string(R.y) + ")";
mathGraph.DrawString(R.x, R.y - 10, R_String.c_str(), GetColor(255, 255, 0));
ScreenFlip(); // 裏で描いておいたスクリーンを表画面にフリップ入れ替え
}
// キー入力待ちをする
WaitKey();
// DXライブラリの後始末
DxLib_End();
// ソフトの終了
return 0;
}
main.cppを変更して、壁(線)line0 と 線分line1が交差しない場合(t0 < 0)を実験で表示してみましょう。
#include "DxLib.h"
#include "Screen.h"
#include "Vector2.h"
#include "MathGraph2D.h"
#include "MyMath.h"
int WINAPI WinMain(HINSTANCE hInstance, HINSTANCE hPrevInstance, LPSTR lpCmdLine, int nCmdShow)
{
// 画面モードの設定
SetWindowSize(Screen::Width, Screen::Height);// ウィンドウサイズ960×540(こことSetGraphModeのサイズが異なると画像がゆがむ)
SetGraphMode(Screen::Width, Screen::Height, 32); // 画面サイズ960×540のカラービット数32ビットで起動
SetMainWindowText("数学のベクトルの練習");//この行でエラーになったら【設定】マルチバイト文字セットが間違ってるかも
ChangeWindowMode(TRUE);//フルスクリーン表示かウィンドウ表示か
SetAlwaysRunFlag(TRUE); // ウィンドウが非アクティブでも動作させる
// DXライブラリの初期化
if (DxLib_Init() < 0)
{
// エラーが発生したら直ちに終了
return -1;
}
SetMouseDispFlag(TRUE);// ここをFALSEにするとマウスカーソル非表示
//表示しているスクリーンの後ろで隠れて次に描く画像を先に描くモード
// これとペアでScreenFlip();でつぎのページと入れ替えでちらつきを防ぐ
SetDrawScreen(DX_SCREEN_BACK);
SetUseTransColor(FALSE); // 画像の指定色を透過する機能を無効化
ScreenFlip();
// 数学っぽくわかりやすくマス目を描いて、原点を画面の中心にして、10倍のスケールでみやすく描く
MathGraph2D mathGraph{ {Screen::Width / 2 ,Screen::Height / 2 },10.0f,{1.0f,1.0f} };
// アニメーション(パラパラ漫画)するにはWhile文
while (ProcessMessage() == 0)
{// ProcessMessage() == 0になるのは×ボタン押したときなど
ClearDrawScreen(); // 画面をまっさらにリセット
mathGraph.DrawGrid(GetColor(100, 100, 100)); // 100,100,100のグレーのグリッドでマス目を描く
// line0
Vector2 p0{ 11,9 }; // line0の始点
Vector2 p1{ 15,11 }; // line0の終点
// 線分line1
Vector2 p2{ 5,10 };
Vector2 p3{ 15,6 };
Vector2 Q; // line0とline1の交点
Vector2 R; // line0を壁wall0とした場合のline1の終点p3の壁line0に対する反射点Rと交点Qを求める
bool isCollision01 = MyMath::LineReflection(R, Q, p0, p1, p2, p3);
mathGraph.DrawArrow(p0.x, p0.y, 0, 0, p1.x, p1.y, 0.8f, 1.0f, (isCollision01) ? GetColor(255, 0, 0) : GetColor(255, 255, 255)); // 線分line0
mathGraph.DrawArrow(p2.x, p2.y, 0, 0, p3.x, p3.y, 0.8f, 1.0f, (isCollision01) ? GetColor(255, 0, 0) : GetColor(255, 255, 255)); // 線分line1
// 反射ベクトル(交点Q→反射点R)を描く
if (isCollision01)
mathGraph.DrawArrow(Q.x, Q.y, 0, 0, R.x, R.y, 0.8f, 1.0f, GetColor(255, 255, 0));
mathGraph.DrawPoint(p0.x, p0.y, 3, GetColor(255, 0, 0), TRUE);
std::string p0_String = "p0=(" + std::to_string((int)p0.x) + "," + std::to_string((int)p0.y) + ")";
mathGraph.DrawString(p0.x, p0.y, p0_String.c_str(), GetColor(255, 0, 0));
mathGraph.DrawPoint(p1.x, p1.y, 3, GetColor(0, 255, 0), TRUE);
std::string p1_String = "p1=(" + std::to_string((int)p1.x) + "," + std::to_string((int)p1.y) + ")";
mathGraph.DrawString(p1.x, p1.y, p1_String.c_str(), GetColor(0, 255, 0));
mathGraph.DrawPoint(p2.x, p2.y, 3, GetColor(0, 0, 255), TRUE);
std::string p2_String = "p2=(" + std::to_string((int)p2.x) + "," + std::to_string((int)p2.y) + ")";
mathGraph.DrawString(p2.x, p2.y, p2_String.c_str(), GetColor(0, 0, 255));
mathGraph.DrawPoint(p3.x, p3.y, 3, GetColor(0, 255, 255), TRUE);
std::string p3_String = "p3=(" + std::to_string((int)p3.x) + "," + std::to_string((int)p3.y) + ")";
mathGraph.DrawString(p3.x, p3.y, p3_String.c_str(), GetColor(0, 255, 255));
mathGraph.DrawPoint(Q.x, Q.y, 3, GetColor(255, 165, 0), TRUE);
std::string Q_String = "Q=(" + std::to_string(Q.x) + "," + std::to_string(Q.y) + ")";
mathGraph.DrawString(Q.x, Q.y - 10, Q_String.c_str(), GetColor(255, 165, 0));
mathGraph.DrawPoint(R.x, R.y, 3, GetColor(255, 255, 0), TRUE);
std::string R_String = "R=(" + std::to_string(R.x) + "," + std::to_string(R.y) + ")";
mathGraph.DrawString(R.x, R.y - 10, R_String.c_str(), GetColor(255, 255, 0));
ScreenFlip(); // 裏で描いておいたスクリーンを表画面にフリップ入れ替え
}
// キー入力待ちをする
WaitKey();
// DXライブラリの後始末
DxLib_End();
// ソフトの終了
return 0;
}
main.cppを変更して、壁(線)line0 と 線分line1が交差しない場合(1 < t0)を実験で表示してみましょう。
#include "DxLib.h"
#include "Screen.h"
#include "Vector2.h"
#include "MathGraph2D.h"
#include "MyMath.h"
int WINAPI WinMain(HINSTANCE hInstance, HINSTANCE hPrevInstance, LPSTR lpCmdLine, int nCmdShow)
{
// 画面モードの設定
SetWindowSize(Screen::Width, Screen::Height);// ウィンドウサイズ960×540(こことSetGraphModeのサイズが異なると画像がゆがむ)
SetGraphMode(Screen::Width, Screen::Height, 32); // 画面サイズ960×540のカラービット数32ビットで起動
SetMainWindowText("数学のベクトルの練習");//この行でエラーになったら【設定】マルチバイト文字セットが間違ってるかも
ChangeWindowMode(TRUE);//フルスクリーン表示かウィンドウ表示か
SetAlwaysRunFlag(TRUE); // ウィンドウが非アクティブでも動作させる
// DXライブラリの初期化
if (DxLib_Init() < 0)
{
// エラーが発生したら直ちに終了
return -1;
}
SetMouseDispFlag(TRUE);// ここをFALSEにするとマウスカーソル非表示
//表示しているスクリーンの後ろで隠れて次に描く画像を先に描くモード
// これとペアでScreenFlip();でつぎのページと入れ替えでちらつきを防ぐ
SetDrawScreen(DX_SCREEN_BACK);
SetUseTransColor(FALSE); // 画像の指定色を透過する機能を無効化
ScreenFlip();
// 数学っぽくわかりやすくマス目を描いて、原点を画面の中心にして、10倍のスケールでみやすく描く
MathGraph2D mathGraph{ {Screen::Width / 2 ,Screen::Height / 2 },10.0f,{1.0f,1.0f} };
// アニメーション(パラパラ漫画)するにはWhile文
while (ProcessMessage() == 0)
{// ProcessMessage() == 0になるのは×ボタン押したときなど
ClearDrawScreen(); // 画面をまっさらにリセット
mathGraph.DrawGrid(GetColor(100, 100, 100)); // 100,100,100のグレーのグリッドでマス目を描く
// line0
Vector2 p0{ 5,5 }; // line0の始点
Vector2 p1{ 9,7 }; // line0の終点
// 線分line1
Vector2 p2{ 5,10 };
Vector2 p3{ 15,6 };
Vector2 Q; // line0とline1の交点
Vector2 R; // line0を壁wall0とした場合のline1の終点p3の壁line0に対する反射点Rと交点Qを求める
bool isCollision01 = MyMath::LineReflection(R, Q, p0, p1, p2, p3);
mathGraph.DrawArrow(p0.x, p0.y, 0, 0, p1.x, p1.y, 0.8f, 1.0f, (isCollision01) ? GetColor(255, 0, 0) : GetColor(255, 255, 255)); // 線分line0
mathGraph.DrawArrow(p2.x, p2.y, 0, 0, p3.x, p3.y, 0.8f, 1.0f, (isCollision01) ? GetColor(255, 0, 0) : GetColor(255, 255, 255)); // 線分line1
// 反射ベクトル(交点Q→反射点R)を描く
if (isCollision01)
mathGraph.DrawArrow(Q.x, Q.y, 0, 0, R.x, R.y, 0.8f, 1.0f, GetColor(255, 255, 0));
mathGraph.DrawPoint(p0.x, p0.y, 3, GetColor(255, 0, 0), TRUE);
std::string p0_String = "p0=(" + std::to_string((int)p0.x) + "," + std::to_string((int)p0.y) + ")";
mathGraph.DrawString(p0.x, p0.y, p0_String.c_str(), GetColor(255, 0, 0));
mathGraph.DrawPoint(p1.x, p1.y, 3, GetColor(0, 255, 0), TRUE);
std::string p1_String = "p1=(" + std::to_string((int)p1.x) + "," + std::to_string((int)p1.y) + ")";
mathGraph.DrawString(p1.x, p1.y, p1_String.c_str(), GetColor(0, 255, 0));
mathGraph.DrawPoint(p2.x, p2.y, 3, GetColor(0, 0, 255), TRUE);
std::string p2_String = "p2=(" + std::to_string((int)p2.x) + "," + std::to_string((int)p2.y) + ")";
mathGraph.DrawString(p2.x, p2.y, p2_String.c_str(), GetColor(0, 0, 255));
mathGraph.DrawPoint(p3.x, p3.y, 3, GetColor(0, 255, 255), TRUE);
std::string p3_String = "p3=(" + std::to_string((int)p3.x) + "," + std::to_string((int)p3.y) + ")";
mathGraph.DrawString(p3.x, p3.y, p3_String.c_str(), GetColor(0, 255, 255));
mathGraph.DrawPoint(Q.x, Q.y, 3, GetColor(255, 165, 0), TRUE);
std::string Q_String = "Q=(" + std::to_string(Q.x) + "," + std::to_string(Q.y) + ")";
mathGraph.DrawString(Q.x, Q.y - 10, Q_String.c_str(), GetColor(255, 165, 0));
mathGraph.DrawPoint(R.x, R.y, 3, GetColor(255, 255, 0), TRUE);
std::string R_String = "R=(" + std::to_string(R.x) + "," + std::to_string(R.y) + ")";
mathGraph.DrawString(R.x, R.y - 10, R_String.c_str(), GetColor(255, 255, 0));
ScreenFlip(); // 裏で描いておいたスクリーンを表画面にフリップ入れ替え
}
// キー入力待ちをする
WaitKey();
// DXライブラリの後始末
DxLib_End();
// ソフトの終了
return 0;
}
main.cppを変更して、壁(線)line0 と 線分line1が交差しない場合(t1 < 0)を実験で表示してみましょう。
#include "DxLib.h"
#include "Screen.h"
#include "Vector2.h"
#include "MathGraph2D.h"
#include "MyMath.h"
int WINAPI WinMain(HINSTANCE hInstance, HINSTANCE hPrevInstance, LPSTR lpCmdLine, int nCmdShow)
{
// 画面モードの設定
SetWindowSize(Screen::Width, Screen::Height);// ウィンドウサイズ960×540(こことSetGraphModeのサイズが異なると画像がゆがむ)
SetGraphMode(Screen::Width, Screen::Height, 32); // 画面サイズ960×540のカラービット数32ビットで起動
SetMainWindowText("数学のベクトルの練習");//この行でエラーになったら【設定】マルチバイト文字セットが間違ってるかも
ChangeWindowMode(TRUE);//フルスクリーン表示かウィンドウ表示か
SetAlwaysRunFlag(TRUE); // ウィンドウが非アクティブでも動作させる
// DXライブラリの初期化
if (DxLib_Init() < 0)
{
// エラーが発生したら直ちに終了
return -1;
}
SetMouseDispFlag(TRUE);// ここをFALSEにするとマウスカーソル非表示
//表示しているスクリーンの後ろで隠れて次に描く画像を先に描くモード
// これとペアでScreenFlip();でつぎのページと入れ替えでちらつきを防ぐ
SetDrawScreen(DX_SCREEN_BACK);
SetUseTransColor(FALSE); // 画像の指定色を透過する機能を無効化
ScreenFlip();
// 数学っぽくわかりやすくマス目を描いて、原点を画面の中心にして、10倍のスケールでみやすく描く
MathGraph2D mathGraph{ {Screen::Width / 2 ,Screen::Height / 2 },10.0f,{1.0f,1.0f} };
// アニメーション(パラパラ漫画)するにはWhile文
while (ProcessMessage() == 0)
{// ProcessMessage() == 0になるのは×ボタン押したときなど
ClearDrawScreen(); // 画面をまっさらにリセット
mathGraph.DrawGrid(GetColor(100, 100, 100)); // 100,100,100のグレーのグリッドでマス目を描く
// line0
Vector2 p0{ 5,5 }; // line0の始点
Vector2 p1{ 15,11 }; // line0の終点
// 線分line1
Vector2 p2{ 12,8 };
Vector2 p3{ 15,6 };
Vector2 Q; // line0とline1の交点
Vector2 R; // line0を壁wall0とした場合のline1の終点p3の壁line0に対する反射点Rと交点Qを求める
bool isCollision01 = MyMath::LineReflection(R, Q, p0, p1, p2, p3);
mathGraph.DrawArrow(p0.x, p0.y, 0, 0, p1.x, p1.y, 0.8f, 1.0f, (isCollision01) ? GetColor(255, 0, 0) : GetColor(255, 255, 255)); // 線分line0
mathGraph.DrawArrow(p2.x, p2.y, 0, 0, p3.x, p3.y, 0.8f, 1.0f, (isCollision01) ? GetColor(255, 0, 0) : GetColor(255, 255, 255)); // 線分line1
// 反射ベクトル(交点Q→反射点R)を描く
if (isCollision01)
mathGraph.DrawArrow(Q.x, Q.y, 0, 0, R.x, R.y, 0.8f, 1.0f, GetColor(255, 255, 0));
mathGraph.DrawPoint(p0.x, p0.y, 3, GetColor(255, 0, 0), TRUE);
std::string p0_String = "p0=(" + std::to_string((int)p0.x) + "," + std::to_string((int)p0.y) + ")";
mathGraph.DrawString(p0.x, p0.y, p0_String.c_str(), GetColor(255, 0, 0));
mathGraph.DrawPoint(p1.x, p1.y, 3, GetColor(0, 255, 0), TRUE);
std::string p1_String = "p1=(" + std::to_string((int)p1.x) + "," + std::to_string((int)p1.y) + ")";
mathGraph.DrawString(p1.x, p1.y, p1_String.c_str(), GetColor(0, 255, 0));
mathGraph.DrawPoint(p2.x, p2.y, 3, GetColor(0, 0, 255), TRUE);
std::string p2_String = "p2=(" + std::to_string((int)p2.x) + "," + std::to_string((int)p2.y) + ")";
mathGraph.DrawString(p2.x, p2.y, p2_String.c_str(), GetColor(0, 0, 255));
mathGraph.DrawPoint(p3.x, p3.y, 3, GetColor(0, 255, 255), TRUE);
std::string p3_String = "p3=(" + std::to_string((int)p3.x) + "," + std::to_string((int)p3.y) + ")";
mathGraph.DrawString(p3.x, p3.y, p3_String.c_str(), GetColor(0, 255, 255));
mathGraph.DrawPoint(Q.x, Q.y, 3, GetColor(255, 165, 0), TRUE);
std::string Q_String = "Q=(" + std::to_string(Q.x) + "," + std::to_string(Q.y) + ")";
mathGraph.DrawString(Q.x, Q.y - 10, Q_String.c_str(), GetColor(255, 165, 0));
mathGraph.DrawPoint(R.x, R.y, 3, GetColor(255, 255, 0), TRUE);
std::string R_String = "R=(" + std::to_string(R.x) + "," + std::to_string(R.y) + ")";
mathGraph.DrawString(R.x, R.y - 10, R_String.c_str(), GetColor(255, 255, 0));
ScreenFlip(); // 裏で描いておいたスクリーンを表画面にフリップ入れ替え
}
// キー入力待ちをする
WaitKey();
// DXライブラリの後始末
DxLib_End();
// ソフトの終了
return 0;
}
main.cppを変更して、壁(線)line0 と 線分line1が交差しない場合(1 < t1)を実験で表示してみましょう。
#include "DxLib.h"
#include "Screen.h"
#include "Vector2.h"
#include "MathGraph2D.h"
#include "MyMath.h"
int WINAPI WinMain(HINSTANCE hInstance, HINSTANCE hPrevInstance, LPSTR lpCmdLine, int nCmdShow)
{
// 画面モードの設定
SetWindowSize(Screen::Width, Screen::Height);// ウィンドウサイズ960×540(こことSetGraphModeのサイズが異なると画像がゆがむ)
SetGraphMode(Screen::Width, Screen::Height, 32); // 画面サイズ960×540のカラービット数32ビットで起動
SetMainWindowText("数学のベクトルの練習");//この行でエラーになったら【設定】マルチバイト文字セットが間違ってるかも
ChangeWindowMode(TRUE);//フルスクリーン表示かウィンドウ表示か
SetAlwaysRunFlag(TRUE); // ウィンドウが非アクティブでも動作させる
// DXライブラリの初期化
if (DxLib_Init() < 0)
{
// エラーが発生したら直ちに終了
return -1;
}
SetMouseDispFlag(TRUE);// ここをFALSEにするとマウスカーソル非表示
//表示しているスクリーンの後ろで隠れて次に描く画像を先に描くモード
// これとペアでScreenFlip();でつぎのページと入れ替えでちらつきを防ぐ
SetDrawScreen(DX_SCREEN_BACK);
SetUseTransColor(FALSE); // 画像の指定色を透過する機能を無効化
ScreenFlip();
// 数学っぽくわかりやすくマス目を描いて、原点を画面の中心にして、10倍のスケールでみやすく描く
MathGraph2D mathGraph{ {Screen::Width / 2 ,Screen::Height / 2 },10.0f,{1.0f,1.0f} };
// アニメーション(パラパラ漫画)するにはWhile文
while (ProcessMessage() == 0)
{// ProcessMessage() == 0になるのは×ボタン押したときなど
ClearDrawScreen(); // 画面をまっさらにリセット
mathGraph.DrawGrid(GetColor(100, 100, 100)); // 100,100,100のグレーのグリッドでマス目を描く
// line0
Vector2 p0{ 5,5 }; // line0の始点
Vector2 p1{ 15,11 }; // line0の終点
// 線分line1
Vector2 p2{ 5,10 };
Vector2 p3{ 9,9 };
Vector2 Q; // line0とline1の交点
Vector2 R; // line0を壁wall0とした場合のline1の終点p3の壁line0に対する反射点Rと交点Qを求める
bool isCollision01 = MyMath::LineReflection(R, Q, p0, p1, p2, p3);
mathGraph.DrawArrow(p0.x, p0.y, 0, 0, p1.x, p1.y, 0.8f, 1.0f, (isCollision01) ? GetColor(255, 0, 0) : GetColor(255, 255, 255)); // 線分line0
mathGraph.DrawArrow(p2.x, p2.y, 0, 0, p3.x, p3.y, 0.8f, 1.0f, (isCollision01) ? GetColor(255, 0, 0) : GetColor(255, 255, 255)); // 線分line1
// 反射ベクトル(交点Q→反射点R)を描く
if (isCollision01)
mathGraph.DrawArrow(Q.x, Q.y, 0, 0, R.x, R.y, 0.8f, 1.0f, GetColor(255, 255, 0));
mathGraph.DrawPoint(p0.x, p0.y, 3, GetColor(255, 0, 0), TRUE);
std::string p0_String = "p0=(" + std::to_string((int)p0.x) + "," + std::to_string((int)p0.y) + ")";
mathGraph.DrawString(p0.x, p0.y, p0_String.c_str(), GetColor(255, 0, 0));
mathGraph.DrawPoint(p1.x, p1.y, 3, GetColor(0, 255, 0), TRUE);
std::string p1_String = "p1=(" + std::to_string((int)p1.x) + "," + std::to_string((int)p1.y) + ")";
mathGraph.DrawString(p1.x, p1.y, p1_String.c_str(), GetColor(0, 255, 0));
mathGraph.DrawPoint(p2.x, p2.y, 3, GetColor(0, 0, 255), TRUE);
std::string p2_String = "p2=(" + std::to_string((int)p2.x) + "," + std::to_string((int)p2.y) + ")";
mathGraph.DrawString(p2.x, p2.y, p2_String.c_str(), GetColor(0, 0, 255));
mathGraph.DrawPoint(p3.x, p3.y, 3, GetColor(0, 255, 255), TRUE);
std::string p3_String = "p3=(" + std::to_string((int)p3.x) + "," + std::to_string((int)p3.y) + ")";
mathGraph.DrawString(p3.x, p3.y, p3_String.c_str(), GetColor(0, 255, 255));
mathGraph.DrawPoint(Q.x, Q.y, 3, GetColor(255, 165, 0), TRUE);
std::string Q_String = "Q=(" + std::to_string(Q.x) + "," + std::to_string(Q.y) + ")";
mathGraph.DrawString(Q.x, Q.y - 10, Q_String.c_str(), GetColor(255, 165, 0));
mathGraph.DrawPoint(R.x, R.y, 3, GetColor(255, 255, 0), TRUE);
std::string R_String = "R=(" + std::to_string(R.x) + "," + std::to_string(R.y) + ")";
mathGraph.DrawString(R.x, R.y - 10, R_String.c_str(), GetColor(255, 255, 0));
ScreenFlip(); // 裏で描いておいたスクリーンを表画面にフリップ入れ替え
}
// キー入力待ちをする
WaitKey();
// DXライブラリの後始末
DxLib_End();
// ソフトの終了
return 0;
}
MyMath.hを変更して線(壁)wall0と線分line1の交点とline1endを中心とする半径rの円の反射点を関数LineReflectionで求められるようにしてみましょう。#ifndef MYMATH_H_
#define MYMATH_H_
#include "Vector2.h" // 線との当たり判定にVector2を使う
#include <cmath>
// 数学関連クラス
class MyMath
{
public:
static const float Sqrt2; // = 1.41421356237f; // √2
static const float PI; // = 3.14159265359f; // 円周率
static const float Deg2Rad; // = PI / 180f; // 度からラジアンに変換する定数
(中略).....
/// <summary>
/// 壁wall0(start→end)に対する線line1(start→end)の反射位置を求める
/// </summary>
/// <param name="reflectPoint">壁から反射したポイント点がreturnされる</param>
/// <param name="collisionPoint">壁に衝突したポイント点がreturnされる</param>
/// <param name="wall0start">壁の起点wall0start</param>
/// <param name="wall0end">壁の終点wall0end</param>
/// <param name="line1start">線bの起点line1start</param>
/// <param name="line1end">線bの終点line1end</param>
/// <param name="r">点line1startが点じゃなく円の場合はr=円の半径とするr=0なら点扱い</param>
/// <returns>線line0(start→end)が壁wall0に接触するか?</returns>
static bool LineReflection(Vector2& reflectPoint, Vector2& collisionPoint,
Vector2 wall0start, Vector2 wall0end, Vector2 line1start, Vector2 line1end, float r = 0)
{
Vector2 wall0 = wall0end - wall0start;
Vector2 line1 = line1end - line1start;
Vector2 e0 = wall0.normalized(); // 壁(wall0start→wall0end)の単位ベクトル
Vector2 v01 = line1end - wall0start;
float cross_e0_v01 = cross(e0, v01);
float L = r + std::abs(cross_e0_v01); // |外積| (外積の絶対値をabsで求める)
Vector2 n; // 壁の法線ベクトル
if(cross_e0_v01 < 0) // 外積がプラスかマイナスかで壁のサイドが変わるので法線ベクトルnの方向切替
n = Vector2(-wall0.y, wall0.x).normalized(); // 法線ベクトル (-y,x)の単位ベクトル
else
n = Vector2(wall0.y, -wall0.x).normalized(); // 法線ベクトル (y,-x)の単位ベクトル
// 壁wall0と線分line1が交差しているか調べ、その交点をcollisionPointに得る
bool isCollision = LineIntersection(collisionPoint, wall0start, wall0end, line1start, line1end);
if(r > 0) // 半径が0以上のときは球の場合として衝突点を求めなおす
{ // 点(r==0)じゃなくて半径rが0じゃない円の反射計算のときだけ円の衝突点を計算
float dot_line1_n = dot(line1, n); // 内積 line1・n
float t = L / dot_line1_n;
collisionPoint = line1end + line1 * t; // 円の場合の衝突点を求める
}
reflectPoint = line1end + 2 * L * n; // 壁wall0(start→end)に対する線line1(start→end)の終点line1endの反射点
return isCollision; // 壁wall0と線分line1が交差するかをreturnする
}
};
#endif
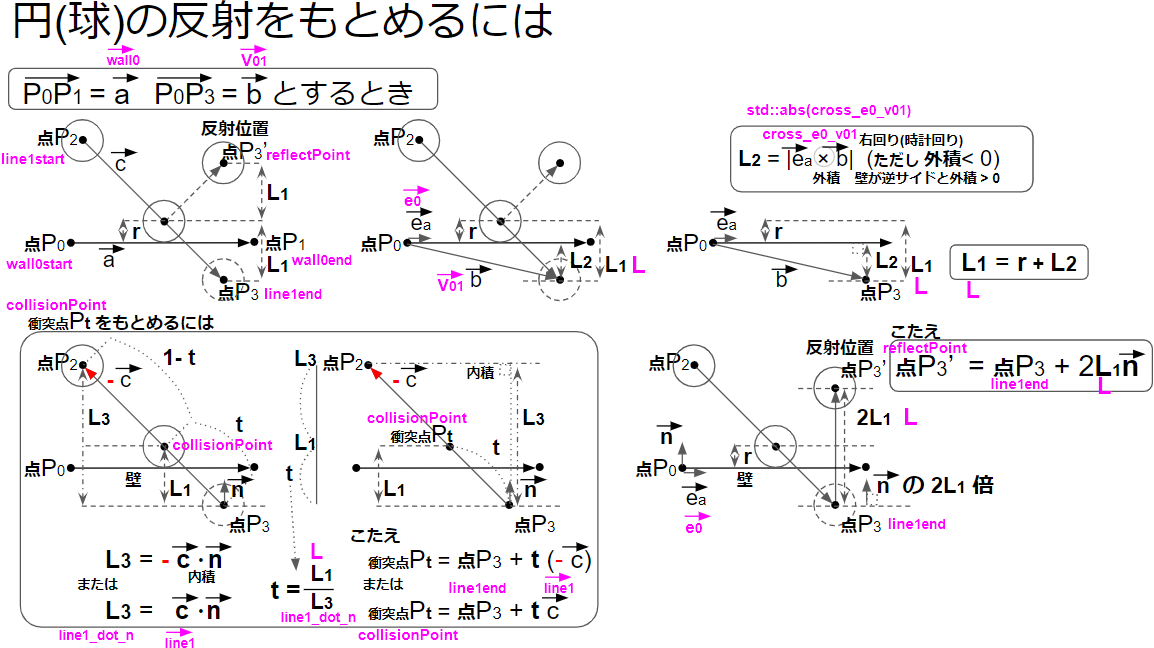
main.cppを変更して、壁(線)line0 に対する 線分line1方向に進む円(半径r)の衝突した瞬間の円の中心Q と 反射した円の中心点R を求めて表示してみましょう。
#include "DxLib.h"
#include "Screen.h"
#include "Vector2.h"
#include "MathGraph2D.h"
#include "MyMath.h"
int WINAPI WinMain(HINSTANCE hInstance, HINSTANCE hPrevInstance, LPSTR lpCmdLine, int nCmdShow)
{
// 画面モードの設定
SetWindowSize(Screen::Width, Screen::Height);// ウィンドウサイズ960×540(こことSetGraphModeのサイズが異なると画像がゆがむ)
SetGraphMode(Screen::Width, Screen::Height, 32); // 画面サイズ960×540のカラービット数32ビットで起動
SetMainWindowText("数学のベクトルの練習");//この行でエラーになったら【設定】マルチバイト文字セットが間違ってるかも
ChangeWindowMode(TRUE);//フルスクリーン表示かウィンドウ表示か
SetAlwaysRunFlag(TRUE); // ウィンドウが非アクティブでも動作させる
// DXライブラリの初期化
if (DxLib_Init() < 0)
{
// エラーが発生したら直ちに終了
return -1;
}
SetMouseDispFlag(TRUE);// ここをFALSEにするとマウスカーソル非表示
//表示しているスクリーンの後ろで隠れて次に描く画像を先に描くモード
// これとペアでScreenFlip();でつぎのページと入れ替えでちらつきを防ぐ
SetDrawScreen(DX_SCREEN_BACK);
SetUseTransColor(FALSE); // 画像の指定色を透過する機能を無効化
ScreenFlip();
// 数学っぽくわかりやすくマス目を描いて、原点を画面の中心にして、10倍のスケールでみやすく描く
MathGraph2D mathGraph{ {Screen::Width / 2 ,Screen::Height / 2 },10.0f,{1.0f,1.0f} };
// アニメーション(パラパラ漫画)するにはWhile文
while (ProcessMessage() == 0)
{// ProcessMessage() == 0になるのは×ボタン押したときなど
ClearDrawScreen(); // 画面をまっさらにリセット
mathGraph.DrawGrid(GetColor(100, 100, 100)); // 100,100,100のグレーのグリッドでマス目を描く
// line0
Vector2 p0{ 5,5 }; // line0の始点
Vector2 p1{ 15,11 }; // line0の終点
// 線分line1
Vector2 p2{ 5,10 };
Vector2 p3{ 15,6 };
float r = 1.0f; // 円の半径r 始点p2が円(青ボール)の場合を想定
Vector2 Q; // line0とline1の交点
Vector2 R; // line0を壁wall0とした場合のline1の終点p3の壁line0に対する反射点Rと交点Qを求める
bool isCollision01 = MyMath::LineReflection(R, Q, p0, p1, p2, p3, r);
mathGraph.DrawCircle(p2.x, p2.y, r, GetColor(0, 0, 255), FALSE); // 円p2(始点)を描く
mathGraph.DrawCircle(Q.x, Q.y, r, GetColor(255, 165, 0), FALSE); // 円Q(衝突位置)を描く
mathGraph.DrawCircle(R.x, R.y, r, GetColor(255, 255, 0), FALSE); // 円R(反射位置)を描く
mathGraph.DrawArrow(p0.x, p0.y, 0, 0, p1.x, p1.y, 0.8f, 1.0f, (isCollision01) ? GetColor(255, 0, 0) : GetColor(255, 255, 255)); // 線分line0
mathGraph.DrawArrow(p2.x, p2.y, 0, 0, p3.x, p3.y, 0.8f, 1.0f, (isCollision01) ? GetColor(255, 0, 0) : GetColor(255, 255, 255)); // 線分line1
// 反射ベクトル(交点Q→反射点R)を描く
if (isCollision01)
mathGraph.DrawArrow(Q.x, Q.y, 0, 0, R.x, R.y, 0.8f, 1.0f, GetColor(255, 255, 0));
mathGraph.DrawPoint(p0.x, p0.y, 3, GetColor(255, 0, 0), TRUE);
std::string p0_String = "p0=(" + std::to_string((int)p0.x) + "," + std::to_string((int)p0.y) + ")";
mathGraph.DrawString(p0.x, p0.y, p0_String.c_str(), GetColor(255, 0, 0));
mathGraph.DrawPoint(p1.x, p1.y, 3, GetColor(0, 255, 0), TRUE);
std::string p1_String = "p1=(" + std::to_string((int)p1.x) + "," + std::to_string((int)p1.y) + ")";
mathGraph.DrawString(p1.x, p1.y, p1_String.c_str(), GetColor(0, 255, 0));
mathGraph.DrawPoint(p2.x, p2.y, 3, GetColor(0, 0, 255), TRUE);
std::string p2_String = "p2=(" + std::to_string((int)p2.x) + "," + std::to_string((int)p2.y) + ")";
mathGraph.DrawString(p2.x, p2.y, p2_String.c_str(), GetColor(0, 0, 255));
mathGraph.DrawPoint(p3.x, p3.y, 3, GetColor(0, 255, 255), TRUE);
std::string p3_String = "p3=(" + std::to_string((int)p3.x) + "," + std::to_string((int)p3.y) + ")";
mathGraph.DrawString(p3.x, p3.y, p3_String.c_str(), GetColor(0, 255, 255));
mathGraph.DrawPoint(Q.x, Q.y, 3, GetColor(255, 165, 0), TRUE);
std::string Q_String = "Q=(" + std::to_string(Q.x) + "," + std::to_string(Q.y) + ")";
mathGraph.DrawString(Q.x, Q.y - 10, Q_String.c_str(), GetColor(255, 165, 0));
mathGraph.DrawPoint(R.x, R.y, 3, GetColor(255, 255, 0), TRUE);
std::string R_String = "R=(" + std::to_string(R.x) + "," + std::to_string(R.y) + ")";
mathGraph.DrawString(R.x, R.y - 10, R_String.c_str(), GetColor(255, 255, 0));
ScreenFlip(); // 裏で描いておいたスクリーンを表画面にフリップ入れ替え
}
// キー入力待ちをする
WaitKey();
// DXライブラリの後始末
DxLib_End();
// ソフトの終了
return 0;
}
MyMath.hを変更してレイ光線ray0と円(中心点:pc 半径:r)の当たり判定と交点を関数RayCircleCollisionで求められるようにしてみましょう。#ifndef MYMATH_H_
#define MYMATH_H_
#include "Vector2.h" // 線との当たり判定にVector2を使う
#include <cmath>
// 数学関連クラス
class MyMath
{
public:
static const float Sqrt2; // = 1.41421356237f; // √2
static const float PI; // = 3.14159265359f; // 円周率
static const float Deg2Rad; // = PI / 180f; // 度からラジアンに変換する定数
(中略).....
/// <summary>
/// 光線ray0と円(中心:pc 半径:r)が重なっているかを調べる
/// </summary>
/// <param name="result1">光線ray0と円の交点1(最初に交わる点)</param>
/// <param name="result2">光線ray0と円の交点2(後ろ側で交わる点)</param>
/// <param name="result_isInsideCircle">レイの始点が円の内側にあるかの結果がtrueかfalseで求まる</param>
/// <param name="ray0start">光線ray0の始点</param>
/// <param name="ray0dir">光線ray0の方向ベクトル</param>
/// <param name="pc">円の中心点の位置ベクトル</param>
/// <param name="r">円の半径</param>
/// <returns>光線ray0と円が交差しているならtrue,してないならfalse</returns>
static bool RayCircleCollision(Vector2& result1, Vector2& result2, bool& result_isInsideCircle,
Vector2 ray0start, Vector2 ray0dir, Vector2 pc, float r)
{
Vector2 vc0 = ray0start - pc; // 円の中心pc→レイの始点ray0startへ向かうベクトル
Vector2 e0 = ray0dir.normalized(); // 光線ray0方向dirの単位ベクトル
float vc0_dot_e0 = dot(vc0, e0);
float vc0_sqrMag = vc0.sqrMagnitude(); //|vc0|の2乗
float dif_vc0_vc0_r_r = vc0_sqrMag - r * r; //↓|vc0|の2乗 - rの2乗
float D = vc0_dot_e0 * vc0_dot_e0 - dif_vc0_vc0_r_r;
if (dif_vc0_vc0_r_r < 0) // |vc0|の2乗 - rの2乗 < 0のときは円の内側に交点ray0の始点がある
result_isInsideCircle = true; // レイの始点が円の内側なのでtrue判定を返す
else
result_isInsideCircle = false; // レイの始点が円の外側なのでfalse判定を返す
if (D < 0) return false; // D < 0なら光線ray0は円とぶつからない
float sqrD = std::sqrtf(D); // √D
float t1 = -vc0_dot_e0 - sqrD;
float t2 = -vc0_dot_e0 + sqrD;
if (dif_vc0_vc0_r_r < 0) // |vc0|の2乗 - rの2乗 < 0のときは円の内側に交点ray0の始点があるので
{ // 円の内側のときは t1 と t2 の±をひっくり返す
t1 = -vc0_dot_e0 + sqrD; // t1とt2の+と-をひっくり返す(とresult1が最初に交わる点扱いになる)
t2 = -vc0_dot_e0 - sqrD;
}
result1 = ray0start + t1 * e0; // D == 0 のときは1,2両方同じになり交点は一つ
result2 = ray0start + t2 * e0;
return true; // 光線ray0は円と交わる(D > 0なら2点交わり、D == 0なら1点交わる)
}
};
#endif
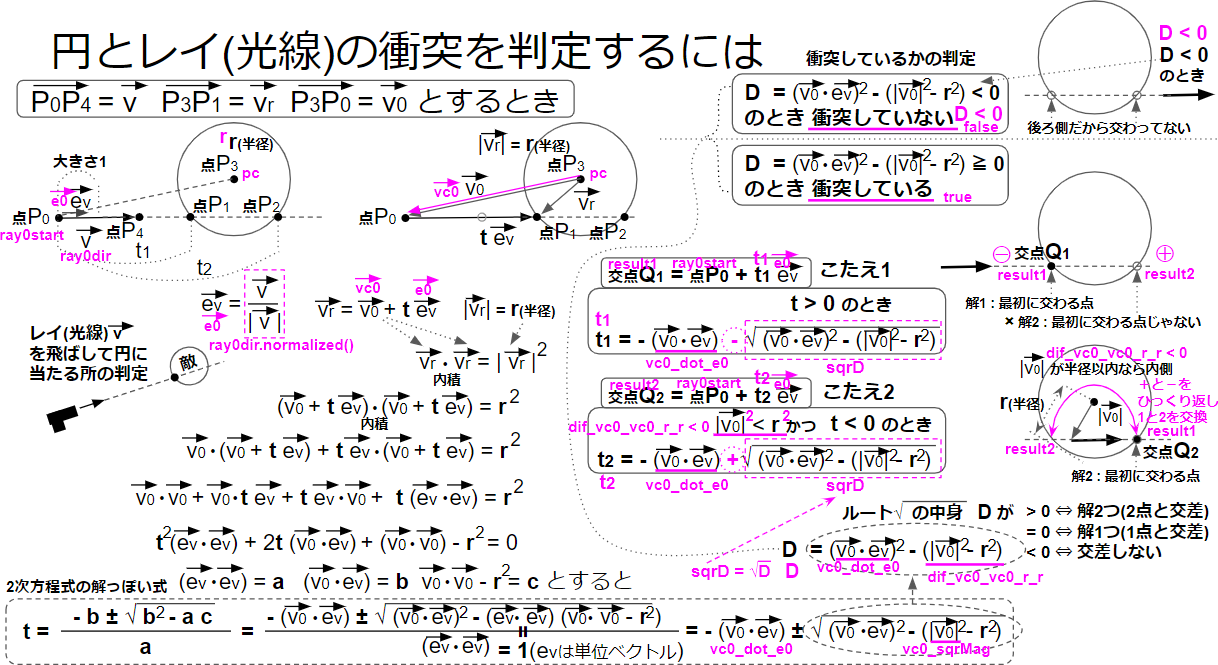
main.cppを一旦、まっさらにリセットしましょう。
#include "DxLib.h"
#include "Screen.h"
#include "Vector2.h"
#include "MathGraph2D.h"
#include "MyMath.h"
int WINAPI WinMain(HINSTANCE hInstance, HINSTANCE hPrevInstance, LPSTR lpCmdLine, int nCmdShow)
{
// 画面モードの設定
SetWindowSize(Screen::Width, Screen::Height);// ウィンドウサイズ960×540(こことSetGraphModeのサイズが異なると画像がゆがむ)
SetGraphMode(Screen::Width, Screen::Height, 32); // 画面サイズ960×540のカラービット数32ビットで起動
SetMainWindowText("数学のベクトルの練習");//この行でエラーになったら【設定】マルチバイト文字セットが間違ってるかも
ChangeWindowMode(TRUE);//フルスクリーン表示かウィンドウ表示か
SetAlwaysRunFlag(TRUE); // ウィンドウが非アクティブでも動作させる
// DXライブラリの初期化
if (DxLib_Init() < 0)
{
// エラーが発生したら直ちに終了
return -1;
}
SetMouseDispFlag(TRUE);// ここをFALSEにするとマウスカーソル非表示
//表示しているスクリーンの後ろで隠れて次に描く画像を先に描くモード
// これとペアでScreenFlip();でつぎのページと入れ替えでちらつきを防ぐ
SetDrawScreen(DX_SCREEN_BACK);
SetUseTransColor(FALSE); // 画像の指定色を透過する機能を無効化
ScreenFlip();
// 数学っぽくわかりやすくマス目を描いて、原点を画面の中心にして、10倍のスケールでみやすく描く
MathGraph2D mathGraph{ {Screen::Width / 2 ,Screen::Height / 2 },10.0f,{1.0f,1.0f} };
// アニメーション(パラパラ漫画)するにはWhile文
while (ProcessMessage() == 0)
{// ProcessMessage() == 0になるのは×ボタン押したときなど
ClearDrawScreen(); // 画面をまっさらにリセット
mathGraph.DrawGrid(GetColor(100, 100, 100)); // 100,100,100のグレーのグリッドでマス目を描く
// line0
Vector2 p0{ 5,5 }; // line0の始点
Vector2 p1{ 15,11 }; // line0の終点
// 線分line1
Vector2 p2{ 5,10 };
Vector2 p3{ 15,6 };
float r = 1.0f; // 円の半径r 始点p2が円(青ボール)の場合を想定
Vector2 Q; // line0とline1の交点
Vector2 R; // line0を壁wall0とした場合のline1の終点p3の壁line0に対する反射点Rと交点Qを求める
bool isCollision01 = MyMath::LineReflection(R, Q, p0, p1, p2, p3, r);
mathGraph.DrawCircle(p2.x, p2.y, r, GetColor(0, 0, 255), FALSE); // 円p2(始点)を描く
mathGraph.DrawCircle(Q.x, Q.y, r, GetColor(255, 165, 0), FALSE); // 円Q(衝突位置)を描く
mathGraph.DrawCircle(R.x, R.y, r, GetColor(255, 255, 0), FALSE); // 円R(反射位置)を描く
mathGraph.DrawArrow(p0.x, p0.y, 0, 0, p1.x, p1.y, 0.8f, 1.0f, (isCollision01) ? GetColor(255, 0, 0) : GetColor(255, 255, 255)); // 線分line0
mathGraph.DrawArrow(p2.x, p2.y, 0, 0, p3.x, p3.y, 0.8f, 1.0f, (isCollision01) ? GetColor(255, 0, 0) : GetColor(255, 255, 255)); // 線分line1
// 反射ベクトル(交点Q→反射点R)を描く
if (isCollision01)
mathGraph.DrawArrow(Q.x, Q.y, 0, 0, R.x, R.y, 0.8f, 1.0f, GetColor(255, 255, 0));
mathGraph.DrawPoint(p0.x, p0.y, 3, GetColor(255, 0, 0), TRUE);
std::string p0_String = "p0=(" + std::to_string((int)p0.x) + "," + std::to_string((int)p0.y) + ")";
mathGraph.DrawString(p0.x, p0.y, p0_String.c_str(), GetColor(255, 0, 0));
mathGraph.DrawPoint(p1.x, p1.y, 3, GetColor(0, 255, 0), TRUE);
std::string p1_String = "p1=(" + std::to_string((int)p1.x) + "," + std::to_string((int)p1.y) + ")";
mathGraph.DrawString(p1.x, p1.y, p1_String.c_str(), GetColor(0, 255, 0));
mathGraph.DrawPoint(p2.x, p2.y, 3, GetColor(0, 0, 255), TRUE);
std::string p2_String = "p2=(" + std::to_string((int)p2.x) + "," + std::to_string((int)p2.y) + ")";
mathGraph.DrawString(p2.x, p2.y, p2_String.c_str(), GetColor(0, 0, 255));
mathGraph.DrawPoint(p3.x, p3.y, 3, GetColor(0, 255, 255), TRUE);
std::string p3_String = "p3=(" + std::to_string((int)p3.x) + "," + std::to_string((int)p3.y) + ")";
mathGraph.DrawString(p3.x, p3.y, p3_String.c_str(), GetColor(0, 255, 255));
mathGraph.DrawPoint(Q.x, Q.y, 3, GetColor(255, 165, 0), TRUE);
std::string Q_String = "Q=(" + std::to_string(Q.x) + "," + std::to_string(Q.y) + ")";
mathGraph.DrawString(Q.x, Q.y - 10, Q_String.c_str(), GetColor(255, 165, 0));
mathGraph.DrawPoint(R.x, R.y, 3, GetColor(255, 255, 0), TRUE);
std::string R_String = "R=(" + std::to_string(R.x) + "," + std::to_string(R.y) + ")";
mathGraph.DrawString(R.x, R.y - 10, R_String.c_str(), GetColor(255, 255, 0));
ScreenFlip(); // 裏で描いておいたスクリーンを表画面にフリップ入れ替え
}
// キー入力待ちをする
WaitKey();
// DXライブラリの後始末
DxLib_End();
// ソフトの終了
return 0;
}
main.cppを変更して、光線ray0 と 円(中心点:pc 半径:r)の当たり判定 と衝突した 交点Q1,Q2 を求めて表示してみましょう。
#include "DxLib.h"
#include "Screen.h"
#include "Vector2.h"
#include "MathGraph2D.h"
#include "MyMath.h"
int WINAPI WinMain(HINSTANCE hInstance, HINSTANCE hPrevInstance, LPSTR lpCmdLine, int nCmdShow)
{
// 画面モードの設定
SetWindowSize(Screen::Width, Screen::Height);// ウィンドウサイズ960×540(こことSetGraphModeのサイズが異なると画像がゆがむ)
SetGraphMode(Screen::Width, Screen::Height, 32); // 画面サイズ960×540のカラービット数32ビットで起動
SetMainWindowText("数学のベクトルの練習");//この行でエラーになったら【設定】マルチバイト文字セットが間違ってるかも
ChangeWindowMode(TRUE);//フルスクリーン表示かウィンドウ表示か
SetAlwaysRunFlag(TRUE); // ウィンドウが非アクティブでも動作させる
// DXライブラリの初期化
if (DxLib_Init() < 0)
{
// エラーが発生したら直ちに終了
return -1;
}
SetMouseDispFlag(TRUE);// ここをFALSEにするとマウスカーソル非表示
//表示しているスクリーンの後ろで隠れて次に描く画像を先に描くモード
// これとペアでScreenFlip();でつぎのページと入れ替えでちらつきを防ぐ
SetDrawScreen(DX_SCREEN_BACK);
SetUseTransColor(FALSE); // 画像の指定色を透過する機能を無効化
ScreenFlip();
// 数学っぽくわかりやすくマス目を描いて、原点を画面の中心にして、10倍のスケールでみやすく描く
MathGraph2D mathGraph{ {Screen::Width / 2 ,Screen::Height / 2 },10.0f,{1.0f,1.0f} };
// アニメーション(パラパラ漫画)するにはWhile文
while (ProcessMessage() == 0)
{// ProcessMessage() == 0になるのは×ボタン押したときなど
ClearDrawScreen(); // 画面をまっさらにリセット
mathGraph.DrawGrid(GetColor(100, 100, 100)); // 100,100,100のグレーのグリッドでマス目を描く
// ray0光線レイ
Vector2 ray0pos{ 1,2 }; // レイ光線の始点
Vector2 ray0dir{ 2,1 }; // レイ光線の方向
// 円
Vector2 pc{ 5,5 };
float r = 2.0f; // 円の半径r
bool isInsideCircle = false; // レイの始点が円の内側のときはtrueになる
Vector2 Q1, Q2; // 光線ray0と円の交点(Q1が最初に円とぶつかる点、Q2が後ろ側でぶつかる点)
bool isCollision01 = MyMath::RayCircleCollision(Q1, Q2, isInsideCircle, ray0pos, ray0dir, pc, r);
mathGraph.DrawCircle(pc.x, pc.y, r, GetColor(0, 0, 255), FALSE); // 円(中心点:pc)を描く
// 光線ray0を描く
mathGraph.DrawArrow(ray0pos.x, ray0pos.y, 0, 0, ray0pos.x + ray0dir.x, ray0pos.y + ray0dir.y, 0.8f, 1.0f,
(isCollision01) ? GetColor(255, 0, 0) : GetColor(255, 255, 255));
// レイ光線の始点
mathGraph.DrawPoint(ray0pos.x, ray0pos.y, 3, GetColor(255, 165, 0), TRUE);
std::string ray0_String = "ray0=(" + std::to_string((int)ray0pos.x) + "," + std::to_string((int)ray0pos.y) + ")";
mathGraph.DrawString(ray0pos.x, ray0pos.y, ray0_String.c_str(), GetColor(255, 165, 0));
if (isCollision01)
{
// 交点Q1を描く(最初に交わる点)
mathGraph.DrawPoint(Q1.x, Q1.y, 3, GetColor(255, 165, 0), TRUE);
std::string Q1_String = "Q1=(" + std::to_string(Q1.x) + "," + std::to_string(Q1.y) + ")";
mathGraph.DrawString(Q1.x, Q1.y-5, Q1_String.c_str(), GetColor(255, 165, 0));
// 交点Q2を描く(後ろ側で交わる点)
if (Q2 != Q1) // (Q2 が Q1と違う点ならば)
{
mathGraph.DrawPoint(Q2.x, Q2.y, 3, GetColor(255, 255, 0), TRUE);
std::string Q2_String = "Q2=(" + std::to_string(Q2.x) + "," + std::to_string(Q2.y) + ")";
mathGraph.DrawString(Q2.x, Q2.y-10, Q2_String.c_str(), GetColor(255, 255, 0));
}
}
ScreenFlip(); // 裏で描いておいたスクリーンを表画面にフリップ入れ替え
}
// キー入力待ちをする
WaitKey();
// DXライブラリの後始末
DxLib_End();
// ソフトの終了
return 0;
}
main.cppの光線ray0の始点を変更して、光線ray0の始点 が 円の内側にあるときに 光線の始点が水色で表示されるか、実験表示してみましょう。
#include "DxLib.h"
#include "Screen.h"
#include "Vector2.h"
#include "MathGraph2D.h"
#include "MyMath.h"
int WINAPI WinMain(HINSTANCE hInstance, HINSTANCE hPrevInstance, LPSTR lpCmdLine, int nCmdShow)
{
// 画面モードの設定
SetWindowSize(Screen::Width, Screen::Height);// ウィンドウサイズ960×540(こことSetGraphModeのサイズが異なると画像がゆがむ)
SetGraphMode(Screen::Width, Screen::Height, 32); // 画面サイズ960×540のカラービット数32ビットで起動
SetMainWindowText("数学のベクトルの練習");//この行でエラーになったら【設定】マルチバイト文字セットが間違ってるかも
ChangeWindowMode(TRUE);//フルスクリーン表示かウィンドウ表示か
SetAlwaysRunFlag(TRUE); // ウィンドウが非アクティブでも動作させる
// DXライブラリの初期化
if (DxLib_Init() < 0)
{
// エラーが発生したら直ちに終了
return -1;
}
SetMouseDispFlag(TRUE);// ここをFALSEにするとマウスカーソル非表示
//表示しているスクリーンの後ろで隠れて次に描く画像を先に描くモード
// これとペアでScreenFlip();でつぎのページと入れ替えでちらつきを防ぐ
SetDrawScreen(DX_SCREEN_BACK);
SetUseTransColor(FALSE); // 画像の指定色を透過する機能を無効化
ScreenFlip();
// 数学っぽくわかりやすくマス目を描いて、原点を画面の中心にして、10倍のスケールでみやすく描く
MathGraph2D mathGraph{ {Screen::Width / 2 ,Screen::Height / 2 },10.0f,{1.0f,1.0f} };
// アニメーション(パラパラ漫画)するにはWhile文
while (ProcessMessage() == 0)
{// ProcessMessage() == 0になるのは×ボタン押したときなど
ClearDrawScreen(); // 画面をまっさらにリセット
mathGraph.DrawGrid(GetColor(100, 100, 100)); // 100,100,100のグレーのグリッドでマス目を描く
// ray0光線レイ
Vector2 ray0pos{ 4,4 }; // レイ光線の始点
Vector2 ray0dir{ 2,1 }; // レイ光線の方向
// 円
Vector2 pc{ 5,5 };
float r = 2.0f; // 円の半径r
bool isInsideCircle = false; // レイの始点が円の内側のときはtrueになる
Vector2 Q1, Q2; // 光線ray0と円の交点(Q1が最初に円とぶつかる点、Q2が後ろ側でぶつかる点)
bool isCollision01 = MyMath::RayCircleCollision(Q1, Q2, isInsideCircle, ray0pos, ray0dir, pc, r);
mathGraph.DrawCircle(pc.x, pc.y, r, GetColor(0, 0, 255), FALSE); // 円(中心点:pc)を描く
// 光線ray0を描く
mathGraph.DrawArrow(ray0pos.x, ray0pos.y, 0, 0, ray0pos.x + ray0dir.x, ray0pos.y + ray0dir.y, 0.8f, 1.0f,
(isCollision01) ? GetColor(255, 0, 0) : GetColor(255, 255, 255));
// レイ光線の始点(円の外側だったらオレンジ、円の内側だったら水色になる)
mathGraph.DrawPoint(ray0pos.x, ray0pos.y, 3, (isInsideCircle)? GetColor(0, 255, 255) : GetColor(255, 165, 0), TRUE);
std::string ray0_String = "ray0=(" + std::to_string((int)ray0pos.x) + "," + std::to_string((int)ray0pos.y) + ")";
mathGraph.DrawString(ray0pos.x, ray0pos.y, ray0_String.c_str(), (isInsideCircle) ? GetColor(0, 255, 255) : GetColor(255, 165, 0));
if (isCollision01)
{
// 交点Q1を描く(最初に交わる点)
mathGraph.DrawPoint(Q1.x, Q1.y, 3, GetColor(255, 165, 0), TRUE);
std::string Q1_String = "Q1=(" + std::to_string(Q1.x) + "," + std::to_string(Q1.y) + ")";
mathGraph.DrawString(Q1.x, Q1.y-5, Q1_String.c_str(), GetColor(255, 165, 0));
// 交点Q2を描く(後ろ側で交わる点)
if (Q2 != Q1) // (Q2 が Q1と違う点ならば)
{
mathGraph.DrawPoint(Q2.x, Q2.y, 3, GetColor(255, 255, 0), TRUE);
std::string Q2_String = "Q2=(" + std::to_string(Q2.x) + "," + std::to_string(Q2.y) + ")";
mathGraph.DrawString(Q2.x, Q2.y-10, Q2_String.c_str(), GetColor(255, 255, 0));
}
}
ScreenFlip(); // 裏で描いておいたスクリーンを表画面にフリップ入れ替え
}
// キー入力待ちをする
WaitKey();
// DXライブラリの後始末
DxLib_End();
// ソフトの終了
return 0;
}
main.cppを変更して、光線ray0の始点 が 円の内側にあるときには 交点Q2は表示しないようにしてみましょう。
#include "DxLib.h"
#include "Screen.h"
#include "Vector2.h"
#include "MathGraph2D.h"
#include "MyMath.h"
int WINAPI WinMain(HINSTANCE hInstance, HINSTANCE hPrevInstance, LPSTR lpCmdLine, int nCmdShow)
{
// 画面モードの設定
SetWindowSize(Screen::Width, Screen::Height);// ウィンドウサイズ960×540(こことSetGraphModeのサイズが異なると画像がゆがむ)
SetGraphMode(Screen::Width, Screen::Height, 32); // 画面サイズ960×540のカラービット数32ビットで起動
SetMainWindowText("数学のベクトルの練習");//この行でエラーになったら【設定】マルチバイト文字セットが間違ってるかも
ChangeWindowMode(TRUE);//フルスクリーン表示かウィンドウ表示か
SetAlwaysRunFlag(TRUE); // ウィンドウが非アクティブでも動作させる
// DXライブラリの初期化
if (DxLib_Init() < 0)
{
// エラーが発生したら直ちに終了
return -1;
}
SetMouseDispFlag(TRUE);// ここをFALSEにするとマウスカーソル非表示
//表示しているスクリーンの後ろで隠れて次に描く画像を先に描くモード
// これとペアでScreenFlip();でつぎのページと入れ替えでちらつきを防ぐ
SetDrawScreen(DX_SCREEN_BACK);
SetUseTransColor(FALSE); // 画像の指定色を透過する機能を無効化
ScreenFlip();
// 数学っぽくわかりやすくマス目を描いて、原点を画面の中心にして、10倍のスケールでみやすく描く
MathGraph2D mathGraph{ {Screen::Width / 2 ,Screen::Height / 2 },10.0f,{1.0f,1.0f} };
// アニメーション(パラパラ漫画)するにはWhile文
while (ProcessMessage() == 0)
{// ProcessMessage() == 0になるのは×ボタン押したときなど
ClearDrawScreen(); // 画面をまっさらにリセット
mathGraph.DrawGrid(GetColor(100, 100, 100)); // 100,100,100のグレーのグリッドでマス目を描く
// ray0光線レイ
Vector2 ray0pos{ 1,2 }; // レイ光線の始点
Vector2 ray0dir{ 2,1 }; // レイ光線の方向
// 円
Vector2 pc{ 5,5 };
float r = 2.0f; // 円の半径r
bool isInsideCircle = false; // レイの始点が円の内側のときはtrueになる
Vector2 Q1, Q2; // 光線ray0と円の交点(Q1が最初に円とぶつかる点、Q2が後ろ側でぶつかる点)
bool isCollision01 = MyMath::RayCircleCollision(Q1, Q2, isInsideCircle, ray0pos, ray0dir, pc, r);
mathGraph.DrawCircle(pc.x, pc.y, r, GetColor(0, 0, 255), FALSE); // 円(中心点:pc)を描く
// 光線ray0を描く
mathGraph.DrawArrow(ray0pos.x, ray0pos.y, 0, 0, ray0pos.x + ray0dir.x, ray0pos.y + ray0dir.y, 0.8f, 1.0f,
(isCollision01) ? GetColor(255, 0, 0) : GetColor(255, 255, 255));
// レイ光線の始点(円の外側だったらオレンジ、円の内側だったら水色になる)
mathGraph.DrawPoint(ray0pos.x, ray0pos.y, 3, (isInsideCircle)? GetColor(0, 255, 255) : GetColor(255, 165, 0), TRUE);
std::string ray0_String = "ray0=(" + std::to_string((int)ray0pos.x) + "," + std::to_string((int)ray0pos.y) + ")";
mathGraph.DrawString(ray0pos.x, ray0pos.y, ray0_String.c_str(), (isInsideCircle) ? GetColor(0, 255, 255) : GetColor(255, 165, 0));
if (isCollision01)
{
// 交点Q1を描く(最初に交わる点)
mathGraph.DrawPoint(Q1.x, Q1.y, 3, GetColor(255, 165, 0), TRUE);
std::string Q1_String = "Q1=(" + std::to_string(Q1.x) + "," + std::to_string(Q1.y) + ")";
mathGraph.DrawString(Q1.x, Q1.y-5, Q1_String.c_str(), GetColor(255, 165, 0));
// 交点Q2を描く(後ろ側で交わる点)
if (Q2 != Q1 && isInsideCircle == false) // (Q2 が Q1と違う点で光線の始点が円の内側にはないとき)
{
mathGraph.DrawPoint(Q2.x, Q2.y, 3, GetColor(255, 255, 0), TRUE);
std::string Q2_String = "Q2=(" + std::to_string(Q2.x) + "," + std::to_string(Q2.y) + ")";
mathGraph.DrawString(Q2.x, Q2.y-10, Q2_String.c_str(), GetColor(255, 255, 0));
}
}
ScreenFlip(); // 裏で描いておいたスクリーンを表画面にフリップ入れ替え
}
// キー入力待ちをする
WaitKey();
// DXライブラリの後始末
DxLib_End();
// ソフトの終了
return 0;
}
Matrix3x3.hを新規作成して3×3の配列[3][3]を内部に持つ行列を定義しましょう。#ifndef MATRIX3X3_H_
#define MATRIX3X3_H_
#include "Vector2.h" // 2Dのベクトル
#include <ostream>
#include <cmath>
// 行列(3×3) 2Dにも3Dにも使う
struct Matrix3x3
{
// 行列[行][列]の順 (行優先) https://qiita.com/suzuryo3893/items/9e543cdf8bc64dc7002a
union
{
float m[3][3]{}; // 3×3の配列
std::array<std::array<float, 3>, 3> mArr; // std::array型ベースなら少し便利
};
// float型のポインタへ(float*)キャストすればデータ配列 m の先頭のアドレスを返す
inline operator float* () const { return (float*)m; }
// float型のポインタへ(const float*)キャストすればデータ配列 m の先頭のアドレスを返す
inline operator const float* () const { return (const float*)m; }
// コンストラクタ
Matrix3x3() = default;
// コンストラクタ
Matrix3x3(float m11, float m12, float m13,
float m21, float m22, float m23,
float m31, float m32, float m33)
: m{ {m11, m12, m13}, {m21, m22, m23}, { m31, m32, m33} } {};
// コンストラクタ (std::arrayで初期化版)
Matrix3x3(std::array<std::array<float, 3>, 3>& matArr)
{
for (int j = 0; j < 3; ++j)
for (int i = 0; i < 3; ++i)
m[i][j] = matArr[i][j];
}
};
// 行列の出力
inline std::ostream& operator << (std::ostream& left, const Matrix3x3& right)
{
for (int i = 0; i < 3; ++i) {
for (int j = 0; j < 3; ++j) {
left << right.m[i][j];
if (j < 3 - 1) {
left << " ";
}
}
left << std::endl;
}
return left;
};
#endif
Matrix3x3.hを変更し、operatorをオーバーロードして行列の足し算や引き算や掛け算や割り算などの基本計算を定義しましょう。#ifndef MATRIX3X3_H_
#define MATRIX3X3_H_
#include "Vector2.h" // 2Dのベクトル
#include <ostream>
#include <cmath>
// 行列(3×3) 2Dにも3Dにも使う
struct Matrix3x3
{
// 行列[行][列]の順 (行優先) https://qiita.com/suzuryo3893/items/9e543cdf8bc64dc7002a
union
{
float m[3][3]{}; // 3×3の配列
std::array<std::array<float, 3>, 3> mArr; // std::array型ベースなら少し便利
};
// float型のポインタへ(float*)キャストすればデータ配列 m の先頭のアドレスを返す
inline operator float* () const { return (float*)m; }
// float型のポインタへ(const float*)キャストすればデータ配列 m の先頭のアドレスを返す
inline operator const float* () const { return (const float*)m; }
// コンストラクタ
Matrix3x3() = default;
// コンストラクタ
Matrix3x3(float m11, float m12, float m13,
float m21, float m22, float m23,
float m31, float m32, float m33)
: m{ {m11, m12, m13}, {m21, m22, m23}, { m31, m32, m33} } {};
// コンストラクタ (std::arrayで初期化版)
Matrix3x3(std::array<std::array<float, 3>, 3>& matArr)
{
for (int j = 0; j < 3; ++j)
for (int i = 0; i < 3; ++i)
m[i][j] = matArr[i][j];
}
/*----- 演算子オーバーロード -----*/
inline Matrix3x3 operator + () const { return *this; }
// マイナスの符号を単体の行列につけたとき
inline Matrix3x3 operator -() const
{
Matrix3x3 result;
for (int i = 0; i < 3; ++i)
for (int j = 0; j < 3; ++j)
result.m[i][j] = -this->m[i][j];
return result;
};
inline Matrix3x3& operator += (const Matrix3x3& add)
{
for (int i = 0; i < 3; ++i)
for (int j = 0; j < 3; ++j)
this->m[i][j] = this->m[i][j] + add.m[i][j];
return *this;
}
inline Matrix3x3& operator -= (const Matrix3x3& sub)
{
for (int i = 0; i < 3; ++i)
for (int j = 0; j < 3; ++j)
this->m[i][j] = this->m[i][j] - sub.m[i][j];
return *this;
}
inline Matrix3x3& operator *= (const Matrix3x3& mul)
{
Matrix3x3 tmp; // 値を一時保管
for (int i = 0; i < 3; ++i)
for (int j = 0; j < 3; ++j)
tmp.m[i][j] = this->m[i][j];
for (int i = 0; i < 3; ++i) {
for (int j = 0; j < 3; ++j) {
this->m[i][j] = 0;
for (int k = 0; k < 3; ++k)
this->m[i][j] += tmp.m[i][k] * mul.m[k][j];
}
}
return *this;
}
inline Matrix3x3& operator *= (float multiply_num)
{
for (int i = 0; i < 3; ++i)
for (int j = 0; j < 3; ++j)
this->m[i][j] = this->m[i][j] * multiply_num;
return *this;
}
inline Matrix3x3& operator /= (float divide_num)
{
for (int i = 0; i < 3; ++i)
for (int j = 0; j < 3; ++j)
this->m[i][j] = this->m[i][j] / divide_num;
return *this;
}
// 一致演算子 行列の中身が全部一致するか 一つでも違えばfalse
inline bool operator == (const Matrix3x3& other)
{
for (int i = 0; i < 3; ++i)
for (int j = 0; j < 3; ++j)
if (this->m[i][j] != other.m[i][j]) return false;
return true;
}
// 不一致演算子
inline bool operator != (const Matrix3x3& other)
{
return !(*this == other);
}
};
// 行列の加算
inline Matrix3x3 operator + (const Matrix3x3& left, const Matrix3x3& right)
{
Matrix3x3 result;
for (int i = 0; i < 3; ++i)
for (int j = 0; j < 3; ++j)
result.m[i][j] = left.m[i][j] + right.m[i][j];
return result;
};
// 行列の減算
inline Matrix3x3 operator - (const Matrix3x3& left, const Matrix3x3& right)
{
Matrix3x3 result;
for (int i = 0; i < 3; ++i)
for (int j = 0; j < 3; ++j)
result.m[i][j] = left.m[i][j] - right.m[i][j];
return result;
};
// 行列のスカラー倍 (スカラー×行列)
inline Matrix3x3 operator * (float left, const Matrix3x3& right)
{
Matrix3x3 result;
for (int i = 0; i < 3; ++i)
for (int j = 0; j < 3; ++j)
result.m[i][j] = left * right.m[i][j];
return result;
};
// 行列のスカラー倍 (行列×スカラー)
inline Matrix3x3 operator * (const Matrix3x3& left, float right)
{
Matrix3x3 result;
for (int i = 0; i < 3; ++i)
for (int j = 0; j < 3; ++j)
result.m[i][j] = left.m[i][j] * right;
return result;
};
// 行列の積
inline Matrix3x3 operator * (const Matrix3x3& left, const Matrix3x3& right)
{
Matrix3x3 result;
for (int i = 0; i < 3; ++i) {
for (int j = 0; j < 3; ++j) {
result.m[i][j] = 0;
for (int k = 0; k < 3; ++k)
result.m[i][j] += left.m[i][k] * right.m[k][j];
}
}
return result;
};
//[2D]ベクトルと行列の積
inline Vector2 operator * (const Vector2& left, const Matrix3x3& right)
{
float x = left.x * right.m[0][0] + left.y * right.m[1][0] + right.m[2][0];
float y = left.x * right.m[0][1] + left.y * right.m[1][1] + right.m[2][1];
return Vector2{ x, y };
};
inline const Matrix3x3 operator / (const Matrix3x3& left, const float right)
{
return left * (1.0f / right);
}
// 行列の出力
inline std::ostream& operator << (std::ostream& left, const Matrix3x3& right)
{
for (int i = 0; i < 3; ++i) {
for (int j = 0; j < 3; ++j) {
left << right.m[i][j];
if (j < 3 - 1) {
left << " ";
}
}
left << std::endl;
}
return left;
};
#endif
Matrix3x3.hを変更し、operatorをオーバーロードして行列の足し算や引き算や掛け算や割り算などの基本計算を定義しましょう。#ifndef MATRIX3X3_H_
#define MATRIX3X3_H_
#include "Vector2.h" // 2Dのベクトル
#include <ostream>
#include <cmath>
// 行列(3×3) 2Dにも3Dにも使う
struct Matrix3x3
{
// 行列[行][列]の順 (行優先) https://qiita.com/suzuryo3893/items/9e543cdf8bc64dc7002a
union
{
float m[3][3]{}; // 3×3の配列
std::array<std::array<float, 3>, 3> mArr; // std::array型ベースなら少し便利
};
// float型のポインタへ(float*)キャストすればデータ配列 m の先頭のアドレスを返す
inline operator float* () const { return (float*)m; }
// float型のポインタへ(const float*)キャストすればデータ配列 m の先頭のアドレスを返す
inline operator const float* () const { return (const float*)m; }
// コンストラクタ
Matrix3x3() = default;
// コンストラクタ
Matrix3x3(float m11, float m12, float m13,
float m21, float m22, float m23,
float m31, float m32, float m33)
: m{ {m11, m12, m13}, {m21, m22, m23}, { m31, m32, m33} } {};
// コンストラクタ (std::arrayで初期化版)
Matrix3x3(std::array<std::array<float, 3>, 3>& matArr)
{
for (int j = 0; j < 3; ++j)
for (int i = 0; i < 3; ++i)
m[i][j] = matArr[i][j];
}
// ゼロ行列を返す
static Matrix3x3 zero()
{
return Matrix3x3{ 0.0f, 0.0f, 0.0f,
0.0f, 0.0f, 0.0f,
0.0f, 0.0f, 0.0f };
};
// 単位行列を返す
static Matrix3x3 identity()
{
return Matrix3x3{ 1.0f, 0.0f, 0.0f,
0.0f, 1.0f, 0.0f,
0.0f, 0.0f, 1.0f };
};
/*----- 演算子オーバーロード -----*/
inline Matrix3x3 operator + () const { return *this; }
// マイナスの符号を単体の行列につけたとき
inline Matrix3x3 operator -() const
{
Matrix3x3 result;
for (int i = 0; i < 3; ++i)
for (int j = 0; j < 3; ++j)
result.m[i][j] = -this->m[i][j];
return result;
};
inline Matrix3x3& operator += (const Matrix3x3& add)
{
for (int i = 0; i < 3; ++i)
for (int j = 0; j < 3; ++j)
this->m[i][j] = this->m[i][j] + add.m[i][j];
return *this;
}
inline Matrix3x3& operator -= (const Matrix3x3& sub)
{
for (int i = 0; i < 3; ++i)
for (int j = 0; j < 3; ++j)
this->m[i][j] = this->m[i][j] - sub.m[i][j];
return *this;
}
inline Matrix3x3& operator *= (const Matrix3x3& mul)
{
Matrix3x3 tmp; // 値を一時保管
for (int i = 0; i < 3; ++i)
for (int j = 0; j < 3; ++j)
tmp.m[i][j] = this->m[i][j];
for (int i = 0; i < 3; ++i) {
for (int j = 0; j < 3; ++j) {
this->m[i][j] = 0;
for (int k = 0; k < 3; ++k)
this->m[i][j] += tmp.m[i][k] * mul.m[k][j];
}
}
return *this;
}
inline Matrix3x3& operator *= (float multiply_num)
{
for (int i = 0; i < 3; ++i)
for (int j = 0; j < 3; ++j)
this->m[i][j] = this->m[i][j] * multiply_num;
return *this;
}
inline Matrix3x3& operator /= (float divide_num)
{
for (int i = 0; i < 3; ++i)
for (int j = 0; j < 3; ++j)
this->m[i][j] = this->m[i][j] / divide_num;
return *this;
}
// 一致演算子 行列の中身が全部一致するか 一つでも違えばfalse
inline bool operator == (const Matrix3x3& other)
{
for (int i = 0; i < 3; ++i)
for (int j = 0; j < 3; ++j)
if (this->m[i][j] != other.m[i][j]) return false;
return true;
}
// 不一致演算子
inline bool operator != (const Matrix3x3& other)
{
return !(*this == other);
}
};
// 行列の加算
inline Matrix3x3 operator + (const Matrix3x3& left, const Matrix3x3& right)
{
Matrix3x3 result;
for (int i = 0; i < 3; ++i)
for (int j = 0; j < 3; ++j)
result.m[i][j] = left.m[i][j] + right.m[i][j];
return result;
};
// 行列の減算
inline Matrix3x3 operator - (const Matrix3x3& left, const Matrix3x3& right)
{
Matrix3x3 result;
for (int i = 0; i < 3; ++i)
for (int j = 0; j < 3; ++j)
result.m[i][j] = left.m[i][j] - right.m[i][j];
return result;
};
// 行列のスカラー倍 (スカラー×行列)
inline Matrix3x3 operator * (float left, const Matrix3x3& right)
{
Matrix3x3 result;
for (int i = 0; i < 3; ++i)
for (int j = 0; j < 3; ++j)
result.m[i][j] = left * right.m[i][j];
return result;
};
// 行列のスカラー倍 (行列×スカラー)
inline Matrix3x3 operator * (const Matrix3x3& left, float right)
{
Matrix3x3 result;
for (int i = 0; i < 3; ++i)
for (int j = 0; j < 3; ++j)
result.m[i][j] = left.m[i][j] * right;
return result;
};
// 行列の積
inline Matrix3x3 operator * (const Matrix3x3& left, const Matrix3x3& right)
{
Matrix3x3 result;
for (int i = 0; i < 3; ++i) {
for (int j = 0; j < 3; ++j) {
result.m[i][j] = 0;
for (int k = 0; k < 3; ++k)
result.m[i][j] += left.m[i][k] * right.m[k][j];
}
}
return result;
};
//[2D]ベクトルと行列の積
inline Vector2 operator * (const Vector2& left, const Matrix3x3& right)
{
float x = left.x * right.m[0][0] + left.y * right.m[1][0] + right.m[2][0];
float y = left.x * right.m[0][1] + left.y * right.m[1][1] + right.m[2][1];
return Vector2{ x, y };
};
inline const Matrix3x3 operator / (const Matrix3x3& left, const float right)
{
return left * (1.0f / right);
}
// 行列の出力
inline std::ostream& operator << (std::ostream& left, const Matrix3x3& right)
{
for (int i = 0; i < 3; ++i) {
for (int j = 0; j < 3; ++j) {
left << right.m[i][j];
if (j < 3 - 1) {
left << " ";
}
}
left << std::endl;
}
return left;
};
#endif
main.cppを一旦、きれいにまっさらにリセットしましょう。
#include "DxLib.h"
#include "Screen.h"
#include "Vector2.h"
#include "MathGraph2D.h"
#include "MyMath.h"
int WINAPI WinMain(HINSTANCE hInstance, HINSTANCE hPrevInstance, LPSTR lpCmdLine, int nCmdShow)
{
// 画面モードの設定
SetWindowSize(Screen::Width, Screen::Height);// ウィンドウサイズ960×540(こことSetGraphModeのサイズが異なると画像がゆがむ)
SetGraphMode(Screen::Width, Screen::Height, 32); // 画面サイズ960×540のカラービット数32ビットで起動
SetMainWindowText("数学のベクトルの練習");//この行でエラーになったら【設定】マルチバイト文字セットが間違ってるかも
ChangeWindowMode(TRUE);//フルスクリーン表示かウィンドウ表示か
SetAlwaysRunFlag(TRUE); // ウィンドウが非アクティブでも動作させる
// DXライブラリの初期化
if (DxLib_Init() < 0)
{
// エラーが発生したら直ちに終了
return -1;
}
SetMouseDispFlag(TRUE);// ここをFALSEにするとマウスカーソル非表示
//表示しているスクリーンの後ろで隠れて次に描く画像を先に描くモード
// これとペアでScreenFlip();でつぎのページと入れ替えでちらつきを防ぐ
SetDrawScreen(DX_SCREEN_BACK);
SetUseTransColor(FALSE); // 画像の指定色を透過する機能を無効化
ScreenFlip();
// 数学っぽくわかりやすくマス目を描いて、原点を画面の中心にして、10倍のスケールでみやすく描く
MathGraph2D mathGraph{ {Screen::Width / 2 ,Screen::Height / 2 },10.0f,{1.0f,1.0f} };
// アニメーション(パラパラ漫画)するにはWhile文
while (ProcessMessage() == 0)
{// ProcessMessage() == 0になるのは×ボタン押したときなど
ClearDrawScreen(); // 画面をまっさらにリセット
mathGraph.DrawGrid(GetColor(100, 100, 100)); // 100,100,100のグレーのグリッドでマス目を描く
// ray0光線レイ
Vector2 ray0pos{ 1,2 }; // レイ光線の始点
Vector2 ray0dir{ 2,1 }; // レイ光線の方向
// 円
Vector2 pc{ 5,5 };
float r = 2.0f; // 円の半径r
bool isInsideCircle = false; // レイの始点が円の内側のときはtrueになる
Vector2 Q1, Q2; // 光線ray0と円の交点(Q1が最初に円とぶつかる点、Q2が後ろ側でぶつかる点)
bool isCollision01 = MyMath::RayCircleCollision(Q1, Q2, isInsideCircle, ray0pos, ray0dir, pc, r);
mathGraph.DrawCircle(pc.x, pc.y, r, GetColor(0, 0, 255), FALSE); // 円(中心点:pc)を描く
// 光線ray0を描く
mathGraph.DrawArrow(ray0pos.x, ray0pos.y, 0, 0, ray0pos.x + ray0dir.x, ray0pos.y + ray0dir.y, 0.8f, 1.0f,
(isCollision01) ? GetColor(255, 0, 0) : GetColor(255, 255, 255));
// レイ光線の始点(円の外側だったらオレンジ、円の内側だったら水色になる)
mathGraph.DrawPoint(ray0pos.x, ray0pos.y, 3, (isInsideCircle)? GetColor(0, 255, 255) : GetColor(255, 165, 0), TRUE);
std::string ray0_String = "ray0=(" + std::to_string((int)ray0pos.x) + "," + std::to_string((int)ray0pos.y) + ")";
mathGraph.DrawString(ray0pos.x, ray0pos.y, ray0_String.c_str(), (isInsideCircle) ? GetColor(0, 255, 255) : GetColor(255, 165, 0));
if (isCollision01)
{
// 交点Q1を描く(最初に交わる点)
mathGraph.DrawPoint(Q1.x, Q1.y, 3, GetColor(255, 165, 0), TRUE);
std::string Q1_String = "Q1=(" + std::to_string(Q1.x) + "," + std::to_string(Q1.y) + ")";
mathGraph.DrawString(Q1.x, Q1.y-5, Q1_String.c_str(), GetColor(255, 165, 0));
// 交点Q2を描く(後ろ側で交わる点)
if (Q2 != Q1 && isInsideCircle == false) // (Q2 が Q1と違う点で光線の始点が円の内側にはないとき)
{
mathGraph.DrawPoint(Q2.x, Q2.y, 3, GetColor(255, 255, 0), TRUE);
std::string Q2_String = "Q2=(" + std::to_string(Q2.x) + "," + std::to_string(Q2.y) + ")";
mathGraph.DrawString(Q2.x, Q2.y-10, Q2_String.c_str(), GetColor(255, 255, 0));
}
}
ScreenFlip(); // 裏で描いておいたスクリーンを表画面にフリップ入れ替え
}
// キー入力待ちをする
WaitKey();
// DXライブラリの後始末
DxLib_End();
// ソフトの終了
return 0;
}
main.cppを変更して、点p0{1,1} を 平行移動行列(translate:トランスレート) で x方向に+2 y方向に+3 平行移動してみましょう。
#include "DxLib.h"
#include "Screen.h"
#include "Vector2.h"
#include "Matrix3x3.h"
#include "MathGraph2D.h"
#include "MyMath.h"
int WINAPI WinMain(HINSTANCE hInstance, HINSTANCE hPrevInstance, LPSTR lpCmdLine, int nCmdShow)
{
// 画面モードの設定
SetWindowSize(Screen::Width, Screen::Height);// ウィンドウサイズ960×540(こことSetGraphModeのサイズが異なると画像がゆがむ)
SetGraphMode(Screen::Width, Screen::Height, 32); // 画面サイズ960×540のカラービット数32ビットで起動
SetMainWindowText("数学のベクトルの練習");//この行でエラーになったら【設定】マルチバイト文字セットが間違ってるかも
ChangeWindowMode(TRUE);//フルスクリーン表示かウィンドウ表示か
SetAlwaysRunFlag(TRUE); // ウィンドウが非アクティブでも動作させる
// DXライブラリの初期化
if (DxLib_Init() < 0)
{
// エラーが発生したら直ちに終了
return -1;
}
SetMouseDispFlag(TRUE);// ここをFALSEにするとマウスカーソル非表示
//表示しているスクリーンの後ろで隠れて次に描く画像を先に描くモード
// これとペアでScreenFlip();でつぎのページと入れ替えでちらつきを防ぐ
SetDrawScreen(DX_SCREEN_BACK);
SetUseTransColor(FALSE); // 画像の指定色を透過する機能を無効化
ScreenFlip();
// 数学っぽくわかりやすくマス目を描いて、原点を画面の中心にして、10倍のスケールでみやすく描く
MathGraph2D mathGraph{ {Screen::Width / 2 ,Screen::Height / 2 },10.0f,{1.0f,1.0f} };
// アニメーション(パラパラ漫画)するにはWhile文
while (ProcessMessage() == 0)
{// ProcessMessage() == 0になるのは×ボタン押したときなど
ClearDrawScreen(); // 画面をまっさらにリセット
mathGraph.DrawGrid(GetColor(100, 100, 100)); // 100,100,100のグレーのグリッドでマス目を描く
Vector2 p0{ 1,1 }; // 点p0
Matrix3x3 translate{ 1,0,0,
0,1,0,
2,3,1 }; // 平行移動行列
// 点p1
Vector2 p1 = p0 * translate; // 点p0×translate (平行移動行列を右から掛け算)すると平行移動する
// 矢印p0→p1を描く
mathGraph.DrawArrow(p0.x, p0.y, 0, 0, p1.x, p1.y, 0.8f, 1.0f, GetColor(255, 255, 255));
// 点p0を描く
mathGraph.DrawPoint(p0.x, p0.y, 3, GetColor(255, 255, 255), TRUE);
std::string p0_String = "p0=(" + std::to_string((int)p0.x) + "," + std::to_string((int)p0.y) + ")";
mathGraph.DrawString(p0.x, p0.y, p0_String.c_str(), GetColor(255, 255, 255));
// 点p1を描く
mathGraph.DrawPoint(p1.x, p1.y, 3, GetColor(255, 0, 0), TRUE);
std::string p1_String = "p1=(" + std::to_string((int)p1.x) + "," + std::to_string((int)p1.y) + ")";
mathGraph.DrawString(p1.x, p1.y, p1_String.c_str(), GetColor(255, 0, 0));
ScreenFlip(); // 裏で描いておいたスクリーンを表画面にフリップ入れ替え
}
// キー入力待ちをする
WaitKey();
// DXライブラリの後始末
DxLib_End();
// ソフトの終了
return 0;
}
main.cppを変更して、点p0{1,1} を 平行移動行列(translate:トランスレート) で x方向に+4 y方向に+5 平行移動してみましょう。
#include "DxLib.h"
#include "Screen.h"
#include "Vector2.h"
#include "Matrix3x3.h"
#include "MathGraph2D.h"
#include "MyMath.h"
int WINAPI WinMain(HINSTANCE hInstance, HINSTANCE hPrevInstance, LPSTR lpCmdLine, int nCmdShow)
{
// 画面モードの設定
SetWindowSize(Screen::Width, Screen::Height);// ウィンドウサイズ960×540(こことSetGraphModeのサイズが異なると画像がゆがむ)
SetGraphMode(Screen::Width, Screen::Height, 32); // 画面サイズ960×540のカラービット数32ビットで起動
SetMainWindowText("数学のベクトルの練習");//この行でエラーになったら【設定】マルチバイト文字セットが間違ってるかも
ChangeWindowMode(TRUE);//フルスクリーン表示かウィンドウ表示か
SetAlwaysRunFlag(TRUE); // ウィンドウが非アクティブでも動作させる
// DXライブラリの初期化
if (DxLib_Init() < 0)
{
// エラーが発生したら直ちに終了
return -1;
}
SetMouseDispFlag(TRUE);// ここをFALSEにするとマウスカーソル非表示
//表示しているスクリーンの後ろで隠れて次に描く画像を先に描くモード
// これとペアでScreenFlip();でつぎのページと入れ替えでちらつきを防ぐ
SetDrawScreen(DX_SCREEN_BACK);
SetUseTransColor(FALSE); // 画像の指定色を透過する機能を無効化
ScreenFlip();
// 数学っぽくわかりやすくマス目を描いて、原点を画面の中心にして、10倍のスケールでみやすく描く
MathGraph2D mathGraph{ {Screen::Width / 2 ,Screen::Height / 2 },10.0f,{1.0f,1.0f} };
// アニメーション(パラパラ漫画)するにはWhile文
while (ProcessMessage() == 0)
{// ProcessMessage() == 0になるのは×ボタン押したときなど
ClearDrawScreen(); // 画面をまっさらにリセット
mathGraph.DrawGrid(GetColor(100, 100, 100)); // 100,100,100のグレーのグリッドでマス目を描く
Vector2 p0{ 1,1 }; // 点p0
Matrix3x3 translate{ 1,0,0,
0,1,0,
4,5,1 }; // 平行移動行列
// 点p1
Vector2 p1 = p0 * translate; // 点p0×translate (平行移動行列を右から掛け算)すると平行移動する
// 矢印p0→p1を描く
mathGraph.DrawArrow(p0.x, p0.y, 0, 0, p1.x, p1.y, 0.8f, 1.0f, GetColor(255, 255, 255));
// 点p0を描く
mathGraph.DrawPoint(p0.x, p0.y, 3, GetColor(255, 255, 255), TRUE);
std::string p0_String = "p0=(" + std::to_string((int)p0.x) + "," + std::to_string((int)p0.y) + ")";
mathGraph.DrawString(p0.x, p0.y, p0_String.c_str(), GetColor(255, 255, 255));
// 点p1を描く
mathGraph.DrawPoint(p1.x, p1.y, 3, GetColor(255, 0, 0), TRUE);
std::string p1_String = "p1=(" + std::to_string((int)p1.x) + "," + std::to_string((int)p1.y) + ")";
mathGraph.DrawString(p1.x, p1.y, p1_String.c_str(), GetColor(255, 0, 0));
ScreenFlip(); // 裏で描いておいたスクリーンを表画面にフリップ入れ替え
}
// キー入力待ちをする
WaitKey();
// DXライブラリの後始末
DxLib_End();
// ソフトの終了
return 0;
}
Matrix3x3 translate{ 1,0,3,
0,1,4,
0,0,1 }; // 平行移動行列{+3,+4}(OpenGL系)
Matrix3x3.hを変更し、転置処理をするtranspose関数を定義しましょう。#ifndef MATRIX3X3_H_
#define MATRIX3X3_H_
#include "Vector2.h" // 2Dのベクトル
#include <ostream>
#include <cmath>
// 行列(3×3) 2Dにも3Dにも使う
struct Matrix3x3
{
// 行列[行][列]の順 (行優先) https://qiita.com/suzuryo3893/items/9e543cdf8bc64dc7002a
union
{
float m[3][3]{}; // 3×3の配列
std::array<std::array<float, 3>, 3> mArr; // std::array型ベースなら少し便利
};
// float型のポインタへ(float*)キャストすればデータ配列 m の先頭のアドレスを返す
inline operator float* () const { return (float*)m; }
// float型のポインタへ(const float*)キャストすればデータ配列 m の先頭のアドレスを返す
inline operator const float* () const { return (const float*)m; }
// コンストラクタ
Matrix3x3() = default;
// コンストラクタ
Matrix3x3(float m11, float m12, float m13,
float m21, float m22, float m23,
float m31, float m32, float m33)
: m{ {m11, m12, m13}, {m21, m22, m23}, { m31, m32, m33} } {};
// コンストラクタ (std::arrayで初期化版)
Matrix3x3(std::array<std::array<float, 3>, 3>& matArr)
{
for (int j = 0; j < 3; ++j)
for (int i = 0; i < 3; ++i)
m[i][j] = matArr[i][j];
}
// ゼロ行列を返す
static Matrix3x3 zero()
{
return Matrix3x3{ 0.0f, 0.0f, 0.0f,
0.0f, 0.0f, 0.0f,
0.0f, 0.0f, 0.0f };
};
// 単位行列を返す
static Matrix3x3 identity()
{
return Matrix3x3{ 1.0f, 0.0f, 0.0f,
0.0f, 1.0f, 0.0f,
0.0f, 0.0f, 1.0f };
};
//[2D]平行移動行列を返す(2D向け) (DirectX系)
static Matrix3x3 translate(const Vector2& t)
{
return Matrix3x3{ 1.0, 0.0f, 0.0f,
0.0, 1.0f, 0.0f,
t.x, t.y, 1.0f };
};
// 転置行列を返す(メンバ関数版)
inline Matrix3x3 transpose()
{
Matrix3x3 result;
for (int i = 0; i < 3; ++i)
for (int j = 0; j < 3; ++j)
result.m[i][j] = this->m[j][i]; // 行i と 列j を 行j と 列i に交換
return result;
};
/*----- 演算子オーバーロード -----*/
inline Matrix3x3 operator + () const { return *this; }
// マイナスの符号を単体の行列につけたとき
inline Matrix3x3 operator -() const
{
Matrix3x3 result;
for (int i = 0; i < 3; ++i)
for (int j = 0; j < 3; ++j)
result.m[i][j] = -this->m[i][j];
return result;
};
inline Matrix3x3& operator += (const Matrix3x3& add)
{
for (int i = 0; i < 3; ++i)
for (int j = 0; j < 3; ++j)
this->m[i][j] = this->m[i][j] + add.m[i][j];
return *this;
}
inline Matrix3x3& operator -= (const Matrix3x3& sub)
{
for (int i = 0; i < 3; ++i)
for (int j = 0; j < 3; ++j)
this->m[i][j] = this->m[i][j] - sub.m[i][j];
return *this;
}
inline Matrix3x3& operator *= (const Matrix3x3& mul)
{
Matrix3x3 tmp; // 値を一時保管
for (int i = 0; i < 3; ++i)
for (int j = 0; j < 3; ++j)
tmp.m[i][j] = this->m[i][j];
for (int i = 0; i < 3; ++i) {
for (int j = 0; j < 3; ++j) {
this->m[i][j] = 0;
for (int k = 0; k < 3; ++k)
this->m[i][j] += tmp.m[i][k] * mul.m[k][j];
}
}
return *this;
}
inline Matrix3x3& operator *= (float multiply_num)
{
for (int i = 0; i < 3; ++i)
for (int j = 0; j < 3; ++j)
this->m[i][j] = this->m[i][j] * multiply_num;
return *this;
}
inline Matrix3x3& operator /= (float divide_num)
{
for (int i = 0; i < 3; ++i)
for (int j = 0; j < 3; ++j)
this->m[i][j] = this->m[i][j] / divide_num;
return *this;
}
// 一致演算子 行列の中身が全部一致するか 一つでも違えばfalse
inline bool operator == (const Matrix3x3& other)
{
for (int i = 0; i < 3; ++i)
for (int j = 0; j < 3; ++j)
if (this->m[i][j] != other.m[i][j]) return false;
return true;
}
// 不一致演算子
inline bool operator != (const Matrix3x3& other)
{
return !(*this == other);
}
};
// 行列の加算
inline Matrix3x3 operator + (const Matrix3x3& left, const Matrix3x3& right)
{
Matrix3x3 result;
for (int i = 0; i < 3; ++i)
for (int j = 0; j < 3; ++j)
result.m[i][j] = left.m[i][j] + right.m[i][j];
return result;
};
// 行列の減算
inline Matrix3x3 operator - (const Matrix3x3& left, const Matrix3x3& right)
{
Matrix3x3 result;
for (int i = 0; i < 3; ++i)
for (int j = 0; j < 3; ++j)
result.m[i][j] = left.m[i][j] - right.m[i][j];
return result;
};
// 行列のスカラー倍 (スカラー×行列)
inline Matrix3x3 operator * (float left, const Matrix3x3& right)
{
Matrix3x3 result;
for (int i = 0; i < 3; ++i)
for (int j = 0; j < 3; ++j)
result.m[i][j] = left * right.m[i][j];
return result;
};
// 行列のスカラー倍 (行列×スカラー)
inline Matrix3x3 operator * (const Matrix3x3& left, float right)
{
Matrix3x3 result;
for (int i = 0; i < 3; ++i)
for (int j = 0; j < 3; ++j)
result.m[i][j] = left.m[i][j] * right;
return result;
};
// 行列の積
inline Matrix3x3 operator * (const Matrix3x3& left, const Matrix3x3& right)
{
Matrix3x3 result;
for (int i = 0; i < 3; ++i) {
for (int j = 0; j < 3; ++j) {
result.m[i][j] = 0;
for (int k = 0; k < 3; ++k)
result.m[i][j] += left.m[i][k] * right.m[k][j];
}
}
return result;
};
//[2D]ベクトルと行列の積
inline Vector2 operator * (const Vector2& left, const Matrix3x3& right)
{
float x = left.x * right.m[0][0] + left.y * right.m[1][0] + right.m[2][0];
float y = left.x * right.m[0][1] + left.y * right.m[1][1] + right.m[2][1];
return Vector2{ x, y };
};
inline const Matrix3x3 operator / (const Matrix3x3& left, const float right)
{
return left * (1.0f / right);
}
// 転置行列を返す
inline Matrix3x3 transpose(const Matrix3x3& mat)
{
Matrix3x3 result;
for (int i = 0; i < 3; ++i)
for (int j = 0; j < 3; ++j)
result.m[i][j] = mat.m[j][i]; // 行i と 列j を 行j と 列i に交換
return result;
};
// 行列の出力
inline std::ostream& operator << (std::ostream& left, const Matrix3x3& right)
{
for (int i = 0; i < 3; ++i) {
for (int j = 0; j < 3; ++j) {
left << right.m[i][j];
if (j < 3 - 1) {
left << " ";
}
}
left << std::endl;
}
return left;
};
#endif
main.cppを変更して、点p0{1,1} を 平行移動行列をtranslate関数を使って初期化して x方向に+4 y方向に+5 平行移動してみましょう。
#include "DxLib.h"
#include "Screen.h"
#include "Vector2.h"
#include "Matrix3x3.h"
#include "MathGraph2D.h"
#include "MyMath.h"
int WINAPI WinMain(HINSTANCE hInstance, HINSTANCE hPrevInstance, LPSTR lpCmdLine, int nCmdShow)
{
// 画面モードの設定
SetWindowSize(Screen::Width, Screen::Height);// ウィンドウサイズ960×540(こことSetGraphModeのサイズが異なると画像がゆがむ)
SetGraphMode(Screen::Width, Screen::Height, 32); // 画面サイズ960×540のカラービット数32ビットで起動
SetMainWindowText("数学のベクトルの練習");//この行でエラーになったら【設定】マルチバイト文字セットが間違ってるかも
ChangeWindowMode(TRUE);//フルスクリーン表示かウィンドウ表示か
SetAlwaysRunFlag(TRUE); // ウィンドウが非アクティブでも動作させる
// DXライブラリの初期化
if (DxLib_Init() < 0)
{
// エラーが発生したら直ちに終了
return -1;
}
SetMouseDispFlag(TRUE);// ここをFALSEにするとマウスカーソル非表示
//表示しているスクリーンの後ろで隠れて次に描く画像を先に描くモード
// これとペアでScreenFlip();でつぎのページと入れ替えでちらつきを防ぐ
SetDrawScreen(DX_SCREEN_BACK);
SetUseTransColor(FALSE); // 画像の指定色を透過する機能を無効化
ScreenFlip();
// 数学っぽくわかりやすくマス目を描いて、原点を画面の中心にして、10倍のスケールでみやすく描く
MathGraph2D mathGraph{ {Screen::Width / 2 ,Screen::Height / 2 },10.0f,{1.0f,1.0f} };
// アニメーション(パラパラ漫画)するにはWhile文
while (ProcessMessage() == 0)
{// ProcessMessage() == 0になるのは×ボタン押したときなど
ClearDrawScreen(); // 画面をまっさらにリセット
mathGraph.DrawGrid(GetColor(100, 100, 100)); // 100,100,100のグレーのグリッドでマス目を描く
Vector2 p0{ 1,1 }; // 点p0
Matrix3x3 translate{ 1,0,0,
0,1,0,
4,5,1 }; // 平行移動行列
Matrix3x3 translate = Matrix3x3::translate(Vector2{ 4,5 }); // 平行移動行列
// 点p1
Vector2 p1 = p0 * translate; // 点p0×translate (平行移動行列を右から掛け算)すると平行移動する
// 矢印p0→p1を描く
mathGraph.DrawArrow(p0.x, p0.y, 0, 0, p1.x, p1.y, 0.8f, 1.0f, GetColor(255, 255, 255));
// 点p0を描く
mathGraph.DrawPoint(p0.x, p0.y, 3, GetColor(255, 255, 255), TRUE);
std::string p0_String = "p0=(" + std::to_string((int)p0.x) + "," + std::to_string((int)p0.y) + ")";
mathGraph.DrawString(p0.x, p0.y, p0_String.c_str(), GetColor(255, 255, 255));
// 点p1を描く
mathGraph.DrawPoint(p1.x, p1.y, 3, GetColor(255, 0, 0), TRUE);
std::string p1_String = "p1=(" + std::to_string((int)p1.x) + "," + std::to_string((int)p1.y) + ")";
mathGraph.DrawString(p1.x, p1.y, p1_String.c_str(), GetColor(255, 0, 0));
ScreenFlip(); // 裏で描いておいたスクリーンを表画面にフリップ入れ替え
}
// キー入力待ちをする
WaitKey();
// DXライブラリの後始末
DxLib_End();
// ソフトの終了
return 0;
}
main.cppを変更して、点p0{1,1} を スケール行列{×3倍,×4倍}を使って、x方向に×3倍 y方向に×4倍 スケーリングしてみましょう。
#include "DxLib.h"
#include "Screen.h"
#include "Vector2.h"
#include "Matrix3x3.h"
#include "MathGraph2D.h"
#include "MyMath.h"
int WINAPI WinMain(HINSTANCE hInstance, HINSTANCE hPrevInstance, LPSTR lpCmdLine, int nCmdShow)
{
// 画面モードの設定
SetWindowSize(Screen::Width, Screen::Height);// ウィンドウサイズ960×540(こことSetGraphModeのサイズが異なると画像がゆがむ)
SetGraphMode(Screen::Width, Screen::Height, 32); // 画面サイズ960×540のカラービット数32ビットで起動
SetMainWindowText("数学のベクトルの練習");//この行でエラーになったら【設定】マルチバイト文字セットが間違ってるかも
ChangeWindowMode(TRUE);//フルスクリーン表示かウィンドウ表示か
SetAlwaysRunFlag(TRUE); // ウィンドウが非アクティブでも動作させる
// DXライブラリの初期化
if (DxLib_Init() < 0)
{
// エラーが発生したら直ちに終了
return -1;
}
SetMouseDispFlag(TRUE);// ここをFALSEにするとマウスカーソル非表示
//表示しているスクリーンの後ろで隠れて次に描く画像を先に描くモード
// これとペアでScreenFlip();でつぎのページと入れ替えでちらつきを防ぐ
SetDrawScreen(DX_SCREEN_BACK);
SetUseTransColor(FALSE); // 画像の指定色を透過する機能を無効化
ScreenFlip();
// 数学っぽくわかりやすくマス目を描いて、原点を画面の中心にして、10倍のスケールでみやすく描く
MathGraph2D mathGraph{ {Screen::Width / 2 ,Screen::Height / 2 },10.0f,{1.0f,1.0f} };
// アニメーション(パラパラ漫画)するにはWhile文
while (ProcessMessage() == 0)
{// ProcessMessage() == 0になるのは×ボタン押したときなど
ClearDrawScreen(); // 画面をまっさらにリセット
mathGraph.DrawGrid(GetColor(100, 100, 100)); // 100,100,100のグレーのグリッドでマス目を描く
Vector2 p0{ 1,1 }; // 点p0
Matrix3x3 scale{ 2,0,0,
0,3,0,
0,0,1 }; // スケール(拡大縮小)行列
Matrix3x3 translate = Matrix3x3::translate(Vector2{ 4,5 }); // 平行移動行列
// 点p1
Vector2 p1 = p0 * scale; // 点p0×scale (スケール行列を右から掛け算)すると拡大縮小する
// 矢印p0→p1を描く
mathGraph.DrawArrow(p0.x, p0.y, 0, 0, p1.x, p1.y, 0.8f, 1.0f, GetColor(255, 255, 255));
// 点p0を描く
mathGraph.DrawPoint(p0.x, p0.y, 3, GetColor(255, 255, 255), TRUE);
std::string p0_String = "p0=(" + std::to_string((int)p0.x) + "," + std::to_string((int)p0.y) + ")";
mathGraph.DrawString(p0.x, p0.y, p0_String.c_str(), GetColor(255, 255, 255));
// 点p1を描く
mathGraph.DrawPoint(p1.x, p1.y, 3, GetColor(255, 0, 0), TRUE);
std::string p1_String = "p1=(" + std::to_string((int)p1.x) + "," + std::to_string((int)p1.y) + ")";
mathGraph.DrawString(p1.x, p1.y, p1_String.c_str(), GetColor(255, 0, 0));
ScreenFlip(); // 裏で描いておいたスクリーンを表画面にフリップ入れ替え
}
// キー入力待ちをする
WaitKey();
// DXライブラリの後始末
DxLib_End();
// ソフトの終了
return 0;
}
main.cppを一旦、きれいにまっさらにリセットしましょう。
#include "DxLib.h"
#include "Screen.h"
#include "Vector2.h"
#include "Matrix3x3.h"
#include "MathGraph2D.h"
#include "MyMath.h"
int WINAPI WinMain(HINSTANCE hInstance, HINSTANCE hPrevInstance, LPSTR lpCmdLine, int nCmdShow)
{
// 画面モードの設定
SetWindowSize(Screen::Width, Screen::Height);// ウィンドウサイズ960×540(こことSetGraphModeのサイズが異なると画像がゆがむ)
SetGraphMode(Screen::Width, Screen::Height, 32); // 画面サイズ960×540のカラービット数32ビットで起動
SetMainWindowText("数学のベクトルの練習");//この行でエラーになったら【設定】マルチバイト文字セットが間違ってるかも
ChangeWindowMode(TRUE);//フルスクリーン表示かウィンドウ表示か
SetAlwaysRunFlag(TRUE); // ウィンドウが非アクティブでも動作させる
// DXライブラリの初期化
if (DxLib_Init() < 0)
{
// エラーが発生したら直ちに終了
return -1;
}
SetMouseDispFlag(TRUE);// ここをFALSEにするとマウスカーソル非表示
//表示しているスクリーンの後ろで隠れて次に描く画像を先に描くモード
// これとペアでScreenFlip();でつぎのページと入れ替えでちらつきを防ぐ
SetDrawScreen(DX_SCREEN_BACK);
SetUseTransColor(FALSE); // 画像の指定色を透過する機能を無効化
ScreenFlip();
// 数学っぽくわかりやすくマス目を描いて、原点を画面の中心にして、10倍のスケールでみやすく描く
MathGraph2D mathGraph{ {Screen::Width / 2 ,Screen::Height / 2 },10.0f,{1.0f,1.0f} };
// アニメーション(パラパラ漫画)するにはWhile文
while (ProcessMessage() == 0)
{// ProcessMessage() == 0になるのは×ボタン押したときなど
ClearDrawScreen(); // 画面をまっさらにリセット
mathGraph.DrawGrid(GetColor(100, 100, 100)); // 100,100,100のグレーのグリッドでマス目を描く
Vector2 p0{ 1,1 }; // 点p0
Matrix3x3 scale{ 2,0,0,
0,3,0,
0,0,1 }; // スケール(拡大縮小)行列
// 点p1
Vector2 p1 = p0 * scale; // 点p0×scale (スケール行列を右から掛け算)すると拡大縮小する
// 矢印p0→p1を描く
mathGraph.DrawArrow(p0.x, p0.y, 0, 0, p1.x, p1.y, 0.8f, 1.0f, GetColor(255, 255, 255));
// 点p0を描く
mathGraph.DrawPoint(p0.x, p0.y, 3, GetColor(255, 255, 255), TRUE);
std::string p0_String = "p0=(" + std::to_string((int)p0.x) + "," + std::to_string((int)p0.y) + ")";
mathGraph.DrawString(p0.x, p0.y, p0_String.c_str(), GetColor(255, 255, 255));
// 点p1を描く
mathGraph.DrawPoint(p1.x, p1.y, 3, GetColor(255, 0, 0), TRUE);
std::string p1_String = "p1=(" + std::to_string((int)p1.x) + "," + std::to_string((int)p1.y) + ")";
mathGraph.DrawString(p1.x, p1.y, p1_String.c_str(), GetColor(255, 0, 0));
ScreenFlip(); // 裏で描いておいたスクリーンを表画面にフリップ入れ替え
}
// キー入力待ちをする
WaitKey();
// DXライブラリの後始末
DxLib_End();
// ソフトの終了
return 0;
}
main.cppを変更して、3点p0{1,1} 点p1{3,4} 点p2{5,2} を スケール行列{×2倍,×5倍}を使って、x方向に×2倍 y方向に×5倍 スケーリングしてみましょう。
#include "DxLib.h"
#include "Screen.h"
#include "Vector2.h"
#include "Matrix3x3.h"
#include "MathGraph2D.h"
#include "MyMath.h"
int WINAPI WinMain(HINSTANCE hInstance, HINSTANCE hPrevInstance, LPSTR lpCmdLine, int nCmdShow)
{
// 画面モードの設定
SetWindowSize(Screen::Width, Screen::Height);// ウィンドウサイズ960×540(こことSetGraphModeのサイズが異なると画像がゆがむ)
SetGraphMode(Screen::Width, Screen::Height, 32); // 画面サイズ960×540のカラービット数32ビットで起動
SetMainWindowText("数学のベクトルの練習");//この行でエラーになったら【設定】マルチバイト文字セットが間違ってるかも
ChangeWindowMode(TRUE);//フルスクリーン表示かウィンドウ表示か
SetAlwaysRunFlag(TRUE); // ウィンドウが非アクティブでも動作させる
// DXライブラリの初期化
if (DxLib_Init() < 0)
{
// エラーが発生したら直ちに終了
return -1;
}
SetMouseDispFlag(TRUE);// ここをFALSEにするとマウスカーソル非表示
//表示しているスクリーンの後ろで隠れて次に描く画像を先に描くモード
// これとペアでScreenFlip();でつぎのページと入れ替えでちらつきを防ぐ
SetDrawScreen(DX_SCREEN_BACK);
SetUseTransColor(FALSE); // 画像の指定色を透過する機能を無効化
ScreenFlip();
// 数学っぽくわかりやすくマス目を描いて、原点を画面の中心にして、10倍のスケールでみやすく描く
MathGraph2D mathGraph{ {Screen::Width / 2 ,Screen::Height / 2 },10.0f,{1.0f,1.0f} };
// アニメーション(パラパラ漫画)するにはWhile文
while (ProcessMessage() == 0)
{// ProcessMessage() == 0になるのは×ボタン押したときなど
ClearDrawScreen(); // 画面をまっさらにリセット
mathGraph.DrawGrid(GetColor(100, 100, 100)); // 100,100,100のグレーのグリッドでマス目を描く
Vector2 p0{ 1,1 }; // 点p0
Vector2 p1{ 3,4 }; // 点p1
Vector2 p2{ 5,2 }; // 点p2
Matrix3x3 scale{ 2,0,0,
0,5,0,
0,0,1 }; // スケール(拡大縮小)行列
// 点q0,q1,q2
Vector2 q0 = p0 * scale; // 点p0×scale (スケール行列を右から掛け算)すると拡大縮小する
Vector2 q1 = p1 * scale; // 点p1×scale (スケール行列を右から掛け算)すると拡大縮小する
Vector2 q2 = p2 * scale; // 点p2×scale (スケール行列を右から掛け算)すると拡大縮小する
// 三角形p0,p1,p2を描く
mathGraph.DrawLine(p0.x, p0.y, p1.x, p1.y, GetColor(255, 255, 255));
mathGraph.DrawLine(p1.x, p1.y, p2.x, p2.y, GetColor(255, 255, 255));
mathGraph.DrawLine(p2.x, p2.y, p0.x, p0.y, GetColor(255, 255, 255));
// スケール後の三角形q0,q1,q2を描く
mathGraph.DrawLine(q0.x, q0.y, q1.x, q1.y, GetColor(255, 255, 255));
mathGraph.DrawLine(q1.x, q1.y, q2.x, q2.y, GetColor(255, 255, 255));
mathGraph.DrawLine(q2.x, q2.y, q0.x, q0.y, GetColor(255, 255, 255));
// スケール前の3点を描く
// 点p0を描く
mathGraph.DrawPoint(p0.x, p0.y, 3, GetColor(255, 0, 0), TRUE);
std::string p0_String = "p0=(" + std::to_string((int)p0.x) + "," + std::to_string((int)p0.y) + ")";
mathGraph.DrawString(p0.x, p0.y, p0_String.c_str(), GetColor(255, 0, 0));
// 点p1を描く
mathGraph.DrawPoint(p1.x, p1.y, 3, GetColor(0, 255, 0), TRUE);
std::string p1_String = "p1=(" + std::to_string((int)p1.x) + "," + std::to_string((int)p1.y) + ")";
mathGraph.DrawString(p1.x, p1.y, p1_String.c_str(), GetColor(0, 255, 0));
// 点p2を描く
mathGraph.DrawPoint(p2.x, p2.y, 3, GetColor(0, 0, 255), TRUE);
std::string p2_String = "p2=(" + std::to_string((int)p2.x) + "," + std::to_string((int)p2.y) + ")";
mathGraph.DrawString(p2.x, p2.y, p2_String.c_str(), GetColor(0, 0, 255));
// スケールしたあとの3点を描く
// 点q0を描く
mathGraph.DrawPoint(q0.x, q0.y, 3, GetColor(255, 0, 0), TRUE);
std::string q0_String = "q0=(" + std::to_string(q0.x) + "," + std::to_string(q0.y) + ")";
mathGraph.DrawString(q0.x, q0.y, q0_String.c_str(), GetColor(255, 0, 0));
// 点q1を描く
mathGraph.DrawPoint(q1.x, q1.y, 3, GetColor(0, 255, 0), TRUE);
std::string q1_String = "q1=(" + std::to_string(q1.x) + "," + std::to_string(q1.y) + ")";
mathGraph.DrawString(q1.x, q1.y, q1_String.c_str(), GetColor(0, 255, 0));
// 点q2を描く
mathGraph.DrawPoint(q2.x, q2.y, 3, GetColor(0, 0, 255), TRUE);
std::string q2_String = "q2=(" + std::to_string(q2.x) + "," + std::to_string(q2.y) + ")";
mathGraph.DrawString(q2.x, q2.y, q2_String.c_str(), GetColor(0, 0, 255));
ScreenFlip(); // 裏で描いておいたスクリーンを表画面にフリップ入れ替え
}
// キー入力待ちをする
WaitKey();
// DXライブラリの後始末
DxLib_End();
// ソフトの終了
return 0;
}
Matrix3x3.hを変更してスケール行列をゲットするためのscale関数を定義しましょう。#ifndef MATRIX3X3_H_
#define MATRIX3X3_H_
#include "Vector2.h" // 2Dのベクトル
#include <ostream>
#include <cmath>
// 行列(3×3) 2Dにも3Dにも使う
struct Matrix3x3
{
// 行列[行][列]の順 (行優先) https://qiita.com/suzuryo3893/items/9e543cdf8bc64dc7002a
union
{
float m[3][3]{}; // 3×3の配列
std::array<std::array<float, 3>, 3> mArr; // std::array型ベースなら少し便利
};
// float型のポインタへ(float*)キャストすればデータ配列 m の先頭のアドレスを返す
inline operator float* () const { return (float*)m; }
// float型のポインタへ(const float*)キャストすればデータ配列 m の先頭のアドレスを返す
inline operator const float* () const { return (const float*)m; }
// コンストラクタ
Matrix3x3() = default;
// コンストラクタ
Matrix3x3(float m11, float m12, float m13,
float m21, float m22, float m23,
float m31, float m32, float m33)
: m{ {m11, m12, m13}, {m21, m22, m23}, { m31, m32, m33} } {};
// コンストラクタ (std::arrayで初期化版)
Matrix3x3(std::array<std::array<float, 3>, 3>& matArr)
{
for (int j = 0; j < 3; ++j)
for (int i = 0; i < 3; ++i)
m[i][j] = matArr[i][j];
}
// ゼロ行列を返す
static Matrix3x3 zero()
{
return Matrix3x3{ 0.0f, 0.0f, 0.0f,
0.0f, 0.0f, 0.0f,
0.0f, 0.0f, 0.0f };
};
// 単位行列を返す
static Matrix3x3 identity()
{
return Matrix3x3{ 1.0f, 0.0f, 0.0f,
0.0f, 1.0f, 0.0f,
0.0f, 0.0f, 1.0f };
};
//[2D]拡大縮小行列を返す(2D向け)
static Matrix3x3 scale(const Vector2& s)
{
return Matrix3x3{ s.x, 0.0f, 0.0f,
0.0f, s.y, 0.0f,
0.0f, 0.0f, 1.0f };
};
//[2D]平行移動行列を返す(2D向け) (DirectX系)
static Matrix3x3 translate(const Vector2& t)
{
return Matrix3x3{ 1.0, 0.0f, 0.0f,
0.0, 1.0f, 0.0f,
t.x, t.y, 1.0f };
};
// 転置行列を返す(メンバ関数版)
inline Matrix3x3 transpose()
{
Matrix3x3 result;
for (int i = 0; i < 3; ++i)
for (int j = 0; j < 3; ++j)
result.m[i][j] = this->m[j][i]; // 行i と 列j を 行j と 列i に交換
return result;
};
/*----- 演算子オーバーロード -----*/
inline Matrix3x3 operator + () const { return *this; }
// マイナスの符号を単体の行列につけたとき
inline Matrix3x3 operator -() const
{
Matrix3x3 result;
for (int i = 0; i < 3; ++i)
for (int j = 0; j < 3; ++j)
result.m[i][j] = -this->m[i][j];
return result;
};
inline Matrix3x3& operator += (const Matrix3x3& add)
{
for (int i = 0; i < 3; ++i)
for (int j = 0; j < 3; ++j)
this->m[i][j] = this->m[i][j] + add.m[i][j];
return *this;
}
inline Matrix3x3& operator -= (const Matrix3x3& sub)
{
for (int i = 0; i < 3; ++i)
for (int j = 0; j < 3; ++j)
this->m[i][j] = this->m[i][j] - sub.m[i][j];
return *this;
}
inline Matrix3x3& operator *= (const Matrix3x3& mul)
{
Matrix3x3 tmp; // 値を一時保管
for (int i = 0; i < 3; ++i)
for (int j = 0; j < 3; ++j)
tmp.m[i][j] = this->m[i][j];
for (int i = 0; i < 3; ++i) {
for (int j = 0; j < 3; ++j) {
this->m[i][j] = 0;
for (int k = 0; k < 3; ++k)
this->m[i][j] += tmp.m[i][k] * mul.m[k][j];
}
}
return *this;
}
inline Matrix3x3& operator *= (float multiply_num)
{
for (int i = 0; i < 3; ++i)
for (int j = 0; j < 3; ++j)
this->m[i][j] = this->m[i][j] * multiply_num;
return *this;
}
inline Matrix3x3& operator /= (float divide_num)
{
for (int i = 0; i < 3; ++i)
for (int j = 0; j < 3; ++j)
this->m[i][j] = this->m[i][j] / divide_num;
return *this;
}
// 一致演算子 行列の中身が全部一致するか 一つでも違えばfalse
inline bool operator == (const Matrix3x3& other)
{
for (int i = 0; i < 3; ++i)
for (int j = 0; j < 3; ++j)
if (this->m[i][j] != other.m[i][j]) return false;
return true;
}
// 不一致演算子
inline bool operator != (const Matrix3x3& other)
{
return !(*this == other);
}
};
// 行列の加算
inline Matrix3x3 operator + (const Matrix3x3& left, const Matrix3x3& right)
{
Matrix3x3 result;
for (int i = 0; i < 3; ++i)
for (int j = 0; j < 3; ++j)
result.m[i][j] = left.m[i][j] + right.m[i][j];
return result;
};
// 行列の減算
inline Matrix3x3 operator - (const Matrix3x3& left, const Matrix3x3& right)
{
Matrix3x3 result;
for (int i = 0; i < 3; ++i)
for (int j = 0; j < 3; ++j)
result.m[i][j] = left.m[i][j] - right.m[i][j];
return result;
};
// 行列のスカラー倍 (スカラー×行列)
inline Matrix3x3 operator * (float left, const Matrix3x3& right)
{
Matrix3x3 result;
for (int i = 0; i < 3; ++i)
for (int j = 0; j < 3; ++j)
result.m[i][j] = left * right.m[i][j];
return result;
};
// 行列のスカラー倍 (行列×スカラー)
inline Matrix3x3 operator * (const Matrix3x3& left, float right)
{
Matrix3x3 result;
for (int i = 0; i < 3; ++i)
for (int j = 0; j < 3; ++j)
result.m[i][j] = left.m[i][j] * right;
return result;
};
// 行列の積
inline Matrix3x3 operator * (const Matrix3x3& left, const Matrix3x3& right)
{
Matrix3x3 result;
for (int i = 0; i < 3; ++i) {
for (int j = 0; j < 3; ++j) {
result.m[i][j] = 0;
for (int k = 0; k < 3; ++k)
result.m[i][j] += left.m[i][k] * right.m[k][j];
}
}
return result;
};
//[2D]ベクトルと行列の積
inline Vector2 operator * (const Vector2& left, const Matrix3x3& right)
{
float x = left.x * right.m[0][0] + left.y * right.m[1][0] + right.m[2][0];
float y = left.x * right.m[0][1] + left.y * right.m[1][1] + right.m[2][1];
return Vector2{ x, y };
};
inline const Matrix3x3 operator / (const Matrix3x3& left, const float right)
{
return left * (1.0f / right);
}
// 転置行列を返す
inline Matrix3x3 transpose(const Matrix3x3& mat)
{
Matrix3x3 result;
for (int i = 0; i < 3; ++i)
for (int j = 0; j < 3; ++j)
result.m[i][j] = mat.m[j][i]; // 行i と 列j を 行j と 列i に交換
return result;
};
// 行列の出力
inline std::ostream& operator << (std::ostream& left, const Matrix3x3& right)
{
for (int i = 0; i < 3; ++i) {
for (int j = 0; j < 3; ++j) {
left << right.m[i][j];
if (j < 3 - 1) {
left << " ";
}
}
left << std::endl;
}
return left;
};
#endif
main.cppを変更して、3点p0{1,1} 点p1{3,4} 点p2{5,2} を scale関数でゲットしたスケール行列{×2倍,×5倍}を使って、x方向に×2倍 y方向に×5倍 スケーリングしてみましょう。
#include "DxLib.h"
#include "Screen.h"
#include "Vector2.h"
#include "Matrix3x3.h"
#include "MathGraph2D.h"
#include "MyMath.h"
int WINAPI WinMain(HINSTANCE hInstance, HINSTANCE hPrevInstance, LPSTR lpCmdLine, int nCmdShow)
{
// 画面モードの設定
SetWindowSize(Screen::Width, Screen::Height);// ウィンドウサイズ960×540(こことSetGraphModeのサイズが異なると画像がゆがむ)
SetGraphMode(Screen::Width, Screen::Height, 32); // 画面サイズ960×540のカラービット数32ビットで起動
SetMainWindowText("数学のベクトルの練習");//この行でエラーになったら【設定】マルチバイト文字セットが間違ってるかも
ChangeWindowMode(TRUE);//フルスクリーン表示かウィンドウ表示か
SetAlwaysRunFlag(TRUE); // ウィンドウが非アクティブでも動作させる
// DXライブラリの初期化
if (DxLib_Init() < 0)
{
// エラーが発生したら直ちに終了
return -1;
}
SetMouseDispFlag(TRUE);// ここをFALSEにするとマウスカーソル非表示
//表示しているスクリーンの後ろで隠れて次に描く画像を先に描くモード
// これとペアでScreenFlip();でつぎのページと入れ替えでちらつきを防ぐ
SetDrawScreen(DX_SCREEN_BACK);
SetUseTransColor(FALSE); // 画像の指定色を透過する機能を無効化
ScreenFlip();
// 数学っぽくわかりやすくマス目を描いて、原点を画面の中心にして、10倍のスケールでみやすく描く
MathGraph2D mathGraph{ {Screen::Width / 2 ,Screen::Height / 2 },10.0f,{1.0f,1.0f} };
// アニメーション(パラパラ漫画)するにはWhile文
while (ProcessMessage() == 0)
{// ProcessMessage() == 0になるのは×ボタン押したときなど
ClearDrawScreen(); // 画面をまっさらにリセット
mathGraph.DrawGrid(GetColor(100, 100, 100)); // 100,100,100のグレーのグリッドでマス目を描く
Vector2 p0{ 1,1 }; // 点p0
Vector2 p1{ 3,4 }; // 点p1
Vector2 p2{ 5,2 }; // 点p2
Matrix3x3 scale{ 2,0,0,
0,5,0,
0,0,1 }; // スケール(拡大縮小)行列
Matrix3x3 scale = Matrix3x3::scale(Vector2{ -2,5 }); // スケール(拡大縮小)行列
// 点q0,q1,q2
Vector2 q0 = p0 * scale; // 点p0×scale (スケール行列を右から掛け算)すると拡大縮小する
Vector2 q1 = p1 * scale; // 点p1×scale (スケール行列を右から掛け算)すると拡大縮小する
Vector2 q2 = p2 * scale; // 点p2×scale (スケール行列を右から掛け算)すると拡大縮小する
// 三角形p0,p1,p2を描く
mathGraph.DrawLine(p0.x, p0.y, p1.x, p1.y, GetColor(255, 255, 255));
mathGraph.DrawLine(p1.x, p1.y, p2.x, p2.y, GetColor(255, 255, 255));
mathGraph.DrawLine(p2.x, p2.y, p0.x, p0.y, GetColor(255, 255, 255));
// スケール後の三角形q0,q1,q2を描く
mathGraph.DrawLine(q0.x, q0.y, q1.x, q1.y, GetColor(255, 255, 255));
mathGraph.DrawLine(q1.x, q1.y, q2.x, q2.y, GetColor(255, 255, 255));
mathGraph.DrawLine(q2.x, q2.y, q0.x, q0.y, GetColor(255, 255, 255));
// スケール前の3点を描く
// 点p0を描く
mathGraph.DrawPoint(p0.x, p0.y, 3, GetColor(255, 0, 0), TRUE);
std::string p0_String = "p0=(" + std::to_string((int)p0.x) + "," + std::to_string((int)p0.y) + ")";
mathGraph.DrawString(p0.x, p0.y, p0_String.c_str(), GetColor(255, 0, 0));
// 点p1を描く
mathGraph.DrawPoint(p1.x, p1.y, 3, GetColor(0, 255, 0), TRUE);
std::string p1_String = "p1=(" + std::to_string((int)p1.x) + "," + std::to_string((int)p1.y) + ")";
mathGraph.DrawString(p1.x, p1.y, p1_String.c_str(), GetColor(0, 255, 0));
// 点p2を描く
mathGraph.DrawPoint(p2.x, p2.y, 3, GetColor(0, 0, 255), TRUE);
std::string p2_String = "p2=(" + std::to_string((int)p2.x) + "," + std::to_string((int)p2.y) + ")";
mathGraph.DrawString(p2.x, p2.y, p2_String.c_str(), GetColor(0, 0, 255));
// スケールしたあとの3点を描く
// 点q0を描く
mathGraph.DrawPoint(q0.x, q0.y, 3, GetColor(255, 0, 0), TRUE);
std::string q0_String = "q0=(" + std::to_string(q0.x) + "," + std::to_string(q0.y) + ")";
mathGraph.DrawString(q0.x, q0.y, q0_String.c_str(), GetColor(255, 0, 0));
// 点q1を描く
mathGraph.DrawPoint(q1.x, q1.y, 3, GetColor(0, 255, 0), TRUE);
std::string q1_String = "q1=(" + std::to_string(q1.x) + "," + std::to_string(q1.y) + ")";
mathGraph.DrawString(q1.x, q1.y, q1_String.c_str(), GetColor(0, 255, 0));
// 点q2を描く
mathGraph.DrawPoint(q2.x, q2.y, 3, GetColor(0, 0, 255), TRUE);
std::string q2_String = "q2=(" + std::to_string(q2.x) + "," + std::to_string(q2.y) + ")";
mathGraph.DrawString(q2.x, q2.y, q2_String.c_str(), GetColor(0, 0, 255));
ScreenFlip(); // 裏で描いておいたスクリーンを表画面にフリップ入れ替え
}
// キー入力待ちをする
WaitKey();
// DXライブラリの後始末
DxLib_End();
// ソフトの終了
return 0;
}
main.cppを変更して、3点p0{1,1} 点p1{3,4} 点p2{5,2} を 回転行列で原点(0,0)を中心に反時計回りに60度(θ=60°)回転してしてみましょう。
#include "DxLib.h"
#include "Screen.h"
#include "Vector2.h"
#include "Matrix3x3.h"
#include "MathGraph2D.h"
#include "MyMath.h"
int WINAPI WinMain(HINSTANCE hInstance, HINSTANCE hPrevInstance, LPSTR lpCmdLine, int nCmdShow)
{
// 画面モードの設定
SetWindowSize(Screen::Width, Screen::Height);// ウィンドウサイズ960×540(こことSetGraphModeのサイズが異なると画像がゆがむ)
SetGraphMode(Screen::Width, Screen::Height, 32); // 画面サイズ960×540のカラービット数32ビットで起動
SetMainWindowText("数学のベクトルの練習");//この行でエラーになったら【設定】マルチバイト文字セットが間違ってるかも
ChangeWindowMode(TRUE);//フルスクリーン表示かウィンドウ表示か
SetAlwaysRunFlag(TRUE); // ウィンドウが非アクティブでも動作させる
// DXライブラリの初期化
if (DxLib_Init() < 0)
{
// エラーが発生したら直ちに終了
return -1;
}
SetMouseDispFlag(TRUE);// ここをFALSEにするとマウスカーソル非表示
//表示しているスクリーンの後ろで隠れて次に描く画像を先に描くモード
// これとペアでScreenFlip();でつぎのページと入れ替えでちらつきを防ぐ
SetDrawScreen(DX_SCREEN_BACK);
SetUseTransColor(FALSE); // 画像の指定色を透過する機能を無効化
ScreenFlip();
// 数学っぽくわかりやすくマス目を描いて、原点を画面の中心にして、10倍のスケールでみやすく描く
MathGraph2D mathGraph{ {Screen::Width / 2 ,Screen::Height / 2 },10.0f,{1.0f,1.0f} };
// アニメーション(パラパラ漫画)するにはWhile文
while (ProcessMessage() == 0)
{// ProcessMessage() == 0になるのは×ボタン押したときなど
ClearDrawScreen(); // 画面をまっさらにリセット
mathGraph.DrawGrid(GetColor(100, 100, 100)); // 100,100,100のグレーのグリッドでマス目を描く
Vector2 p0{ 1,1 }; // 点p0
Vector2 p1{ 3,4 }; // 点p1
Vector2 p2{ 5,2 }; // 点p2
constexpr float pi = 3.14159265359f;
float rad = 60 * (pi / 180.0f);
Matrix3x3 rotate{ std::cosf(rad),std::sinf(rad), 0,
-std::sinf(rad),std::cosf(rad), 0,
0, 0, 1 }; // 回転行列
Matrix3x3 scale = Matrix3x3::scale(Vector2{ -2,5 }); // スケール(拡大縮小)行列
// 点q0,q1,q2
Vector2 q0 = p0 * rotate; // 点p0×rotate (回転行列を右から掛け算)すると原点を中心に回転する
Vector2 q1 = p1 * rotate; // 点p1×rotate (回転行列を右から掛け算)すると原点を中心に回転する
Vector2 q2 = p2 * rotate; // 点p2×rotate (回転行列を右から掛け算)すると原点を中心に回転する
// 三角形p0,p1,p2を描く
mathGraph.DrawLine(p0.x, p0.y, p1.x, p1.y, GetColor(255, 255, 255));
mathGraph.DrawLine(p1.x, p1.y, p2.x, p2.y, GetColor(255, 255, 255));
mathGraph.DrawLine(p2.x, p2.y, p0.x, p0.y, GetColor(255, 255, 255));
// 回転後の三角形q0,q1,q2を描く
mathGraph.DrawLine(q0.x, q0.y, q1.x, q1.y, GetColor(255, 255, 255));
mathGraph.DrawLine(q1.x, q1.y, q2.x, q2.y, GetColor(255, 255, 255));
mathGraph.DrawLine(q2.x, q2.y, q0.x, q0.y, GetColor(255, 255, 255));
// 回転前の3点を描く
// 点p0を描く
mathGraph.DrawPoint(p0.x, p0.y, 3, GetColor(255, 0, 0), TRUE);
std::string p0_String = "p0=(" + std::to_string((int)p0.x) + "," + std::to_string((int)p0.y) + ")";
mathGraph.DrawString(p0.x, p0.y, p0_String.c_str(), GetColor(255, 0, 0));
// 点p1を描く
mathGraph.DrawPoint(p1.x, p1.y, 3, GetColor(0, 255, 0), TRUE);
std::string p1_String = "p1=(" + std::to_string((int)p1.x) + "," + std::to_string((int)p1.y) + ")";
mathGraph.DrawString(p1.x, p1.y, p1_String.c_str(), GetColor(0, 255, 0));
// 点p2を描く
mathGraph.DrawPoint(p2.x, p2.y, 3, GetColor(0, 0, 255), TRUE);
std::string p2_String = "p2=(" + std::to_string((int)p2.x) + "," + std::to_string((int)p2.y) + ")";
mathGraph.DrawString(p2.x, p2.y, p2_String.c_str(), GetColor(0, 0, 255));
// 回転したあとの3点を描く
// 点q0を描く
mathGraph.DrawPoint(q0.x, q0.y, 3, GetColor(255, 0, 0), TRUE);
std::string q0_String = "q0=(" + std::to_string(q0.x) + "," + std::to_string(q0.y) + ")";
mathGraph.DrawString(q0.x, q0.y, q0_String.c_str(), GetColor(255, 0, 0));
// 点q1を描く
mathGraph.DrawPoint(q1.x, q1.y, 3, GetColor(0, 255, 0), TRUE);
std::string q1_String = "q1=(" + std::to_string(q1.x) + "," + std::to_string(q1.y) + ")";
mathGraph.DrawString(q1.x, q1.y, q1_String.c_str(), GetColor(0, 255, 0));
// 点q2を描く
mathGraph.DrawPoint(q2.x, q2.y, 3, GetColor(0, 0, 255), TRUE);
std::string q2_String = "q2=(" + std::to_string(q2.x) + "," + std::to_string(q2.y) + ")";
mathGraph.DrawString(q2.x, q2.y, q2_String.c_str(), GetColor(0, 0, 255));
ScreenFlip(); // 裏で描いておいたスクリーンを表画面にフリップ入れ替え
}
// キー入力待ちをする
WaitKey();
// DXライブラリの後始末
DxLib_End();
// ソフトの終了
return 0;
}
Matrix3x3.hを変更して回転行列をゲットするための関数を定義しましょう。#ifndef MATRIX3X3_H_
#define MATRIX3X3_H_
#include "Vector2.h" // 2Dのベクトル
#include <ostream>
#include <cmath>
// 行列(3×3) 2Dにも3Dにも使う
struct Matrix3x3
{
// 行列[行][列]の順 (行優先) https://qiita.com/suzuryo3893/items/9e543cdf8bc64dc7002a
union
{
float m[3][3]{}; // 3×3の配列
std::array<std::array<float, 3>, 3> mArr; // std::array型ベースなら少し便利
};
// float型のポインタへ(float*)キャストすればデータ配列 m の先頭のアドレスを返す
inline operator float* () const { return (float*)m; }
// float型のポインタへ(const float*)キャストすればデータ配列 m の先頭のアドレスを返す
inline operator const float* () const { return (const float*)m; }
// コンストラクタ
Matrix3x3() = default;
// コンストラクタ
Matrix3x3(float m11, float m12, float m13,
float m21, float m22, float m23,
float m31, float m32, float m33)
: m{ {m11, m12, m13}, {m21, m22, m23}, { m31, m32, m33} } {};
// コンストラクタ (std::arrayで初期化版)
Matrix3x3(std::array<std::array<float, 3>, 3>& matArr)
{
for (int j = 0; j < 3; ++j)
for (int i = 0; i < 3; ++i)
m[i][j] = matArr[i][j];
}
// ゼロ行列を返す
static Matrix3x3 zero()
{
return Matrix3x3{ 0.0f, 0.0f, 0.0f,
0.0f, 0.0f, 0.0f,
0.0f, 0.0f, 0.0f };
};
// 単位行列を返す
static Matrix3x3 identity()
{
return Matrix3x3{ 1.0f, 0.0f, 0.0f,
0.0f, 1.0f, 0.0f,
0.0f, 0.0f, 1.0f };
};
//[2D]拡大縮小行列を返す(2D向け)
static Matrix3x3 scale(const Vector2& s)
{
return Matrix3x3{ s.x, 0.0f, 0.0f,
0.0f, s.y, 0.0f,
0.0f, 0.0f, 1.0f };
};
//[2D]回転行列を返す(2D向け) degree:角度(°) (DirectX系)
static Matrix3x3 rotate(float degree)
{
constexpr float pi = 3.14159265359f;
float rad = degree * (pi / 180.0f);
float cos_theta = std::cos(rad), sin_theta = std::sin(rad);
return Matrix3x3{ cos_theta, sin_theta, 0.0f,
-sin_theta, cos_theta, 0.0f,
0.0f, 0.0f, 1.0f };
};
//[2D]平行移動行列を返す(2D向け) (DirectX系)
static Matrix3x3 translate(const Vector2& t)
{
return Matrix3x3{ 1.0, 0.0f, 0.0f,
0.0, 1.0f, 0.0f,
t.x, t.y, 1.0f };
};
// 転置行列を返す(メンバ関数版)
inline Matrix3x3 transpose()
{
Matrix3x3 result;
for (int i = 0; i < 3; ++i)
for (int j = 0; j < 3; ++j)
result.m[i][j] = this->m[j][i]; // 行i と 列j を 行j と 列i に交換
return result;
};
/*----- 演算子オーバーロード -----*/
inline Matrix3x3 operator + () const { return *this; }
// マイナスの符号を単体の行列につけたとき
inline Matrix3x3 operator -() const
{
Matrix3x3 result;
for (int i = 0; i < 3; ++i)
for (int j = 0; j < 3; ++j)
result.m[i][j] = -this->m[i][j];
return result;
};
inline Matrix3x3& operator += (const Matrix3x3& add)
{
for (int i = 0; i < 3; ++i)
for (int j = 0; j < 3; ++j)
this->m[i][j] = this->m[i][j] + add.m[i][j];
return *this;
}
inline Matrix3x3& operator -= (const Matrix3x3& sub)
{
for (int i = 0; i < 3; ++i)
for (int j = 0; j < 3; ++j)
this->m[i][j] = this->m[i][j] - sub.m[i][j];
return *this;
}
inline Matrix3x3& operator *= (const Matrix3x3& mul)
{
Matrix3x3 tmp; // 値を一時保管
for (int i = 0; i < 3; ++i)
for (int j = 0; j < 3; ++j)
tmp.m[i][j] = this->m[i][j];
for (int i = 0; i < 3; ++i) {
for (int j = 0; j < 3; ++j) {
this->m[i][j] = 0;
for (int k = 0; k < 3; ++k)
this->m[i][j] += tmp.m[i][k] * mul.m[k][j];
}
}
return *this;
}
inline Matrix3x3& operator *= (float multiply_num)
{
for (int i = 0; i < 3; ++i)
for (int j = 0; j < 3; ++j)
this->m[i][j] = this->m[i][j] * multiply_num;
return *this;
}
inline Matrix3x3& operator /= (float divide_num)
{
for (int i = 0; i < 3; ++i)
for (int j = 0; j < 3; ++j)
this->m[i][j] = this->m[i][j] / divide_num;
return *this;
}
// 一致演算子 行列の中身が全部一致するか 一つでも違えばfalse
inline bool operator == (const Matrix3x3& other)
{
for (int i = 0; i < 3; ++i)
for (int j = 0; j < 3; ++j)
if (this->m[i][j] != other.m[i][j]) return false;
return true;
}
// 不一致演算子
inline bool operator != (const Matrix3x3& other)
{
return !(*this == other);
}
};
// 行列の加算
inline Matrix3x3 operator + (const Matrix3x3& left, const Matrix3x3& right)
{
Matrix3x3 result;
for (int i = 0; i < 3; ++i)
for (int j = 0; j < 3; ++j)
result.m[i][j] = left.m[i][j] + right.m[i][j];
return result;
};
// 行列の減算
inline Matrix3x3 operator - (const Matrix3x3& left, const Matrix3x3& right)
{
Matrix3x3 result;
for (int i = 0; i < 3; ++i)
for (int j = 0; j < 3; ++j)
result.m[i][j] = left.m[i][j] - right.m[i][j];
return result;
};
// 行列のスカラー倍 (スカラー×行列)
inline Matrix3x3 operator * (float left, const Matrix3x3& right)
{
Matrix3x3 result;
for (int i = 0; i < 3; ++i)
for (int j = 0; j < 3; ++j)
result.m[i][j] = left * right.m[i][j];
return result;
};
// 行列のスカラー倍 (行列×スカラー)
inline Matrix3x3 operator * (const Matrix3x3& left, float right)
{
Matrix3x3 result;
for (int i = 0; i < 3; ++i)
for (int j = 0; j < 3; ++j)
result.m[i][j] = left.m[i][j] * right;
return result;
};
// 行列の積
inline Matrix3x3 operator * (const Matrix3x3& left, const Matrix3x3& right)
{
Matrix3x3 result;
for (int i = 0; i < 3; ++i) {
for (int j = 0; j < 3; ++j) {
result.m[i][j] = 0;
for (int k = 0; k < 3; ++k)
result.m[i][j] += left.m[i][k] * right.m[k][j];
}
}
return result;
};
//[2D]ベクトルと行列の積
inline Vector2 operator * (const Vector2& left, const Matrix3x3& right)
{
float x = left.x * right.m[0][0] + left.y * right.m[1][0] + right.m[2][0];
float y = left.x * right.m[0][1] + left.y * right.m[1][1] + right.m[2][1];
return Vector2{ x, y };
};
inline const Matrix3x3 operator / (const Matrix3x3& left, const float right)
{
return left * (1.0f / right);
}
// 転置行列を返す
inline Matrix3x3 transpose(const Matrix3x3& mat)
{
Matrix3x3 result;
for (int i = 0; i < 3; ++i)
for (int j = 0; j < 3; ++j)
result.m[i][j] = mat.m[j][i]; // 行i と 列j を 行j と 列i に交換
return result;
};
// 行列の出力
inline std::ostream& operator << (std::ostream& left, const Matrix3x3& right)
{
for (int i = 0; i < 3; ++i) {
for (int j = 0; j < 3; ++j) {
left << right.m[i][j];
if (j < 3 - 1) {
left << " ";
}
}
left << std::endl;
}
return left;
};
#endif
main.cppを変更して、3点p0{1,1} 点p1{3,4} 点p2{5,2} を 手軽にrotate関数でゲットした回転行列で原点(0,0)を中心に反時計回りに60度(θ=60°)回転してみましょう。
#include "DxLib.h"
#include "Screen.h"
#include "Vector2.h"
#include "Matrix3x3.h"
#include "MathGraph2D.h"
#include "MyMath.h"
int WINAPI WinMain(HINSTANCE hInstance, HINSTANCE hPrevInstance, LPSTR lpCmdLine, int nCmdShow)
{
// 画面モードの設定
SetWindowSize(Screen::Width, Screen::Height);// ウィンドウサイズ960×540(こことSetGraphModeのサイズが異なると画像がゆがむ)
SetGraphMode(Screen::Width, Screen::Height, 32); // 画面サイズ960×540のカラービット数32ビットで起動
SetMainWindowText("数学のベクトルの練習");//この行でエラーになったら【設定】マルチバイト文字セットが間違ってるかも
ChangeWindowMode(TRUE);//フルスクリーン表示かウィンドウ表示か
SetAlwaysRunFlag(TRUE); // ウィンドウが非アクティブでも動作させる
// DXライブラリの初期化
if (DxLib_Init() < 0)
{
// エラーが発生したら直ちに終了
return -1;
}
SetMouseDispFlag(TRUE);// ここをFALSEにするとマウスカーソル非表示
//表示しているスクリーンの後ろで隠れて次に描く画像を先に描くモード
// これとペアでScreenFlip();でつぎのページと入れ替えでちらつきを防ぐ
SetDrawScreen(DX_SCREEN_BACK);
SetUseTransColor(FALSE); // 画像の指定色を透過する機能を無効化
ScreenFlip();
// 数学っぽくわかりやすくマス目を描いて、原点を画面の中心にして、10倍のスケールでみやすく描く
MathGraph2D mathGraph{ {Screen::Width / 2 ,Screen::Height / 2 },10.0f,{1.0f,1.0f} };
// アニメーション(パラパラ漫画)するにはWhile文
while (ProcessMessage() == 0)
{// ProcessMessage() == 0になるのは×ボタン押したときなど
ClearDrawScreen(); // 画面をまっさらにリセット
mathGraph.DrawGrid(GetColor(100, 100, 100)); // 100,100,100のグレーのグリッドでマス目を描く
Vector2 p0{ 1,1 }; // 点p0
Vector2 p1{ 3,4 }; // 点p1
Vector2 p2{ 5,2 }; // 点p2
constexpr float pi = 3.14159265359f;
float rad = 60 * (pi / 180.0f);
Matrix3x3 rotate{ std::cosf(rad),std::sinf(rad), 0,
-std::sinf(rad),std::cosf(rad), 0,
0, 0, 1 }; // 回転行列
Matrix3x3 rotate = Matrix3x3::rotate(60); // 回転行列
// 点q0,q1,q2
Vector2 q0 = p0 * rotate; // 点p0×rotate (回転行列を右から掛け算)すると原点を中心に回転する
Vector2 q1 = p1 * rotate; // 点p1×rotate (回転行列を右から掛け算)すると原点を中心に回転する
Vector2 q2 = p2 * rotate; // 点p2×rotate (回転行列を右から掛け算)すると原点を中心に回転する
// 三角形p0,p1,p2を描く
mathGraph.DrawLine(p0.x, p0.y, p1.x, p1.y, GetColor(255, 255, 255));
mathGraph.DrawLine(p1.x, p1.y, p2.x, p2.y, GetColor(255, 255, 255));
mathGraph.DrawLine(p2.x, p2.y, p0.x, p0.y, GetColor(255, 255, 255));
// 回転後の三角形q0,q1,q2を描く
mathGraph.DrawLine(q0.x, q0.y, q1.x, q1.y, GetColor(255, 255, 255));
mathGraph.DrawLine(q1.x, q1.y, q2.x, q2.y, GetColor(255, 255, 255));
mathGraph.DrawLine(q2.x, q2.y, q0.x, q0.y, GetColor(255, 255, 255));
// 回転前の3点を描く
// 点p0を描く
mathGraph.DrawPoint(p0.x, p0.y, 3, GetColor(255, 0, 0), TRUE);
std::string p0_String = "p0=(" + std::to_string((int)p0.x) + "," + std::to_string((int)p0.y) + ")";
mathGraph.DrawString(p0.x, p0.y, p0_String.c_str(), GetColor(255, 0, 0));
// 点p1を描く
mathGraph.DrawPoint(p1.x, p1.y, 3, GetColor(0, 255, 0), TRUE);
std::string p1_String = "p1=(" + std::to_string((int)p1.x) + "," + std::to_string((int)p1.y) + ")";
mathGraph.DrawString(p1.x, p1.y, p1_String.c_str(), GetColor(0, 255, 0));
// 点p2を描く
mathGraph.DrawPoint(p2.x, p2.y, 3, GetColor(0, 0, 255), TRUE);
std::string p2_String = "p2=(" + std::to_string((int)p2.x) + "," + std::to_string((int)p2.y) + ")";
mathGraph.DrawString(p2.x, p2.y, p2_String.c_str(), GetColor(0, 0, 255));
// 回転したあとの3点を描く
// 点q0を描く
mathGraph.DrawPoint(q0.x, q0.y, 3, GetColor(255, 0, 0), TRUE);
std::string q0_String = "q0=(" + std::to_string(q0.x) + "," + std::to_string(q0.y) + ")";
mathGraph.DrawString(q0.x, q0.y, q0_String.c_str(), GetColor(255, 0, 0));
// 点q1を描く
mathGraph.DrawPoint(q1.x, q1.y, 3, GetColor(0, 255, 0), TRUE);
std::string q1_String = "q1=(" + std::to_string(q1.x) + "," + std::to_string(q1.y) + ")";
mathGraph.DrawString(q1.x, q1.y, q1_String.c_str(), GetColor(0, 255, 0));
// 点q2を描く
mathGraph.DrawPoint(q2.x, q2.y, 3, GetColor(0, 0, 255), TRUE);
std::string q2_String = "q2=(" + std::to_string(q2.x) + "," + std::to_string(q2.y) + ")";
mathGraph.DrawString(q2.x, q2.y, q2_String.c_str(), GetColor(0, 0, 255));
ScreenFlip(); // 裏で描いておいたスクリーンを表画面にフリップ入れ替え
}
// キー入力待ちをする
WaitKey();
// DXライブラリの後始末
DxLib_End();
// ソフトの終了
return 0;
}
main.cppを変更して、3点p0{1,1} 点p1{3,4} 点p2{5,2} を transform行列でまずはscale行列だけを設定して、原点(0,0)を中心にスケーリングしてみましょう。
#include "DxLib.h"
#include "Screen.h"
#include "Vector2.h"
#include "Matrix3x3.h"
#include "MathGraph2D.h"
#include "MyMath.h"
int WINAPI WinMain(HINSTANCE hInstance, HINSTANCE hPrevInstance, LPSTR lpCmdLine, int nCmdShow)
{
// 画面モードの設定
SetWindowSize(Screen::Width, Screen::Height);// ウィンドウサイズ960×540(こことSetGraphModeのサイズが異なると画像がゆがむ)
SetGraphMode(Screen::Width, Screen::Height, 32); // 画面サイズ960×540のカラービット数32ビットで起動
SetMainWindowText("数学のベクトルの練習");//この行でエラーになったら【設定】マルチバイト文字セットが間違ってるかも
ChangeWindowMode(TRUE);//フルスクリーン表示かウィンドウ表示か
SetAlwaysRunFlag(TRUE); // ウィンドウが非アクティブでも動作させる
// DXライブラリの初期化
if (DxLib_Init() < 0)
{
// エラーが発生したら直ちに終了
return -1;
}
SetMouseDispFlag(TRUE);// ここをFALSEにするとマウスカーソル非表示
//表示しているスクリーンの後ろで隠れて次に描く画像を先に描くモード
// これとペアでScreenFlip();でつぎのページと入れ替えでちらつきを防ぐ
SetDrawScreen(DX_SCREEN_BACK);
SetUseTransColor(FALSE); // 画像の指定色を透過する機能を無効化
ScreenFlip();
// 数学っぽくわかりやすくマス目を描いて、原点を画面の中心にして、10倍のスケールでみやすく描く
MathGraph2D mathGraph{ {Screen::Width / 2 ,Screen::Height / 2 },10.0f,{1.0f,1.0f} };
// アニメーション(パラパラ漫画)するにはWhile文
while (ProcessMessage() == 0)
{// ProcessMessage() == 0になるのは×ボタン押したときなど
ClearDrawScreen(); // 画面をまっさらにリセット
mathGraph.DrawGrid(GetColor(100, 100, 100)); // 100,100,100のグレーのグリッドでマス目を描く
Vector2 p0{ 0, 1 }; // 点p0
Vector2 p1{-2,-1 }; // 点p1
Vector2 p2{ 2,-1 }; // 点p2
Matrix3x3 translate = Matrix3x3::translate(Vector2{ 2,3 }); // 平行移動行列
Matrix3x3 scale = Matrix3x3::scale(Vector2{ 4,6 }); // スケール行列
Matrix3x3 rotate = Matrix3x3::rotate(45); // 回転行列
Matrix3x3 transform = scale; // 組み合わせ行列(スケール)
// 点q0,q1,q2
Vector2 q0 = p0 * transform; // 点p0×transform (組み合わせ行列を右から掛け算)するとスケールする
Vector2 q1 = p1 * transform; // 点p1×transform (組み合わせ行列を右から掛け算)するとスケールする
Vector2 q2 = p2 * transform; // 点p2×transform (組み合わせ行列を右から掛け算)するとスケールする
// 三角形p0,p1,p2を描く
mathGraph.DrawLine(p0.x, p0.y, p1.x, p1.y, GetColor(255, 255, 255));
mathGraph.DrawLine(p1.x, p1.y, p2.x, p2.y, GetColor(255, 255, 255));
mathGraph.DrawLine(p2.x, p2.y, p0.x, p0.y, GetColor(255, 255, 255));
// 組み合わせ変換(transform)後の三角形q0,q1,q2を描く
mathGraph.DrawLine(q0.x, q0.y, q1.x, q1.y, GetColor(255, 255, 255));
mathGraph.DrawLine(q1.x, q1.y, q2.x, q2.y, GetColor(255, 255, 255));
mathGraph.DrawLine(q2.x, q2.y, q0.x, q0.y, GetColor(255, 255, 255));
// 組み合わせ変換(transform)前の3点を描く
// 点p0を描く
mathGraph.DrawPoint(p0.x, p0.y, 3, GetColor(255, 0, 0), TRUE);
std::string p0_String = "p0=(" + std::to_string((int)p0.x) + "," + std::to_string((int)p0.y) + ")";
mathGraph.DrawString(p0.x, p0.y, p0_String.c_str(), GetColor(255, 0, 0));
// 点p1を描く
mathGraph.DrawPoint(p1.x, p1.y, 3, GetColor(0, 255, 0), TRUE);
std::string p1_String = "p1=(" + std::to_string((int)p1.x) + "," + std::to_string((int)p1.y) + ")";
mathGraph.DrawString(p1.x, p1.y, p1_String.c_str(), GetColor(0, 255, 0));
// 点p2を描く
mathGraph.DrawPoint(p2.x, p2.y, 3, GetColor(0, 0, 255), TRUE);
std::string p2_String = "p2=(" + std::to_string((int)p2.x) + "," + std::to_string((int)p2.y) + ")";
mathGraph.DrawString(p2.x, p2.y, p2_String.c_str(), GetColor(0, 0, 255));
// 組み合わせ変換(transform)したあとの3点を描く
// 点q0を描く
mathGraph.DrawPoint(q0.x, q0.y, 3, GetColor(255, 0, 0), TRUE);
std::string q0_String = "q0=(" + std::to_string(q0.x) + "," + std::to_string(q0.y) + ")";
mathGraph.DrawString(q0.x, q0.y, q0_String.c_str(), GetColor(255, 0, 0));
// 点q1を描く
mathGraph.DrawPoint(q1.x, q1.y, 3, GetColor(0, 255, 0), TRUE);
std::string q1_String = "q1=(" + std::to_string(q1.x) + "," + std::to_string(q1.y) + ")";
mathGraph.DrawString(q1.x, q1.y, q1_String.c_str(), GetColor(0, 255, 0));
// 点q2を描く
mathGraph.DrawPoint(q2.x, q2.y, 3, GetColor(0, 0, 255), TRUE);
std::string q2_String = "q2=(" + std::to_string(q2.x) + "," + std::to_string(q2.y) + ")";
mathGraph.DrawString(q2.x, q2.y, q2_String.c_str(), GetColor(0, 0, 255));
ScreenFlip(); // 裏で描いておいたスクリーンを表画面にフリップ入れ替え
}
// キー入力待ちをする
WaitKey();
// DXライブラリの後始末
DxLib_End();
// ソフトの終了
return 0;
}
main.cppを変更して、3点p0{1,1} 点p1{3,4} 点p2{5,2} を transform行列に右側からrotate行列を掛け算して、原点(0,0)を中心にスケール→回転、の順に拡大回転してみましょう。
#include "DxLib.h"
#include "Screen.h"
#include "Vector2.h"
#include "Matrix3x3.h"
#include "MathGraph2D.h"
#include "MyMath.h"
int WINAPI WinMain(HINSTANCE hInstance, HINSTANCE hPrevInstance, LPSTR lpCmdLine, int nCmdShow)
{
// 画面モードの設定
SetWindowSize(Screen::Width, Screen::Height);// ウィンドウサイズ960×540(こことSetGraphModeのサイズが異なると画像がゆがむ)
SetGraphMode(Screen::Width, Screen::Height, 32); // 画面サイズ960×540のカラービット数32ビットで起動
SetMainWindowText("数学のベクトルの練習");//この行でエラーになったら【設定】マルチバイト文字セットが間違ってるかも
ChangeWindowMode(TRUE);//フルスクリーン表示かウィンドウ表示か
SetAlwaysRunFlag(TRUE); // ウィンドウが非アクティブでも動作させる
// DXライブラリの初期化
if (DxLib_Init() < 0)
{
// エラーが発生したら直ちに終了
return -1;
}
SetMouseDispFlag(TRUE);// ここをFALSEにするとマウスカーソル非表示
//表示しているスクリーンの後ろで隠れて次に描く画像を先に描くモード
// これとペアでScreenFlip();でつぎのページと入れ替えでちらつきを防ぐ
SetDrawScreen(DX_SCREEN_BACK);
SetUseTransColor(FALSE); // 画像の指定色を透過する機能を無効化
ScreenFlip();
// 数学っぽくわかりやすくマス目を描いて、原点を画面の中心にして、10倍のスケールでみやすく描く
MathGraph2D mathGraph{ {Screen::Width / 2 ,Screen::Height / 2 },10.0f,{1.0f,1.0f} };
// アニメーション(パラパラ漫画)するにはWhile文
while (ProcessMessage() == 0)
{// ProcessMessage() == 0になるのは×ボタン押したときなど
ClearDrawScreen(); // 画面をまっさらにリセット
mathGraph.DrawGrid(GetColor(100, 100, 100)); // 100,100,100のグレーのグリッドでマス目を描く
Vector2 p0{ 0, 1 }; // 点p0
Vector2 p1{-2,-1 }; // 点p1
Vector2 p2{ 2,-1 }; // 点p2
Matrix3x3 translate = Matrix3x3::translate(Vector2{ 2,3 }); // 平行移動行列
Matrix3x3 scale = Matrix3x3::scale(Vector2{ 4,6 }); // スケール行列
Matrix3x3 rotate = Matrix3x3::rotate(45); // 回転行列
Matrix3x3 transform = scale * rotate; // 組み合わせ行列(スケール→回転)
// 点q0,q1,q2
Vector2 q0 = p0 * transform; // 点p0×transform (組み合わせ行列を右から掛け算)するとスケール→回転する
Vector2 q1 = p1 * transform; // 点p1×transform (組み合わせ行列を右から掛け算)するとスケール→回転する
Vector2 q2 = p2 * transform; // 点p2×transform (組み合わせ行列を右から掛け算)するとスケール→回転する
// 三角形p0,p1,p2を描く
mathGraph.DrawLine(p0.x, p0.y, p1.x, p1.y, GetColor(255, 255, 255));
mathGraph.DrawLine(p1.x, p1.y, p2.x, p2.y, GetColor(255, 255, 255));
mathGraph.DrawLine(p2.x, p2.y, p0.x, p0.y, GetColor(255, 255, 255));
// 組み合わせ変換(transform)後の三角形q0,q1,q2を描く
mathGraph.DrawLine(q0.x, q0.y, q1.x, q1.y, GetColor(255, 255, 255));
mathGraph.DrawLine(q1.x, q1.y, q2.x, q2.y, GetColor(255, 255, 255));
mathGraph.DrawLine(q2.x, q2.y, q0.x, q0.y, GetColor(255, 255, 255));
// 組み合わせ変換(transform)前の3点を描く
// 点p0を描く
mathGraph.DrawPoint(p0.x, p0.y, 3, GetColor(255, 0, 0), TRUE);
std::string p0_String = "p0=(" + std::to_string((int)p0.x) + "," + std::to_string((int)p0.y) + ")";
mathGraph.DrawString(p0.x, p0.y, p0_String.c_str(), GetColor(255, 0, 0));
// 点p1を描く
mathGraph.DrawPoint(p1.x, p1.y, 3, GetColor(0, 255, 0), TRUE);
std::string p1_String = "p1=(" + std::to_string((int)p1.x) + "," + std::to_string((int)p1.y) + ")";
mathGraph.DrawString(p1.x, p1.y, p1_String.c_str(), GetColor(0, 255, 0));
// 点p2を描く
mathGraph.DrawPoint(p2.x, p2.y, 3, GetColor(0, 0, 255), TRUE);
std::string p2_String = "p2=(" + std::to_string((int)p2.x) + "," + std::to_string((int)p2.y) + ")";
mathGraph.DrawString(p2.x, p2.y, p2_String.c_str(), GetColor(0, 0, 255));
// 組み合わせ変換(transform)したあとの3点を描く
// 点q0を描く
mathGraph.DrawPoint(q0.x, q0.y, 3, GetColor(255, 0, 0), TRUE);
std::string q0_String = "q0=(" + std::to_string(q0.x) + "," + std::to_string(q0.y) + ")";
mathGraph.DrawString(q0.x, q0.y, q0_String.c_str(), GetColor(255, 0, 0));
// 点q1を描く
mathGraph.DrawPoint(q1.x, q1.y, 3, GetColor(0, 255, 0), TRUE);
std::string q1_String = "q1=(" + std::to_string(q1.x) + "," + std::to_string(q1.y) + ")";
mathGraph.DrawString(q1.x, q1.y, q1_String.c_str(), GetColor(0, 255, 0));
// 点q2を描く
mathGraph.DrawPoint(q2.x, q2.y, 3, GetColor(0, 0, 255), TRUE);
std::string q2_String = "q2=(" + std::to_string(q2.x) + "," + std::to_string(q2.y) + ")";
mathGraph.DrawString(q2.x, q2.y, q2_String.c_str(), GetColor(0, 0, 255));
ScreenFlip(); // 裏で描いておいたスクリーンを表画面にフリップ入れ替え
}
// キー入力待ちをする
WaitKey();
// DXライブラリの後始末
DxLib_End();
// ソフトの終了
return 0;
}
main.cppを変更して、3点p0{1,1} 点p1{3,4} 点p2{5,2} を transform行列に右側からrotate行列を掛け算して、原点(0,0)を中心にスケール→回転、の順に拡大回転してみましょう。
#include "DxLib.h"
#include "Screen.h"
#include "Vector2.h"
#include "Matrix3x3.h"
#include "MathGraph2D.h"
#include "MyMath.h"
int WINAPI WinMain(HINSTANCE hInstance, HINSTANCE hPrevInstance, LPSTR lpCmdLine, int nCmdShow)
{
// 画面モードの設定
SetWindowSize(Screen::Width, Screen::Height);// ウィンドウサイズ960×540(こことSetGraphModeのサイズが異なると画像がゆがむ)
SetGraphMode(Screen::Width, Screen::Height, 32); // 画面サイズ960×540のカラービット数32ビットで起動
SetMainWindowText("数学のベクトルの練習");//この行でエラーになったら【設定】マルチバイト文字セットが間違ってるかも
ChangeWindowMode(TRUE);//フルスクリーン表示かウィンドウ表示か
SetAlwaysRunFlag(TRUE); // ウィンドウが非アクティブでも動作させる
// DXライブラリの初期化
if (DxLib_Init() < 0)
{
// エラーが発生したら直ちに終了
return -1;
}
SetMouseDispFlag(TRUE);// ここをFALSEにするとマウスカーソル非表示
//表示しているスクリーンの後ろで隠れて次に描く画像を先に描くモード
// これとペアでScreenFlip();でつぎのページと入れ替えでちらつきを防ぐ
SetDrawScreen(DX_SCREEN_BACK);
SetUseTransColor(FALSE); // 画像の指定色を透過する機能を無効化
ScreenFlip();
// 数学っぽくわかりやすくマス目を描いて、原点を画面の中心にして、10倍のスケールでみやすく描く
MathGraph2D mathGraph{ {Screen::Width / 2 ,Screen::Height / 2 },10.0f,{1.0f,1.0f} };
// アニメーション(パラパラ漫画)するにはWhile文
while (ProcessMessage() == 0)
{// ProcessMessage() == 0になるのは×ボタン押したときなど
ClearDrawScreen(); // 画面をまっさらにリセット
mathGraph.DrawGrid(GetColor(100, 100, 100)); // 100,100,100のグレーのグリッドでマス目を描く
Vector2 p0{ 0, 1 }; // 点p0
Vector2 p1{-2,-1 }; // 点p1
Vector2 p2{ 2,-1 }; // 点p2
Matrix3x3 translate = Matrix3x3::translate(Vector2{ 2,3 }); // 平行移動行列
Matrix3x3 scale = Matrix3x3::scale(Vector2{ 4,6 }); // スケール行列
Matrix3x3 rotate = Matrix3x3::rotate(45); // 回転行列
Matrix3x3 transform = rotate * scale; // 組み合わせ行列(回転→スケール)
// 点q0,q1,q2
Vector2 q0 = p0 * transform; // 点p0×transform (組み合わせ行列を右から掛け算)すると回転→スケールする
Vector2 q1 = p1 * transform; // 点p1×transform (組み合わせ行列を右から掛け算)すると回転→スケールする
Vector2 q2 = p2 * transform; // 点p2×transform (組み合わせ行列を右から掛け算)すると回転→スケールする
// 三角形p0,p1,p2を描く
mathGraph.DrawLine(p0.x, p0.y, p1.x, p1.y, GetColor(255, 255, 255));
mathGraph.DrawLine(p1.x, p1.y, p2.x, p2.y, GetColor(255, 255, 255));
mathGraph.DrawLine(p2.x, p2.y, p0.x, p0.y, GetColor(255, 255, 255));
// 組み合わせ変換(transform)後の三角形q0,q1,q2を描く
mathGraph.DrawLine(q0.x, q0.y, q1.x, q1.y, GetColor(255, 255, 255));
mathGraph.DrawLine(q1.x, q1.y, q2.x, q2.y, GetColor(255, 255, 255));
mathGraph.DrawLine(q2.x, q2.y, q0.x, q0.y, GetColor(255, 255, 255));
// 組み合わせ変換(transform)前の3点を描く
// 点p0を描く
mathGraph.DrawPoint(p0.x, p0.y, 3, GetColor(255, 0, 0), TRUE);
std::string p0_String = "p0=(" + std::to_string((int)p0.x) + "," + std::to_string((int)p0.y) + ")";
mathGraph.DrawString(p0.x, p0.y, p0_String.c_str(), GetColor(255, 0, 0));
// 点p1を描く
mathGraph.DrawPoint(p1.x, p1.y, 3, GetColor(0, 255, 0), TRUE);
std::string p1_String = "p1=(" + std::to_string((int)p1.x) + "," + std::to_string((int)p1.y) + ")";
mathGraph.DrawString(p1.x, p1.y, p1_String.c_str(), GetColor(0, 255, 0));
// 点p2を描く
mathGraph.DrawPoint(p2.x, p2.y, 3, GetColor(0, 0, 255), TRUE);
std::string p2_String = "p2=(" + std::to_string((int)p2.x) + "," + std::to_string((int)p2.y) + ")";
mathGraph.DrawString(p2.x, p2.y, p2_String.c_str(), GetColor(0, 0, 255));
// 組み合わせ変換(transform)したあとの3点を描く
// 点q0を描く
mathGraph.DrawPoint(q0.x, q0.y, 3, GetColor(255, 0, 0), TRUE);
std::string q0_String = "q0=(" + std::to_string(q0.x) + "," + std::to_string(q0.y) + ")";
mathGraph.DrawString(q0.x, q0.y, q0_String.c_str(), GetColor(255, 0, 0));
// 点q1を描く
mathGraph.DrawPoint(q1.x, q1.y, 3, GetColor(0, 255, 0), TRUE);
std::string q1_String = "q1=(" + std::to_string(q1.x) + "," + std::to_string(q1.y) + ")";
mathGraph.DrawString(q1.x, q1.y, q1_String.c_str(), GetColor(0, 255, 0));
// 点q2を描く
mathGraph.DrawPoint(q2.x, q2.y, 3, GetColor(0, 0, 255), TRUE);
std::string q2_String = "q2=(" + std::to_string(q2.x) + "," + std::to_string(q2.y) + ")";
mathGraph.DrawString(q2.x, q2.y, q2_String.c_str(), GetColor(0, 0, 255));
ScreenFlip(); // 裏で描いておいたスクリーンを表画面にフリップ入れ替え
}
// キー入力待ちをする
WaitKey();
// DXライブラリの後始末
DxLib_End();
// ソフトの終了
return 0;
}
main.cppを変更して、transform行列に右側から順にscale、rotate、translate行列を掛け算して、原点(0,0)を中心にスケール→回転→平行移動、の順に行列変換してみましょう。
#include "DxLib.h"
#include "Screen.h"
#include "Vector2.h"
#include "Matrix3x3.h"
#include "MathGraph2D.h"
#include "MyMath.h"
int WINAPI WinMain(HINSTANCE hInstance, HINSTANCE hPrevInstance, LPSTR lpCmdLine, int nCmdShow)
{
// 画面モードの設定
SetWindowSize(Screen::Width, Screen::Height);// ウィンドウサイズ960×540(こことSetGraphModeのサイズが異なると画像がゆがむ)
SetGraphMode(Screen::Width, Screen::Height, 32); // 画面サイズ960×540のカラービット数32ビットで起動
SetMainWindowText("数学のベクトルの練習");//この行でエラーになったら【設定】マルチバイト文字セットが間違ってるかも
ChangeWindowMode(TRUE);//フルスクリーン表示かウィンドウ表示か
SetAlwaysRunFlag(TRUE); // ウィンドウが非アクティブでも動作させる
// DXライブラリの初期化
if (DxLib_Init() < 0)
{
// エラーが発生したら直ちに終了
return -1;
}
SetMouseDispFlag(TRUE);// ここをFALSEにするとマウスカーソル非表示
//表示しているスクリーンの後ろで隠れて次に描く画像を先に描くモード
// これとペアでScreenFlip();でつぎのページと入れ替えでちらつきを防ぐ
SetDrawScreen(DX_SCREEN_BACK);
SetUseTransColor(FALSE); // 画像の指定色を透過する機能を無効化
ScreenFlip();
// 数学っぽくわかりやすくマス目を描いて、原点を画面の中心にして、10倍のスケールでみやすく描く
MathGraph2D mathGraph{ {Screen::Width / 2 ,Screen::Height / 2 },10.0f,{1.0f,1.0f} };
// アニメーション(パラパラ漫画)するにはWhile文
while (ProcessMessage() == 0)
{// ProcessMessage() == 0になるのは×ボタン押したときなど
ClearDrawScreen(); // 画面をまっさらにリセット
mathGraph.DrawGrid(GetColor(100, 100, 100)); // 100,100,100のグレーのグリッドでマス目を描く
Vector2 p0{ 0, 1 }; // 点p0
Vector2 p1{-2,-1 }; // 点p1
Vector2 p2{ 2,-1 }; // 点p2
Matrix3x3 translate = Matrix3x3::translate(Vector2{ 2,3 }); // 平行移動行列
Matrix3x3 scale = Matrix3x3::scale(Vector2{ 4,6 }); // スケール行列
Matrix3x3 rotate = Matrix3x3::rotate(45); // 回転行列
Matrix3x3 transform = scale * rotate * translate; // 組み合わせ行列(スケール→回転→平行移動)
// 点q0,q1,q2
Vector2 q0 = p0 * transform; // 点p0×transform (組み合わせ行列を右から掛け算)するとスケール→回転→平行移動する
Vector2 q1 = p1 * transform; // 点p1×transform (組み合わせ行列を右から掛け算)するとスケール→回転→平行移動する
Vector2 q2 = p2 * transform; // 点p2×transform (組み合わせ行列を右から掛け算)するとスケール→回転→平行移動する
// 三角形p0,p1,p2を描く
mathGraph.DrawLine(p0.x, p0.y, p1.x, p1.y, GetColor(255, 255, 255));
mathGraph.DrawLine(p1.x, p1.y, p2.x, p2.y, GetColor(255, 255, 255));
mathGraph.DrawLine(p2.x, p2.y, p0.x, p0.y, GetColor(255, 255, 255));
// 組み合わせ変換(transform)後の三角形q0,q1,q2を描く
mathGraph.DrawLine(q0.x, q0.y, q1.x, q1.y, GetColor(255, 255, 255));
mathGraph.DrawLine(q1.x, q1.y, q2.x, q2.y, GetColor(255, 255, 255));
mathGraph.DrawLine(q2.x, q2.y, q0.x, q0.y, GetColor(255, 255, 255));
// 組み合わせ変換(transform)前の3点を描く
// 点p0を描く
mathGraph.DrawPoint(p0.x, p0.y, 3, GetColor(255, 0, 0), TRUE);
std::string p0_String = "p0=(" + std::to_string((int)p0.x) + "," + std::to_string((int)p0.y) + ")";
mathGraph.DrawString(p0.x, p0.y, p0_String.c_str(), GetColor(255, 0, 0));
// 点p1を描く
mathGraph.DrawPoint(p1.x, p1.y, 3, GetColor(0, 255, 0), TRUE);
std::string p1_String = "p1=(" + std::to_string((int)p1.x) + "," + std::to_string((int)p1.y) + ")";
mathGraph.DrawString(p1.x, p1.y, p1_String.c_str(), GetColor(0, 255, 0));
// 点p2を描く
mathGraph.DrawPoint(p2.x, p2.y, 3, GetColor(0, 0, 255), TRUE);
std::string p2_String = "p2=(" + std::to_string((int)p2.x) + "," + std::to_string((int)p2.y) + ")";
mathGraph.DrawString(p2.x, p2.y, p2_String.c_str(), GetColor(0, 0, 255));
// 組み合わせ変換(transform)したあとの3点を描く
// 点q0を描く
mathGraph.DrawPoint(q0.x, q0.y, 3, GetColor(255, 0, 0), TRUE);
std::string q0_String = "q0=(" + std::to_string(q0.x) + "," + std::to_string(q0.y) + ")";
mathGraph.DrawString(q0.x, q0.y, q0_String.c_str(), GetColor(255, 0, 0));
// 点q1を描く
mathGraph.DrawPoint(q1.x, q1.y, 3, GetColor(0, 255, 0), TRUE);
std::string q1_String = "q1=(" + std::to_string(q1.x) + "," + std::to_string(q1.y) + ")";
mathGraph.DrawString(q1.x, q1.y, q1_String.c_str(), GetColor(0, 255, 0));
// 点q2を描く
mathGraph.DrawPoint(q2.x, q2.y, 3, GetColor(0, 0, 255), TRUE);
std::string q2_String = "q2=(" + std::to_string(q2.x) + "," + std::to_string(q2.y) + ")";
mathGraph.DrawString(q2.x, q2.y, q2_String.c_str(), GetColor(0, 0, 255));
ScreenFlip(); // 裏で描いておいたスクリーンを表画面にフリップ入れ替え
}
// キー入力待ちをする
WaitKey();
// DXライブラリの後始末
DxLib_End();
// ソフトの終了
return 0;
}